Maya – Rendering with Arnold 5

Duration:03:41:00
Actual Duration:3h 41m
Release date:2017, July 31
Skill level:Intermediate
Language:English
Exercise files:Yes
Course URL:https://www.lynda.com/Maya-tutorials/Maya-Rendering-Arnold-5/625946-2.html
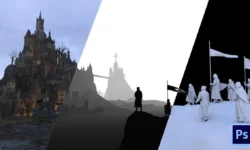
Arnold is the new high-quality rendering engine in Maya. Realistic rendering in Maya is easier than ever with this brute force Monte Carlo ray tracer. Arnold’s physically based rendering accurately simulates light in the real world, but allows breaking physical laws to achieve artistic styles. This course is an overview of essential features for lighting, materials, and rendering in Maya using Arnold core version 5.
Topics include:
Arnold rendering concepts
Lighting with Maya and Arnold lights
Controlling exposure
Filtering light with Gobo
Light attenuation with Decay
Image-based lighting with Skydome
Exterior daylight with Physical Sky
Arnold Standard Surface material attributes
Mapping material attributes
Rendering refractions
Mesh subdivision and displacement at render time
Shading effects such as ambient occlusion and vertex color
Camera effects such as fisheye and depth of field
Animation image sequence rendering
00. Introduction
01 – Welcome
02 – Using the exercise files
03 – Updating the Arnold plugin
01. Concepts
04 – Course prerequisites
05 – Introducing Arnold
06 – Arnold rendering concepts
07 – Controlling processing in Render Settings
08 – Interactivity in the Arnold RenderView
09 – Balancing sampling and Ray Depth
02. Studio Lighting
10 – Creating an Arnold area light
11 – Setting Ai Area Light attributes
12 – Controlling camera exposure
13 – Rigging a spot light
14 – Focusing a spot light
15 – Masking a spot light with gobo filter
16 – Adding suffuse illumination
17 – Fine tuning lights and rendering
18 – Attenuation with Light Decay filter
03. Natural and Environmental Lighting
19 – Image-based lighting with Ai Skydome light
20 – Directing Skydome light visibility
21 – Exterior daylight with Physical Sky
22 – Interior daylight with a Skydome
23 – Increasing Skydome render sampling
04. Materials and Mapping
24 – Setting Ai Standard Surface material attributes
25 – Mapping opacity with an alpha channel
26 – Controlling specular roughness
27 – Shading with ambient occlusion
28 – Building an Arnold shading network
29 – Rendering refractions with transmission
30 – Rendering vertex color with Ai UserData Color
31 – Wireframe analysis with Ai Utility shader
32 – Smooth mesh subdivisions at render time
33 – Deforming a mesh with displacement
34 – Displacement, subdivisions, and bump mapping
05. Rendering
35 – Atmospheric perspective with Ai Fog
36 – Lens distortion with fisheye camera
37 – Rendering a panorama
38 – Rendering light and object passes with AOVs
39 – Compositing AOVs in Photoshop
40 – Rendering bokeh with depth of field
41 – Rendering an image sequence
06. Conclusion
42 – Next steps
Ex_Files_Maya_Rendering_Arnold_5.7z