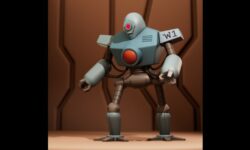
Creating Stylized Robot in Maya

Release date:2021, May 28
Skill level:Beginner
Language:English
Exercise files:Yes
Course URL:https://www.udemy.com/course/creating-stylized-robot-in-maya/
In this course you will learn from scratch on how to model and texture stylized hard-surface robot in Maya. We start with very basis stuff like Maya interface, project folder setup, setting up image plane in Maya and Photoshop. Through the course, we will discuss the amazing features of Maya and Photoshop as well as tips & tricks on how to work efficiently so you can achieve the result much faster and accurate.
Learn how to create 3D Models and Assets for games using Maya. We start super simple so you’ll be ok with little or no experience. With our online tutorials, you’ll be amazed what you can achieve.
If you’re a complete beginner, we’ll teach you all the modelling fundamentals you’ll need. If you’re an artist, we’ll teach you to bring your assets to life. If you’re a coder, we’ll teach you modelling and design principles.
This course is designed to teach art students how to use Maya and become more confident with it to develop their own character designs from scratch. Each step is explained clearly so the student can follow along with ease.
What will you learn?
1)Getting started with Maya and understanding the interface
2)Modeling your own objects and scenes
3)Shading your objects
4)Creating proper UVs
5)Texturing your objects
6)Lighting your scene and creating shadows
7)Rendering your project
8)Exporting your character into Game Engine (Unity)
9)Exporting your character to SketchFab
01 Introduction to Maya interface and Basic functionality
001 01 – Basic Maya Interface
002 02 – Vertex, Edge, Faces Manipulation
003 03 – Split Polygon and Insert Edge Loop
004 04 – Extrude
005 05 – Local vs Global Extrusion
006 06 – Understanding Maya Project Folder
007 07 – How to open project folder properly
02 Planning your project
001 01 – Pre-planning your project
002 01 – Setting Image Plane and Grid Size
003 02 – Creating Base shape for Body
03 Modeling Robot using basic shape
001 03 – Creating Lower Body
002 04 – Creating Neck
003 05 – Creating Side Crease
004 06 – Creating Fat Ear Gear
005 07 – Creating Ear Bolt
006 08 – Creating Knob Torso
04 Continuing Modeling the Robot Part 1
001 09 – Creating Metal Plate Torso
002 10 – Creating LCD Torso
003 11 – Creating Head Base
004 12 – Creating Metal Rim Head
05 Continuing Modeling the Robot Part 2
001 13 – Creating Eye and Arm
002 14 – Creating Palm
003 15 – Creating Filament Bulb
004 16 – Creating Leg
06 Finishing up the Robot model
001 17 – Creating Sole
002 18 – Creating Bolt
003 19 – Cleanup and Mirroring Objects
07 Introduction to UV map
001 01 – UV Map Theory
002 02 – UV Map part 1
003 03 – UV Map part 2
08 Planning your UV map and UV map concept
001 01 – Pre-planning UV map
002 02 – Understanding UV Transfer Concept
003 03 – UV Unwrapping Head + Ear
004 04 – Fixing Seam for Head Uv map
005 05 – UV Unwrapping Eye and Ear Gear
09 Continue UV unwrapping the Robot part 1
001 06 – UV Unwrapping Metal Plate
002 07 – UV Unwrapping Torso
003 08- UV Unwrapping Lower Body
004 09 – Uv Unwrapping Hand and Leg
005 10 – Tips & Tricks, UV transfer, Quick select
006 11 – Completing the UV map
10 Start Texturing in Photoshop
001 12 – Exporting to Photoshop
002 13 – Applying Solid Color in Photoshop part 1
003 14 – Applying Solid Color in Photoshop part 2
004 15 – Applying Solid Color in Photoshop part 3
11 Continuing Texturing in Photoshop
001 16 – Applying Solid Color for Head Display
002 17- Creating Display Texture using Path Tool
003 18 – Adjusting Texture Resolution in Viewport
004 19 – Using Brush tool to paint Mouth
12 Lighting and Rendering in Arnold
001 20 – Basic Lighting Principles
002 21 – Introduction to Arnold Lighting
003 22 – 3D point Lighting and Rembrandt
004 23 – Lighting and Rendering
005 24 – Importing to Unity
006 25 – Uploading to Sketchfab