It looks like you're using an adblocker.
Adblockers make us sad. We use ads to keep our content happy and free. If you like what we are doing please consider supporting us by whitelisting our website. You can report badly-behaved ads by clicking/tapping the nearby 'Advertisement' X text.
Stylized 3D Environments with Blender 4 Geometry Nodes (Update) by 3D Tudor
Build a complete stylized well environment from scratch using Blender 4 Geometry Nodes, from greyboxing to final render.
This course walks you through building a complete stylized well environment using Blender 4 Geometry Nodes. You’ll start with a greybox model to establish scale and proportions, then move through detailed modeling, materials, lighting, and final rendering. The workflow is fully procedural, so you’ll learn how to create reusable node setups for grass, bricks, roof tiles, chains, and ivy that you can adapt for future projects.
🎯 What you’ll learn
Foundations of Blender 4 and the Geometry Nodes system
Procedural environment creation with node-based generators
Detailed modeling techniques starting from a greybox model
Advanced material and texture application using an exclusive resource pack
Dynamic lighting and rendering with Blender’s Cycles renderer and compositor
Efficient non-destructive workflows combining geometry nodes with modifiers
✅ Requirements
Skills: No previous experience in Blender or 3D modeling necessary
Hardware: Computer running Microsoft, Linux, or Mac
📝 Description
This course is built around one project: a stylized well environment. You’ll construct it piece by piece, starting with a greybox model to lock in scale and proportions. From there, you’ll work through stone walls, wooden roof structures, terrain sculpting, and decorative elements like lanterns and buckets.
The real focus here is Geometry Nodes. You’ll build several reusable node setups—a grass meadow generator, roof tile generator, brick generator, chain generator, ivy generator, and plank generator. These aren’t just one-off tools for this scene; they’re workflows you can adapt for any stylized environment project.
The course also covers the practical side of production. UV unwrapping is simplified using angle-based edge selection and the Magic UV addon. Materials come from an exclusive resource pack with ten shader setups. And when it’s time to render, you’ll use Cycles and the compositor to add ambient occlusion, glare, and color correction for that polished final look.
What makes this course stand out is the combination of geometry nodes with traditional modifiers. You’ll use the Lattice modifier for curved roof geometry, Skin modifiers for wooden supports, and Solidify for structural elements. This hybrid approach keeps everything non-destructive, so you can tweak parameters without breaking your mesh.
🧑🎓 Who this course is for
Beginners to 3D modeling who want a structured, project-based introduction to Blender 4
Artists and designers looking to add stylized environment work to their portfolio
Game developers and animators who need procedural environment creation skills
Hobbyists and digital art enthusiasts wanting to expand into 3D environment design
Career changers seeking a comprehensive foundation in 3D design techniques
🧑🏫 About the Author
3D Tudor is led by Luke, an experienced 3D artist and instructor who has created multiple best-selling Blender courses on Udemy. His teaching style focuses on practical, project-driven learning with an emphasis on efficient workflows. He specializes in stylized environment art and has developed a reputation for making complex procedural techniques accessible to artists at all levels.
🏁 Final Result
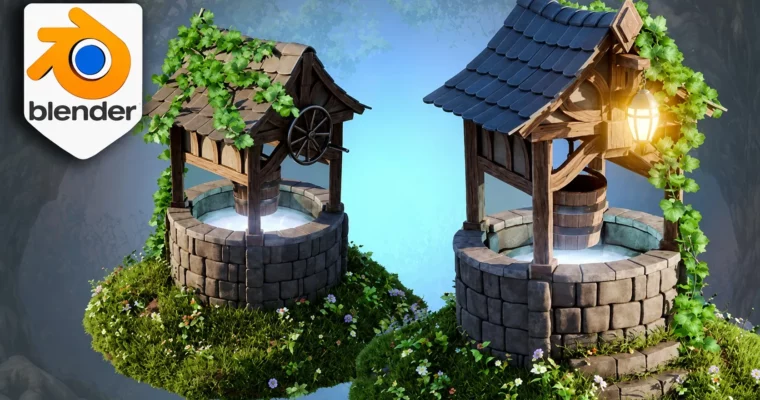
By the end of this course, you’ll have a fully realized stylized well environment ready for your portfolio. The scene includes a stone well with wooden roof, lush grass terrain with wildflowers, a glowing lantern, ivy-covered walls, and a functional-looking turning wheel and bucket—all rendered with Cycles and enhanced through the compositor.
Curriculum
📋 Course content
Module 1: Mastering Geometry Nodes
Introduction3:31
Lesson 1 – Navigating Blender Viewport: A Beginner’s Guide7:13
Lesson 2 – Unlocking Blender’s Resource Pack for Stylized Design5:23
Lesson 3 – Blender Modeling Basics for Enchanting Environments16:15
Lesson 4 – The Art of Greyboxing in Blender for Efficient Design10:46
Lesson 5 – Advanced Cavity Shading Techniques in Blender9:50
Lesson 6 – Mastering Brick Textures with Blender’s Geometry Nodes9:34
Module 2: Building the Foundation
Lesson 7 – Constructing Detailed 3D Wells with Blender Geometry Nodes13:08
Lesson 8 – Adding Structural Integrity with Stone Supports in Blender13:23
Lesson 9 – Crafting Stone Slabs in Blender for Stylized Environments13:51
Lesson 10 – Refining Stone Tile Textures in Blender for Enhanced Realism12:19
Lesson 11 – Seamless Seams and Sharp Edges: Texturing in Blender9:26
Lesson 12 – Efficient UV Unwrapping for Complex Environmental Designs in Blender12:45
Lesson 13 – Material Shaders in Blender: Bringing Environments to Life14:06
Lesson 14 – Applying Realistic Materials to 3D Models in Blender10:53
Module 3: Crafting the Details
Lesson 15 – Crafting Wooden Planks and Tiles for Roofs in Blender9:36
Lesson 16 – Perfecting Roof Tile Details with Geometry Nodes in Blender13:25
Lesson 17 – Modeling and Deforming Tiles for Dynamic Roofs in Blender11:57
Lesson 18 – Sculpting the Top of Roofs in Blender for Enhanced Realism9:05
Lesson 19 – Texturing Wood Frames for Stylized Environments in Blender10:24
Lesson 20 – Constructing Wooden Frameworks for Roof Tiles in Blender14:02
Lesson 21 – Creating Supportive Roof Frameworks and Well Mechanisms in Blender11:07
Lesson 22 – Modeling the Base of Stylized Roofs in Blender12:14
Lesson 23 – Organizing and Refining Greybox Sets for Roofs in Blender13:00
Module 4: Designing the Roof
Lesson 24 – Utilizing Skin Modifiers for Realistic Wood Supports in Blender10:48
Lesson 25 – Crafting Curved Frames with Skin Modifiers in Blender15:31
Lesson 26 – Designing Side Walls for Stylized Wells in Blender11:41
Lesson 27 – Dynamic Terrain Sculpting for Stylized Environments in Blender10:50
Lesson 28 – Integrating Staircases into Stylized Environments in Blender11:13
Lesson 29 – Adapting Staircases for Dynamic Environments in Blender8:19
Module 5: Structural Elements
Lesson 30 – Implementing Lush Grass with Geometry Nodes in Blender13:58
Lesson 31 – Advanced Grass Application Techniques in Blender for Realistic Envir9:35
Lesson 32 – Optimizing Terrain with Grass Modifiers in Blender17:49
Lesson 33 – Finalizing the Terrain with Detailed Touches in Blender10:58
Lesson 34 – Crafting Decorative Elements for Stylized Environments in Blender10:58
Lesson 35 – Modeling Support Structures for Lanterns in Blender12:58
Lesson 36 – Creating Stylized Lanterns in Blender for Atmospheric Lighting10:45
Lesson 37 – Utilizing the Magic UV Addon in Blender for Efficient Texturing19:18
Lesson 38 – Attaching Lanterns to Chains with Realism in Blender8:21
Module 6: Sculpting and Terrain
Lesson 39 – Designing Turning Wheels for Wells in Blender12:36
Lesson 40 – Adjusting and Refining Cog Wheels in Blender for Dynamic Interaction8:46
Lesson 41 – Creating Realistic Buckets with Geometry Nodes and Modifiers13:39
Lesson 42 – Adding Intricate Details to Buckets in Blender for Enhanced Realism8:05
Lesson 43 – Integrating Buckets into Stylized Wells in Blender15:18
Lesson 44 – Setting Up Cameras and Skies in Blender for Dynamic Renders6:42
Lesson 45 – Enhancing Environments with Ivy Geometry Nodes in Blender13:28
Module 7: Final Touches
Lesson 46 – Fundamentals of Rendering in Blender for Stylized Scenes16:01
Lesson 47 – Advanced Compositing Techniques in Blender for Dynamic Scenes12:06
Lesson 48 – Fine-Tuning Your Renders with Glare and Background Adjustments11:10
Lesson 49 – Applying Color Correction and Contrast Controls in Blender9:57
Lesson 50 – The Final Touches: Rendering Adjustments for Perfect Presentation13:10
Course Outro: Your Learning Journey Continues2:18
Watch online or Download for Free
Stylized 3D Environments with Blender 4 Geometry Nodes (Update) by 3D Tudor




 Channel