

, Texturizado estilizado para videojuegos con Blender (Spanish, Eng sub)")
Stylized texturing for video games with Blender by Jose Moreno (English), Texturizado estilizado para videojuegos con Blender (Spanish, Eng sub)

Duration:10:32:00
Actual Duration:10h 32m
Release date:2022, October
Skill level:Beginner
Language:English
Exercise files:Yes
Course URL:https://www.udemy.com/course/texturizado-estilizado-para-videojuegos-con-blender/
In this course, you will learn the complete workflow for creating stylized materials and textures for your models using Blender tools.
You will learn how to texture objects using Blender. The course is divided into six sections, starting with an introduction.
The next section is called “Foundations” and is a brief overview of the Texture Paint mode and the node editor in Blender. The Texture Paint mode is where you will paint textures onto your models, while the node editor is where you will edit the material nodes. I will show you the important tools and nodes you will use in both modes.
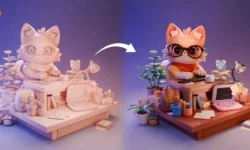
The following sections of the course will cover four different projects. Project 1 is a small diorama where you will learn the entire texturing process, starting with modeling and deploying objects, putting flat colors on everything, and then painting textures by hand. After painting, you will distribute the objects in a diorama and export all the maps for the presentation in Marmoset, a real-time rendering engine.
Project 2 is a bit different in that you will already have high-poly and low-poly models. We will extract the details of the high-poly model using the map bake feature in Marmoset, extract normal maps, curvature, environmental occlusion, among others. You will then polish the maps before beginning to texture the model, starting with the skull and candle, then moving onto the book. We will use a method called stencil to project images onto the cover and side of the book. When we finish with the color, you will add the roughness channel and the emission, working on the specularity of the surface. Finally, you will create an emission map and export all the maps for presentation in Marmoset.
Project 3 is similar to Project 2, where we will work on a chest, starting with the map bake, then working on the wood variation, details of the roof, and metals. You will also work on the roughness and metallicity, which is different from the way roughness is worked in non-metallic materials.
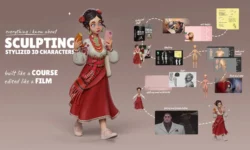
Project 4 is the final project and is a complete character with all its details. We will start by blocking the materials and working on the map bake. The blocking of materials is more critical in this project because there are so many, and it helps to get a good order and perceive how the texturing is progressing globally. You will then work on the hair, skin, parchment, and other organic parts of the character. We will also work on the dress using patterns to put all the details on the fabric. You will continue with the armor, ropes, and hull, where they will start working on the metallicity. I will show you how to work on the katana, which has two materials, one made of wood and one made of metal.
Finally, we will work on the fox tails, the straps of the armor, and all the details of the face. In the end, we will make some adjustments before exporting all the maps for the presentation.
What we will cover in the course:
Fundamentals
- How Blender’s texture paint mode works
- How Blender’s node editor works
Project 1: Mushroom Diorama
- Basic modeling and UV unwrapping
- Blocking and color gradations
- Hand-painting for refinement and details
- Exporting final maps
- Lighting and rendering in Marmoset
Project 2: Mystery Diorama
- Texture baking with Marmoset Toolbag
- Procedural stylized texturing with Blender’s node editor
- Projection of custom textures with the stencil tool
- Creation of the emissive channel and transparency channel
- Exporting final maps
- Lighting and rendering in Marmoset
Project 3: Golden Sun Chest
- Texture baking with Marmoset Toolbag
- Procedural stylized texturing with Blender’s node editor
- Creation of the metallic and hardness channels
- Exporting final maps
- Lighting and rendering in Marmoset
Project 4: Character (Kiuby Girl)
- Texture baking with Marmoset Toolbag
- Procedural color blocking for materials
- Procedural texturing for organic materials (hair, skin, fur)
- Procedural texturing for fabrics with patterns
- Procedural texturing for armor, wood, and metal objects
- Hand-painting for facial details and other skin parts
- Exporting final maps
- Lighting and rendering in Marmoset
Final Talk and Recommendations
We will discuss studying references and how to approach texture challenges on your own.
Who this course is for:
- Anyone who wants to learn how to texture models with stylized finishes
- Students and professionals who want to learn how to create materials with Blender.
[Wingfox] Stylized Texturing for Video Games with Blender by Jose Arley Moreno
01. Introduction
01. Instructor Presentation
02. Course Presentation
02. Fundamentals
01. Shader Editor Fundamentals
02. Texturing Fundamentals
03. Mushroom Texturing
01. Modeling and Unwrapping
02. Aplyng the Base Color
03. Painting the Cap
04. Painting the Stem
05. Painting the Base and the Leaf
06. Distributing Everything Diorama Style
07. Preparing the Model in Marmoset for Presentation
04. Skull Texturing
01. Baking the Maps
02. Polishing the Maps
03. Skull and Candle Textures
04. Book Textures
05. Text of the Book
06. Texture of the Ink and the Feather
07. Adding the Roughness and Lighting
08. Creating the Emisive Channel
09. Exporting Everything and Rendering in Marmoset
05. Chest Texturing
01. Making the Bakes
02. Making the Base Wood Texture
03. Wood Variations
04. Roof Details and Gold
05. Adding the Roughness and the Metalness
06. Exporting and Rendering
06. Kiuby Texturing
01. Making the Bakes
02. Blocking the Materials
03. Hair and Skin
04. Scroll
05. Dress
06. Armor
07. Cuerdas
08. Materials On the Legs
09. Katana
10. Tails
11. Straps
12. Skin and Face Details
13. Final Adjustments in the Materials
14. Exporting the Maps and Making the Petals
15. Rendering the Character
07. Final Talking
[Wingfox] Stylized Texturing for Video Games with Blender by Jose Arley Moreno.7z.rar
[Wingfox] Stylized Texturing for Video Games with Blender by Jose Arley Moreno_Subtitles.7z
[Wingfox] Stylized Texturing for Video Games with Blender by Jose Arley Moreno_Subtitles_ENGlish.7z
[Udemy] Stylized texturing for video games with Blender by Jose Moreno (English)
1. Introduction
1. Instructor presentation
2. Course presentation
2. Fundamentals
1. Shader editor fundamentals
2. Texture paint fundamentals Tools and brush properties
3. Mushroom texturing
1. 1 mushroom – modeling and unwrapping
2. 2 mushroom – Aplyng the base color
3. 3 mushroom – Painting the cap
4. 4 mushroom – Painting the stem
5. 5 mushroom – Painting the base and the leaf
6. 6 mushroom – Distributing everything Diorama style
7. 7 mushroom – Preparing the model in Marmoset for presentation
4. Skull texturing
1. 1 Skull – Baking the maps
2. 2 Skull – Polishing the maps
3. 3 Skull – Skull and candle textures
4. 4 Skull – Book textures
5. 5 Skull – Text of the book
6. 6 Skull – Texture of the ink and the feather
7. 7 Skull – Adding the roughness and lighting
8. 8 Skull – Creating the emisive channel
9. 9 Skull – exporting everything and rendering in Marmoset
5. Chest texturing
1. Chest 1 – Making the bakes
2. Chest 2 – Making the base wood texture
3. Chest 3 – Wood variations
4. Chest 4 – Chest Roof Details and Gold
5. Chest 5 – Chest Adding the roughness and the metalness
6. Chest 6 – Chest Exporting and Rendering
6. Kiuby texturing
1. Kiuby 1 – Making the bakes
2. Kiuby 2 – Blocking the materials
3. Kiuby 3 – Hair and skin
4. Kiuby 4 – Scroll
5. Kiuby 5 – Dress
6. Kiuby 6 – Armor
7. Kiuby 7 – Kiuby ropes
8. Kiuby 8 – Materials on the legs
[Udemy] Stylized texturing for videogames with Blender by Jose Moreno (English).7z.rar
[Udemy] Stylized texturing for videogames with Blender by Jose Moreno (English)_Subtitles.7z
Texturizado estilizado para videojuegos con Blender
01 Introducción
01-01 Presentación del Instructor
01-02 Presentación del Curso
02 Fundamentos
02-01 Introducción al método texture paint_ Herramientas y propiedades de la brocha
02-02 Introducción al editor de nodos
03 Diorama seta
03-01 Modelado y desplegado UV
03-02 Bloques de color
03-03 Pintado el sombrero
03-04 Pintado el Tallo
03-05 Base y hoja
03-06 Distribuyando todo en el diorama
03-07 Presentación Marmoset Toolbag
04 Diorama de misterio
04-01 Haciendo bakes de mapas
04-02 Puliendo los mapas
04-03 Textura del cráneo y vela
04-04 Textura del libro
04-05 Texto e imágenes del libro con stencils
04-06 Textura de la tinta y la pluma
04-07 Agregando el roughness y la emisión
04-08 Creando el mapa de emisión
04-09 Presentación Marmoset Toolbag
05 Cofre
05-01 Haciendo el bake de mapas
05-02 Haciendo la madera de base
05-03 Haciendo las variaciones de la madera
05-04 Detalles del techo y del metal
05-05 Agregando el roughness y la metalicidad
05-06 Renderizando
06 Kiuby
06-01 Bakes
06-02 Bloqueando los materiales
06-03 Cabello y piel
06-04 Pergamino
06-05 Vestido
06-06 Armadura
06-07 Cuerdas y cascabel
06-08 Materiales en las piernas
06-09 Katana
06-10 Colas
06-11 Correas
06-12 Detalles del rostro
06-13 Ajustes finales en los materiales
06-14 Exportando los mapas y haciendo los pétalos
06-15 Renderizando el personaje
07 Final
[Udemy] Stylized texturing for video games with Blender by Jose Moreno (Texturizado estilizado para videojuegos con Blender – Spanish, Eng sub).7z.rar
[Udemy] Stylized texturing for video games with Blender by Jose Moreno (Texturizado estilizado para videojuegos con Blender – Spanish, Eng sub)_Subtitles.7z


Please upload this by Noah schnap https://www.cgcircuit.com/tutorial/auto-place-skeletons-in-any-character it would help alot