Blender 2.9 3D Model & Render a Stylized Halloween Scene
Release date:2020, October 17
Author:Neil Bettison
Skill level:Beginner
Language:English
Exercise files:Yes
Hi and welcome to this new Udemy course, ‘Stylised Halloween Scene Blender 2.9 ’. This is the complete beginner’s guide to creating a 3D stylised game model. This course will teach you how to create a stylised 3D model from scratch to a professional level.
‘Stylized Halloween Scene in Blender 2.9 ’ will take you through a Halloween 3D modeling rollercoaster exclusively in Blender 2.9. You will come away with an inspiring portfolio piece that will let you shine through.
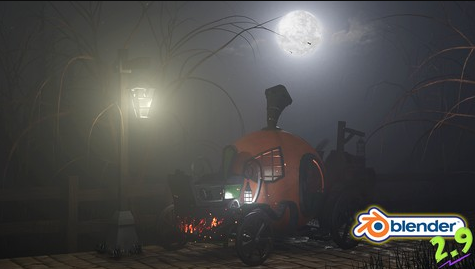
Like my other Udemy courses, I will be taking you on an extensive 3D modeling journey involving modeling, texturing, freebies, lighting and rendering a game ready 3D asset. The focus of this course is to creating a spooky creative scene to showcase your stylised game model of a Halloween pumpkin carriage in a way that it will make your 3D modelling artist portfolio shine!
We will also focus on making our model according to a real-world scale.
Enroll in this Blender 2.9 course and experience over 20 hours of content, full of learning opportunities to take your 3D modeling, sculpting, texturing, lighting and rendering skills up by quite a few notches. By completing this course, you will walk away with a comprehensive view of how to model, texture, and render from the ground up, with a super-fast industry-standard workflow.
What is more, we will be taking a new approach compared to my other past courses: after finishing the modelling of every course asset or sub-component, we will be texturing it straight away. This will elevate your excitement to new levels as with every couple of lessons, you will be able to grasp more of the final product step-by-step.
‘Stylized Halloween Scene in Blender 2.9 ’ is beginner friendly, so even if you’ve just started 3D modelling, this course will set you up with a professional and efficient workflow.
Using everything I learned from previous courses, mainly from all your helpful feedback, I was able to make a course that really has the wow-factor; something you will be proud of accomplishing.
Through the incorporation of varied pumpkin carriage components, we will go over interesting functionalities, including new and creative ways of using various Blender 2.9 modifiers and addons, including but not limited to:
– Marking Seams, Sharps, and fixing Normals;
– Smoothing and preparing meshes for texturing;
– Adding materials using Blender 2.9’s node system;
– Mesh deforming and using Booleans;
– Loop cuts;
– Joining meshes and finishing seams;
– Fixing Ngons;
– Creating Glass, Leather, and Coal Materials;
– Creating Collections of Objects and Meshes using a Hierarchy System;
– Creating a Simple Animation;
– Creating Grass using Particle Systems;
– Creating Trees using the Ivy Generator;
– Creating Moths & Bats using silhouette alphas;
– Creating Atmospheric Light using principled volume;
– Creating a Mood with Emission Lights;
– Creating a Spooky, Halloween, Night Sky;
– Creating Burning Ember with Nodes;
– Rendering a Stylized Halloween Scene.
Modelling
Through this course, we will be modelling several smaller props and assets to be placed within our stylised Halloween pumpkin.
This course will teach you how to model stylised assets from the ground up, using Blender 2.9. Whether you are an absolute beginner or someone who is looking to elevate their skill level, animations will be popping up when you need them, telling you all about modifiers, Blender functions, and key commands. This course explains everything and will include a step-by-step exploration of all the new shortcuts that have come with this new Blender version. Best of all, this unique course functionality also lets you set your own pace. This allows the course to be viable for Blender users of any level.
By the end of the course, the knowledge you will have learned can be used independent of the direction you take in 3D modeling – following the amateur or the professional path.
Texturing
As part of the texturing part of ‘Stylized Halloween Scene in Blender 2.9 ’, you will learn how to create complex stylised materials from scratch. This will include the embers and the world material for the night sky. To make the texturing process quicker and more beginner-friendly, you will be supplied with all the other materials that will be used in this course.
As part of the texturing process, we will also go over how to lay or apply multiple materials to meshes.
Rendering
Finally, to present our model in a professional way and make it really stand out in any portfolio, we will be rendering out in a fully equipped spooky Halloween scene. A starry night with moths and bats in front of a full moon with cast light to our fully modelled and textured Halloween pumpkin carriage as it stands on a cobbled road with fenced off grass.
You will come away with renders which you will be proud to show off on your social media. By the time we have finished rendering in Blender 2.9, you will have the knowledge and confidence to create stylised assets that look like they fell out straight out of a game. As part of rendering, I will show you how to make backdrops and specialised lighting, including extra lights. I always feel that lighting is one of the key components that tend to be the most overlooked. To be honest, I learned this the hard way, seeing as lighting is important with regards to making a scene pop.



 Channel




Flipped Normals – Sci-Fi Game Environment in Blender & UE4
Flipped Normals – Creating a Realistic Ocean in UE4
upload these ones please
Hi, do you have any body mechanics courses from Kyle Kentworthy?
Thanks
Hey Strawberry do you think you can add this: Gumroad -> Gendarmerie (Character Concept and Sculpting – Zbrush and Photoshop).
Hello, I am premium member, how to download whole files at single go…?
Btw thanks for the course.
you can use any download manager