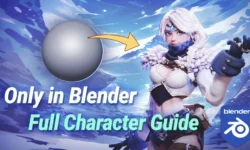
Character Creation for Game – Complete Pipeline by Nexttut

Release date:2021, January 18
Skill level:Beginner
Language:English
Exercise files:Yes
Course URL:https://www.udemy.com/course/character-texturing-for-game/
What Will I Learn?
- Making Shirt, Jacket & Pant in Marvelous Designer
- Learning Different Type of Folds
- Retopology
- UV Unwrapping
- Texturing Skin and Clothing
- Creating Hair Cards
- Rendering for presentation shots
Requirements
Basic knowledge of Zbrush
No Marvelous Designer knowledge required
Description
Do you want to make the entire character by yourself starting from sculpting to texturing and hair cards ?
Welcome to Nexttut Education’s Character Creation for Game | Complete Pipeline Course
INSTRUCTOR: My name is Masuk Ahemad, I am a 3d modelling and texturing artist. I have been working in production since 20. Currently I am working at Little red zombie studio in India.
GOAL OF THE COURSE: At the end of this course, you will be able to use Marvelous Designer & Zbrush workflow to create high quality realistic clothing for AAA game male characters and you will be able to Retopo your Zbrush character sculpt and create the low poly version for game, texture skin and clothing and create game ready hair for your character and render images for presentation.
YOU WILL LEARN:
In this course, we will be covering:
- Sculpting the base body
- Creating cloth patterns in MD
- Refining the wrinkles and folds in Zbrush
- Adding memory folds
- Adding Wear & Tear
- Posing the Character
- Rendering for presentation
- Retopology method
- UV Unwrapping
- Texturing Skin and clothing
- Creating Hair cards
- Rendering for presentation shots
First we are going to model the base body in Zbrush then I will export the model into Marvelous Designer. There I will create pattern for shirt, inner jacket and pant. Don’t worry if don’t know anything about Marvelous Designer. I have covered the basics of MD before I create the clothes.
Once I am happy with the overall look & feel of the folds and wrinkles then I will move to Zbrush. There I am gonna clean up the MD mesh and refine the fold and wrinkles. After that I will add some tertiary level details such as small wrinkles, memory folds, wear & tear.
After completing the clothing, I will Work on the head, hand, hair & shoe to complete the character. And finally I will pose the character and render for final presentation image.
and then take that to Topogun to do the low poly version then we are gonna move to Maya for UV unwrapping. once I am done with UV I will use Marmoset toolbag to bake all the maps I need for texturing. then I will use the very powerful Substance painter to texture tho clothe and the skin. Finally I am going to show you how to create hair using hair card Technic and render some final images which you can use for your portfolio.
IDEAL STUDENTS:
I have design this course keeping in mind the students who struggles to model realistic clothing for characters. This course is also for artist who wants to speed up their cloth modeling workflow by replacing the old school hand sculpting method to MD & Zbrush workflow.
I have also designed this course for Intermediate modeling students and artist who wants to texture their Zbrush high poly characters and create hair for real time games but they don’t have any step by step tutorial to follow. In this course I have used Zbrush, Maya, Topogun, Substance painter and Marmoset toolbag so make sure you have installed these software in order to follow the course properly.
WHO IS NOT THE IDEAL STUDENT:
This course is not for absolute zbrush beginners, as I haven’t spent mush time on zbrush basics. so I expect you to have some sort of zbrush basic experience.
Who is the target audience?
Intermediate modeling students and artist who wants to texture their Zbrush high poly characters and create hair cards for real time games but you don’t have any step by step tutorial to follow along.
Students who struggles to model realistic clothing for characters.
Artist who wants to speed up their cloth modeling workflow by replacing the old school hand sculpting method to MD & Zbrush workflow.
01 – Introduction
01 – My Tools and References
02 – My Zbrush UI
02 – Blocking out the character in Zbrush
04 – Blocking out the body
05 – Preparing the model for MD
03 – Blocking out Clothing in Marvelous Designer
06 – A brief Introduction to Marvelous Designer
07 – Clothing in Marvelous 1
08 – Clothing in Marvelous 2
09 – Clothing in Marvelous 3
10 – Clothing in Marvelous 4
11 – Clothing in Marvelous 4 part2
12 – Exporting mesh out of Marvelous Designer
04 – MD to Zbrush
13 – Creating a clean mesh for Zbrush
14 – Preparing the model for sculpting
05 – Detailing the Clothing in Zbrush
15 – Essential Concepts for Sculpting Clothing
16 – Proportions and cleanup
17 – Secoundary folds and seams
18 – Tertiary folds and wear and tear
19 – Shoes and belt
06 – Detailing the Character in Zbrush
20 – Sculpting the head
21 – Sculting the hands
07 – Rendering the Character for Presentation
22 – Posing the Character
23 – BPR Rendering
24 – Compositing in Photoshop
08 – Preparing The model for Retopology
25 – Cleaning up the jacket
26 – Cleaning up the shirt and the sweater
27 – Cleaning up the pants
28 – Decimating the model
29 – Exporting the model
09 – Retopology in Topogun
30 – Introduction to Topogun
31 – Retopologizing the jacket back part 1
32 – Retopologizing the jacket back part 2
33 – Retopologizing the jacket front part 1
34 – Retopologizing the jacket front part 2
35 – Retopologizing the jacket sleeves part 1
36 – Retopologizing the jacket sleeves part 2
37 – Retopologizing the Sweater
38 – Retopologizing the Sweater
39 – Retopologizing the pants part 1
40 – Retopologizing the pants part 2
41 – Retopologizing the pants part 2
42 – Retopologizing the head Eyes and Nose
43 – Retopologizing the head Ears
44 – Retopologizing the head Mouth and cheeks
45 – Finalizing the head
46 – Cleaning up the head in Maya
47 – Retopologizing the head eyeballs
48 – Retopologizing the hands
49 – Retopologizing the Shoes and belt
50 – cleaning up the mesh
10 – UVing the Character
51 – UVing the upper clothing
52 – Packing the upper clothing
53 – UVing the lower clothing
54 – UVing the heads and hands
11 – Baking the model in Marmoset Toolbag
55 – Preparing the model for baking
56 – Baking the character
57 – Cleaning up the normal map
12 – Texturing the clothing
58 – Introduction to substance painter
59 – Adding base material to the clothing
60 – Adding colour variation to the clothing
61 – Detailing the shoe and the belt
62 – Adding dirt to the upper clothing
63 – Adding damages to the lower clothing
64 – Adding damages to the upper clothing
13 – Texturing the Skin
65 – Texturing the head sub dermis layer
66 – Texturing the head Skin layer
67 – Texturing the head Irregularities layer
68 – Texturing the head Eyes and Additional maps
69 – Texturing the hands
70 – Exporting the textures
14 – Setting up the Marmoset toolbag
71 – Setting up the marmoset file
72 – Lighting the Scene
15 – Hair
73 – Creating the Hair alpha
74 – Creating the Hair cards
75 – Final Render
16 – Conclusion
76 – Goodbye
[Udemy] Character Creation for Game – Complete Pipeline by Nexttut.7z
[Udemy] Character Creation for Game – Complete Pipeline by Nexttut_Subtitles.7z