

Ad Clicks : Ad Views : Ad Clicks : Ad Views : Ad Clicks : Ad Views : Ad Clicks : Ad Views :
Oh Snap!

It looks like you're using an adblocker. Adblockers make us sad. We use ads to keep our content happy and free. If you like what we are doing please consider supporting us by whitelisting our website. You can report badly-behaved ads by clicking/tapping the nearby 'Advertisement' X text.

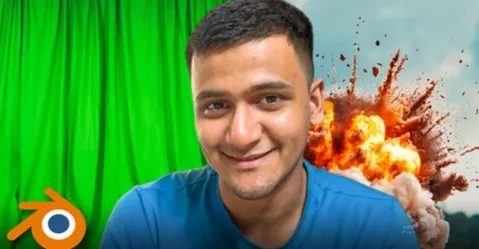
Blender Masterclass Camera Tracking & VFX Combined by Udit Gala
Blender Masterclass Camera Tracking & VFX Combined by Udit Gala

/

Author:Udit Gala

Duration:10 hours on-demand video

Actual Duration:4h 31m

Release date:2025

Publisher:Udemy

Skill level:Intermediate

Language:English

Exercise files:Yes

Software:Blender, After Effects

Course URL:https://www.udemy.com/course/blender-masterclass-camera-tracking-vfx-combined/

Learn to lock CGI into real footage with Blender camera tracking, green screen keying, and cinematic compositing.

If you have a camera and Blender, you can make shots that look straight out of a film. This combined masterclass walks you through the full deal – track live footage, drop in CGI, key out green screen, light it to match, and render a clean final shot.

🎯 What you’ll learn

  • Use Blender’s camera tracker to solve shots and lock 3D objects to live-action footage
  • Key out green screen in After Effects and composite actors into full 3D environments in Blender
  • Match lighting, shadows and reflections with Shadow Catcher, HDRI and volumetrics
  • Build cinematic scenes with modeling, particles, cloth, ocean and animation tools
  • Finish shots with professional compositing and render settings for film and YouTube

✅ Requirements

  • Skills: Basic familiarity with Blender is helpful but not required, step-by-step guidance included
  • Tools: Blender (free), After Effects for green screen keying and rotoscoping
  • Hardware: A computer capable of running Blender, mouse with middle-click

📝 Description

This is a project-first course. No long theory lectures. You open Blender, grab real footage, and build actual shots from day one. Each project covers the full loop: track, solve, set up the scene, add CGI, light it, and composite.

The first half is all about camera tracking. You will learn how to place markers, get a clean solve with low error, set up the floor and camera, and use the Shadow Catcher so your 3D objects sit in the footage with real contact shadows and reflections. Projects get progressively harder – from a simple object placement to a pirate ship on an animated ocean, a Mixamo character with a rifle, and outdoor scenes with grass and trees.

The second half switches to green screen compositing. You shoot (or reuse) green screen footage, key it in After Effects, then bring the actor into Blender. From there you build the world around them: a house interior with a TV screen, a grassy field with animated camera, a superhero shot with cloth-sim cape, a subway station with an animated metro. You will work with HDRI lighting, volumetrics, depth maps, and rotoscoping when keying alone is not enough.

What makes it work is the focus on realism tricks. Matching lighting and perspective, adding grain, fixing edges, balancing reflections – the small stuff that makes CGI stop looking like a sticker pasted on video. By the end you will have a repeatable workflow you can use for short films, commercials, and YouTube VFX.

🧑‍🎓 Who this course is for

  • Filmmakers and YouTubers who want to add CGI to their own footage without expensive software
  • Blender users who know the basics and want to get into VFX, matchmoving and compositing
  • Aspiring VFX artists building portfolio shots for films, commercials and personal projects

🧑‍🏫 About the Author

Udit Gala is a Blender instructor focused on practical VFX production – camera tracking, green screen, and compositing. His teaching style is direct and project-based, built around recreating film-quality shots with free tools and clear step-by-step workflows.

He covers the full pipeline from shoot to final render, including After Effects keying, Mixamo integration, and Blender lighting setups, so students learn how shots are actually finished for clients and content.

🏁 Final Result

  • 7+ finished camera-tracked VFX shots with integrated CGI, including ocean, character and environment work, plus 5 green screen composites and 2 cinematic animations ready for your reel
Curriculum

📋 Course content

  1. Module 1:  Camera Tracking and CGI Integration
    • Join My Community!0:08
    • Introduction0:20
    • 1.1 Create a project and import the clip2:48
    • 1.2 Track the markers5:15
    • 1.3 Solve7:15
    • 1.4 Set up the tracking scene5:21
    • 1.5 Set up the tracking scene (continue)2:48
    • 1.6 Place a 3D model in the scene5:53
    • 1.7 Compositing & Render Settings4:44
    • 2.1 Create a new project2:40
    • 2.2 Track the markers2:00
    • 2.3 Solve1:36
    • 2.4 Set up the tracking scene1:49
    • 2.5 Model the bowl and the chunk2:23
    • 2.6 Particle Emitter3:45
    • 2.7 Texturing8:39
    • 2.8 Shadow Catcher in Eevee4:00
    • 2.9 Compositing1:42
    • 3.1 Brief2:50
    • 3.2 Track the markers4:37
    • 3.3 Solve2:13
    • 3.4 Set up the floor3:16
    • 3.5 Shadow Catcher4:57
    • 3.6 Download Character animation from Mixamo5:49
    • 3.7 Attach the rifle to the hand3:39
    • 3.8 Create the window part4:00
    • 3.9 Compositing5:07
    • 4.1 Track the markers3:49
    • 4.2 Solve3:53
    • 4.3 Set up the tracking scene3:08
    • 4.4 Ocean Modifier4:07
    • 4.5 Get a Pirate Ship 3D model3:18
    • 4.6 Animate the Pirate Ship6:05
    • 4.7 Lighting and Shadow Catcher6:49
    • 4.8 Compositing and Render5:55
    • 5.1 Track and Solve8:59
    • 5.2 Shadow Catcher10:41
    • 5.3 Deadpool and Wolverine16:09
    • 5.4 Compositing and Render14:38
    • 6.1 Track and Solve15:34
    • 6.2 Shadow Catcher and Reflection10:35
    • 6.3 Track and Solve10:41
    • 6.4 Props and Shadow Catcher10:29
    • 7.1 Track and Solve a new scene15:11
    • 7.2 Set up the 3D scene6:16
    • 7.3 Creating Grass, Tree and Shadow Catcher17:54
    • 7.4 Compositing and Final Render4:12
    • Bonus Section 1: Introduction0:28
    • Create a new project3:38
    • Camera track the footage2:26
    • Solve2:31
    • Set up the 3D scene3:14
    • Shadow Catcher and HDRI4:52
    • Compositing and Render6:53
    • Bonus Section 2: Track and Solve5:10
    • Set up the tracking scene4:07
    • Lighting3:02
    • Get a Coffee Mug5:23
    • Compositing and some final touchups6:21
    • Assignment: Create Your Own Camera Tracked Shot
    • Final Test – Camera Tracking
  2. Module 2:  Green Screen Compositing and CGI Environments
    • Introduction0:21
    • 1.1 Shoot a green screen footage1:48
    • 1.2 Remove the green screen in After Effects5:47
    • 1.3 Create a new project in Blender2:02
    • 1.4 Create the house12:32
    • 1.5 Attach gameplay footage on TV screen8:53
    • 1.6 Volumetrics and Render Settings6:16
    • 1.7 Compositing6:00
    • 2.1 Shoot a green screen footage1:16
    • 2.2 Remove the green screen in After Effects3:52
    • 2.3 Switch Light Studio5:06
    • 2.4 Depth Map2:24
    • 2.5 Create the grass4:36
    • 2.6 HDRI2:46
    • 2.7 Animate the camera and change the grass settings8:12
    • 2.8 Animate the grass3:19
    • 2.9 Compositing1:17
    • 3.1 Shoot a green screen footage1:39
    • 3.2 Remove the green screen4:03
    • 3.3 Create a new project and import the clip1:08
    • 3.4 Create the superhero cape using Cloth Modifier11:24
    • 3.5 Animate the cape1:23
    • 3.6 Cape Material & Baking the animation2:13
    • 3.7 Terrain1:33
    • 3.8 HDRI2:18
    • 3.9 Volumetrics5:14
    • 3.10 Compositing2:40
    • 4.1 Introduction2:44
    • 4.2 Get a 3D model of Subway Station5:58
    • 4.3 Lighting7:52
    • 4.4 Get your green screen footage in the scene5:06
    • 4.5 Animate the metro7:30
    • 4.6 Volumetric Lighting3:14
    • 4.7 Compositing4:36
    • 5.1 Introduction0:55
    • 5.2 Rotoscoping6:55
    • 5.3 Export the clip2:17
    • 5.4 Create the environment and lighting7:06
    • 5.5 Volumetric Lighting3:43
    • 5.6 Add Props7:19
    • 5.7 Compositing2:41
    • Assignment: Composite a Green Screen Actor into a 3D Scene
    • Final Test – Green Screen
  3. Module 3:  Bonus Cinematic Animation Projects
    • Intro0:15
    • Create a Photorealistic Auto Rickshaw Animation45:52
    • Create a simple Superman 3D Animation in Blender48:03
Watch online or Download for Free
Blender Masterclass Camera Tracking & VFX Combined by Udit Gala
NAME
SIZEDURATION

Download all Videos (66)
850.1 MB4h 31m

Project Files (Assets, Resources)
19.1 KB

Download all

Join us on
  Channel    and      Group

Leave a Comment

Your email address will not be published. Required fields are marked *