Ad Clicks : Ad Views : Ad Clicks : Ad Views : Ad Clicks : Ad Views : Ad Clicks : Ad Views :
Oh Snap!

It looks like you're using an adblocker. Adblockers make us sad. We use ads to keep our content happy and free. If you like what we are doing please consider supporting us by whitelisting our website. You can report badly-behaved ads by clicking/tapping the nearby 'Advertisement' X text.

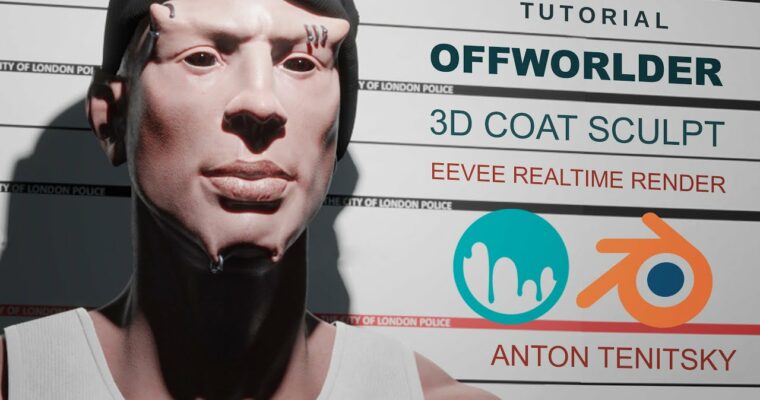
Offworlder Sculpting and Texturing in 3D Coat for Blender Eevee

/

Release date:2020, July 16

Author:Anton Tenitsky

Skill level:Beginner

Language:English

Exercise files:Yes

What you’ll learn:
Sculpting and texturing in 3D Coat with a scene set up in Blender

Requirements:
Basic Blender for the interface. 3D Coat knowledge is not necessary.

Description:
Explore a new pipeline of 3D Coat and Blender that could fit very well in certain productions and cover many needs at a fraction of the commonly used software costs.
The whole course is structured that every video about a certain point that is in the name of the file. It makes it convenient to navigate and study.
All videos are short between 2-5 minutes for easy watching and the best learning experience.
Long boring processes are recorded to timelapses without narration.

COURSE STRUCTURE:

Part 1 – Creating the Base Head
Setting up a sculpt that is easy and fast to modify. You will be able to turn it to various character designs while retaining the important bits (lips, eyes, nose, ears) under control. At this speed, it is only possible to do in 3D Coat.
The segmented head is included in the project files so you can even just skip doing it yourself and start designing straight ahead.

Part 2 – Character Sculpting
The second part is about modifying the base head to different creatures. Then moving on to creating the finished voxel sculpt of the character. Talking about particularities of sculpting in 3D Coat.

Part 3 – Retopology and UVs
3D Coat has great retopology and UV tools to do the job fast and it is covered in this chapter.

Part 4 – Texture Painting
Texturing in 3D Coat is a great experience. The brushes give you a very natural painting feeling and are highly customizable.

Part 5 – Blender Presentation
This part covers the basics of the scene set up like skin shader, lighting, sculpting, and modeling tools.

Bonus Part – Marvelous Designer
Jumping in Marvelous to design clothing for the character and bringing back to Blender.

Project Files:
Includes the segmented basehead as .obj and .3b (3d coat) and the actual character scene with the relevant textures So you can jump straight into it.
Also, you’ll get pdfs with useful links to resources and my 3d coat hotkeys.
If you are interested in my background I have a whole channel dedicated to 3D Coat
For the tutorial support please join my discord (search by my name)
Happy watching!

Who this course is for:
3D Coat users interested in sculpting for real-time characters

Watch online or Download for Free
Part 1 – Creating the Base Head

00 3D Coat Interface
01 Carve Brush Options
02 Move Tool
03 Split Tool
04 Mesh 3D Scan Import
05 Shaping Head with Move Tool
06 Timelapse Head Shaping
07 Materials and Lighting
08 Pinch Tool Surface and Vox
09 Mesh Resolution Proxy and Proxy Slider
10 Starting to Split the Head
11 Head Resampling
12 Timelapse Ecorche Splitting 1
13 Symmetry Copy
14 Timelapse Ecorche Splitting 2
15 Sculpting Instances
16 Using 2D Grid for Proportions Check
17 Renaming Script
18 Merging Voxel Tree
19 Timelapse Extra Bust Parts

Part 2 – Character Sculpting

01 Modifying Face Shapes
02 Multiple Layer Select and Merge in Viewport
03 Fill Expand Steady Stroke Tools
04 Timelapse Offworlder v1
05 Timelapse Offworlder v2
06 Timelapse Offworlder v3
07 Importing from another 3D Coat File
08 Timelapse Detailing
09 Important Hierarchy Change for Sculpting
10 Starting to Sculpt with Smooth and Fill Tools
11 Timelapse Sculpting (2)
12 Finishing Touches
13 Timelapse Sculpting
14 Sculpt Overview Before Retopo

Part 3 – Retopology and UVs

01 Retopo Tools
02 Topology Flow Overview
03 Timelapse Retopology
04 Retopo Turning Symmetry Off
05 Timelapse Retopo of Another Half
06 UVing the Head
07 UV Isles Placement
08 Normal Map Baking
09 Fixing the Bake

Part 4 – Texture Painting

01 Normal Map Painting in Paint Room
02 Alpha Stamps and Resources where to get them
03 3D Scan Store Scan Free Referecne for Micro Detail
04 Timelapse Normal Map Painting
05 Colour Map Brush Set Up
06 Colour Theory for the Face
07 Timelapse Colour Map Painting
08 Glossiness Map
09 Timelapse Roughness Map Painting
10 Textures and Geometry Export

Part 5 – Blender Scene

01 Blender Basic Scene Set Up
02 Eevee Set Up
03 Skin Shader Set Up
04 Fixing Skin Specular in Shading Window using RGB Curves
05 Eye Modeling and Materil Set Up
06 Adding Extra Asymmetry in Sculpting Room
07 Piercing Ring Modeling
08 Backdrop Height Chart Set Up
09 Blender Eevee Render Set Up

Part 6 – Marvelous Designer Bonus

01 Making Hat in Marvelous Part 1
02 Making Hat in Marvelous Part 2
03 Making Tank Top in Marvelous Part 1
04 Making Tank Top in Marvelous Part 2
05 Textures from Textures-com
06 Importing Clothes to Blender
07 Timelapse Sculpting Clothes
08 Scaling UVs
09 Final Materials
10 Thank you

Project Files.7z
Quick Intro


Join us on
  Channel    and      Group

  • Facebook
  • Twitter
  • Google+
  • Linkedin
  • Pinterest

Leave a Comment

Your email address will not be published. Required fields are marked *