Ad Clicks : Ad Views : Ad Clicks : Ad Views : Ad Clicks : Ad Views : Ad Clicks : Ad Views :
Oh Snap!

It looks like you're using an adblocker. Adblockers make us sad. We use ads to keep our content happy and free. If you like what we are doing please consider supporting us by whitelisting our website. You can report badly-behaved ads by clicking/tapping the nearby 'Advertisement' X text.

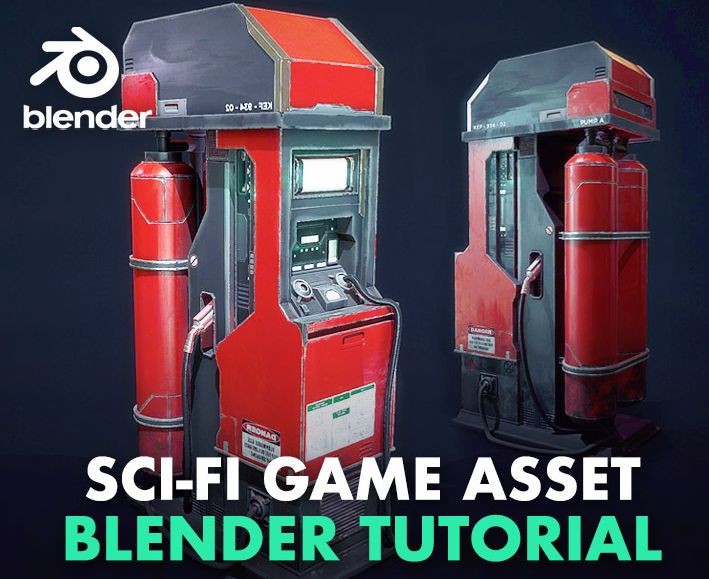
Blender Sci fi Game Asset Creation with Emiel Sleegers

Release date:2020, October 5

Author:Emiel Sleegers

Skill level:Beginner

Language:English

Exercise files:Yes

Who should enroll : This course is for those who are interested to be able to make AAA quality game environment objects and props using Blender as main 3d software.

Requirements to enroll : It is not for complete beginners who never has used Blender, Substance painter, Marmoset toolbag before. Instead it is a beginner friendly course that means if you know how to move around in these software, may be has used those before but you consider yourself still a beginner then this course is for you.

Software we are gonna use : Blender, Marmoset Toolbag, Substance painter and Photoshop and some free plugins for Substance Painter. So don’t worry about the plugins, we will let you know from where you can download in the lecture.

If it sounds like you then keep reading.

What will you learn :

Modeling in Blender both Low poly and High poly

Baking Maps in Marmoset toolbag

Texturing in Substance Painter

Who am I to teach : My name is Emiel sleegers, I am a 3d environment artist at Ubisoft. I have created many courses on game environments, props and objects.

Some More Readings : In this tutorial course we will go over on how to make a hero sci-fi game asset from start to finish.

We will be using Blender3d for the modeling, Marmoset toolbag for the baking and final renders and substance painter along with a tiny bit of Photoshop for the texturing.

We will go over many techniques but the most important ones are on how to get good shape and form while following a reference image, how to create a correct and efficient high poly model, and how to create an optimized low poly model. how to uv unwrap a model and how to bake a model properly and fast and of course on how to texture a model inside substance painter.

I hope you are just as excited for this tutorial course as I am and I hope to see you soon!

Thanks again for watching Nexttut education and as always, enjoy.

Watch online or Download for Free

Section 1 – Introduction
01_Introduction
02_Going Over Our Reference And Installing Plugins

Section 2 – Creating Blockout Model
03_Creating Our Block out Part1
04_Creating Our Block Out Part2
05_Creating Our Block Out Part3

Section 3 – Creating the High Poly Model
06_Creating Our Final High Poly Asset Part1
07_Creating Our Final High Poly Asset Part2
08_Creating Our Final High Poly Asset Part3
09_Creating Our Final High Poly Asset Part4
10_Creating Our Final High Poly Asset Part5
11_Creating Our Final High Poly Asset Part6
12_Creating Our Final High Poly Asset Part7
13_Creating Our Final High Poly Asset Part8
14_Creating Our Final High Poly Asset Part9
15_Creating Our Final High Poly Asset Part10
16_Creating Our Final High Poly Asset Part11
17_Creating Our Final High Poly Asset Part12
18_Creating Our Final High Poly Asset Part13
19_Creating Our Final High Poly Asset Part14

Section 4 – Making the Low poly Version
20_Creating Our Final Low Poly Part1
21_Creating Our Final Low Poly Part2
22_Creating Our Final Low Poly Part3
23_Creating Our Final Low Poly Part4

Section 5 – Unwrapping the UVs
24_Creating Our Final Uv Unwrap Part1
25_Creating Our Final Uv Unwrap Part2
26_Creating Our Final Uv Unwrap Part3
27_Creating Our Final Uv Unwrap Part4

Section 6 – Texturing and Rendering
28_Baking Our Asset Part1
29_Baking Our Asset Part2
30_Setting Up Our Substance Painter Scene
31_Adding Some Extra Normal Map Details To
32_Adding Normal Map Details Part1
33_Adding Normal Map Details Part2
34_Adding Normal Map Details Part3
35_Adding Normal Map Details Part4
36_Adding Our Base Colors Part1
37_Adding Our Base Colors Part2
38_Adding Our Base Colors Part3
39_Adding Our Base Colors Part4
40_Painting In Edge Damage Part1
41_Painting In Edge Damage Part2
42_Setting Up Our Render Scene
43_Adding Our Signs And Polishing Details Part1
44_Adding Our Signs And Polishing Details Part2
45_Final Polish And Taking Portfolio Screenshots

Sourcefiles.7z


Join us on
  Channel    and      Group

  • Facebook
  • Twitter
  • Google+
  • Linkedin
  • Pinterest

Leave a Comment

Your email address will not be published. Required fields are marked *