Ad Clicks : Ad Views : Ad Clicks : Ad Views : Ad Clicks : Ad Views : Ad Clicks : Ad Views :
Oh Snap!

It looks like you're using an adblocker. Adblockers make us sad. We use ads to keep our content happy and free. If you like what we are doing please consider supporting us by whitelisting our website. You can report badly-behaved ads by clicking/tapping the nearby 'Advertisement' X text.

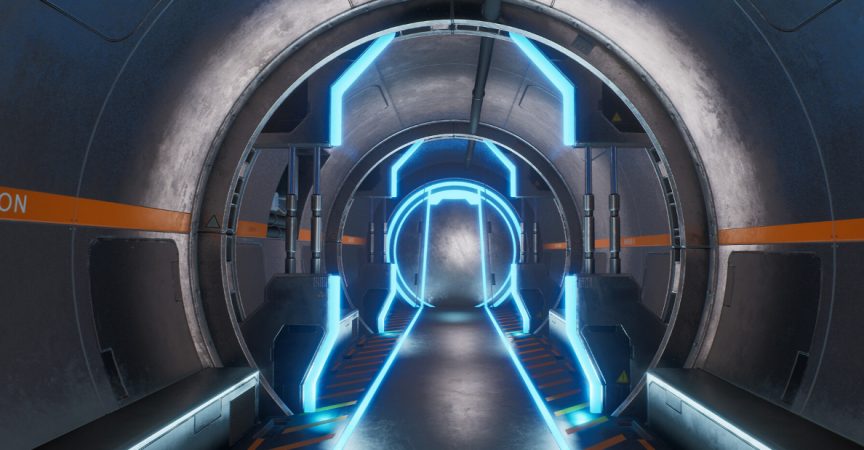
Futuristic Game Environment in Blender

Release date:2021

Author:Emiel Sleegers

Skill level:Beginner

Language:English

Exercise files:Yes

Finding a Blender course on creating a game environment that will take your skills to a whole new level can be hard to find. But don’t worry, I am here to show you my workflow that will guide you in creating a professional environment like you see in AAA video games that you play today.

In this course, we will go through the entire pipeline of creating a game-ready environment.

The major topics we will be covering are:

High Poly to Low Poly Modeling using Blender
Proper UV unwrapping in Blender
Baking maps in Marmoset Toolbag
Detailing & Texturing in Substance Painter
Scene setup, lighting, & post effects in Unreal Engine
By the end of this course, you will be able to create a clean and amazing futuristic game environment.

Before beginning this course, you should have a basic knowledge of Blender, Substance Painter, Marmoset Toolbag and Unreal Engine.

If you want to be a 3D environment artist, you need to know the latest tools, methods, and strategies to better strengthen your skills to get closer to your goal. This course will put you ahead of 99.9% of all beginners out there when it comes to game environment creation. In this course, you will learn the proper workflow and techniques that will allow you to build a complete production-ready scene. If you are serious about elevating your skills, sign up for this course, at Victory3D.

Watch online or Download for Free

1.Introduction
00-Promo
01-Going over our reference
02-Installing our plugins and shortcuts

2.Blockout & Modeling Phase
03-Creating our blockout Part1
04-Creating our blockout Part2
05-Creating our blockout Part3
06-Creating our blockout Part4
07-Creating our floor low poly and creating the door Part1
08-Creating our door Part2
09-Creating our door Part3
10-Creating our door Part4
11-Creating our door Part5
12-Creating our door Part6
13-Creating our door Part7
14-Creating our door Part8
15-Creating our door Part9
16-Creating our wall Part1
17-Creating our wall Part2
18-Creating our wall Part3
19-Creating our second wall Part1
20-Creating our second wall Part2
21-Creating our second wall Part3
22-Finishing our second wall and creating our closed door
23-Turning our high poly into low poly Part1
24-Turning our high poly into low poly Part2
25-Turning our high poly into low poly Part3
26-Turning our high poly into low poly Part4

3.UV Unwrapping & Baking
27-UV Unwrapping our models Part1
28-UV Unwrapping our models Part2
29-UV Unwrapping our models Part3
30-UV Unwrapping our models Part4
31-Exporting our models for baking
32-Baking our models Part1
33-Baking our models Part2

4.Normal Map Detailing & Texturing
34-Setting up our substance painter scene
35-Adding normalmap details to our door Part1
36-Adding normalmap details to our door Part2
37-Adding normalmap details to our back door
38-Adding normalmap details to WallA
39-Adding normalmap details to WallB
40-Exporting our models for unreal and setting up a quick preview scene
41-Adding extra normal map details to all meshes
42-Creating the final texture for our door Part1
43-Creating the final texture for our door Part2
44-Creating the final texture for our door Part3
45-Creating the final texture for our door Part4
46-Creating the final texture for our floor
47-Creating the final texture for our WallA Part1
48-Creating the final texture for our WallA Part2 and start on WallB
49-Creating the final texture for our WallB
50-Creating the final texture for our backdoor

5.Scene Setup, Lighting, Post Effects & Tweaks
51-Setting up our unreal project
52-Building our level
53-Setting up our first lighting pass Part1
54-Setting up our first lighting pass Part2
55-Going over our post effects and some material polish
56-Improving our floor texture Part1
57-Improving our floor texture Part2
58-Improving our door texture
59-Improving our wall textures
60-Improving our backdoor texture Part1
61-Improving our backdoor texture Part2
62-Final polish of our scene

[Victory3D] Futuristic Game Environment in Blender.7z.001
[Victory3D] Futuristic Game Environment in Blender.7z.002


Join us on
  Channel    and      Group

  • Facebook
  • Twitter
  • Google+
  • Linkedin
  • Pinterest

2 Comments

Leave a Comment

Your email address will not be published. Required fields are marked *