

Advanced Bottle Modeling and Rendering in Cinema 4D and Redshift by Polygonpen

Duration:2 hours and 25 minutes
Actual Duration:2h 27m
Release date:2025
Publisher:Gumroad
Skill level:Intermediate
Language:English
Exercise files:Yes
Software:Cinema 4D, Redshift, Photoshop
Course URL:https://polygonpen.gumroad.com/l/bottle1
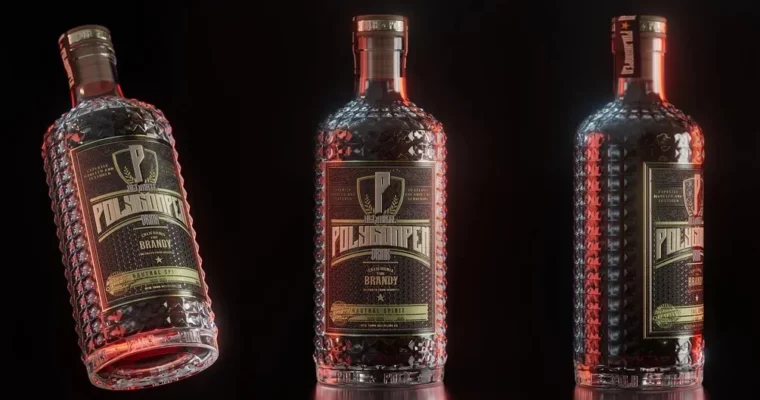
This course walks you through the entire process of creating a complex bottle, from the initial model to the final studio render. The focus is on a non-destructive workflow in Cinema 4D, so you can tweak bevels, displacement, and other details at any stage without breaking your model. Then, you’ll move into Redshift to build materials and lighting from scratch, finishing with a multi-layer render setup.
🎯 What you’ll learn
- Model complex cylindrical shapes efficiently using deformers and selections
- Set up a flexible, non-destructive modeling pipeline for easy revisions
- Unwrap cylindrical UVs and prep them for texturing in Photoshop
- Build realistic glass, liquid, and label materials in Redshift
- Create a studio lighting scene that highlights product details
- Use Redshift’s Takes System to manage multiple render settings, cameras, and material variations in one scene
✅ Requirements
- Skills: Basic understanding of Cinema 4D’s interface and navigation, familiarity with standard modeling tools
- Tools: Cinema 4D, Redshift, and Photoshop (for texture work)
- Hardware: A dedicated GPU compatible with Redshift, 16GB RAM minimum
📝 Description
This isn’t a quick “click here, do that” tutorial. It’s a breakdown of a practical, professional workflow that keeps your model editable from start to finish. You’ll see how to lean on deformers and selection sets to keep your geometry clean and your options open. Changing the bevel size or displacement amount later? No problem—it’s all still live.
The rendering sections are just as hands-on. You’ll build materials from scratch in Redshift, not just tweak presets. The label material gets special attention: you’ll layer bump, glossy, specular, and diffuse maps to get that printed-on-glass look. And when it’s time to present your work, the Takes System lets you switch between cameras, lighting setups, and material variations without duplicating scenes.
By the end, you’ll have a solid grasp of how to approach complex product visualization projects with confidence. The techniques here apply to more than just bottles—they’re the building blocks for any hard-surface or packaging work.
🧑🎓 Who this course is for
- 3D artists who want to improve their product visualization skills
- Cinema 4D users looking to adopt a more flexible, non-destructive modeling workflow
- Artists transitioning to Redshift who want to see a full material and lighting breakdown
- Anyone who wants to create portfolio-ready renders of complex objects
🧑🏫 About the Author
Polygonpen is a 3D artist and educator focused on product visualization and look development. Their tutorials emphasize practical, production-ready techniques that prioritize flexibility and efficiency. This course reflects their hands-on approach to solving real-world modeling and rendering challenges.
🏁 Final Result
- A fully modeled and UV-unwrapped bottle with a non-destructive setup
- A complete Redshift scene with studio lighting and layered materials
- A final render of the bottle with a detailed front label, ready for your portfolio
- A Takes System setup that lets you output multiple variations from a single scene
 Channel