Creating a Japanese Shrine Environment in Unreal Engine 5
Release date:2022, February
Skill level:Beginner
Language:English
Exercise files:Yes
Course URL:https://www.skillshare.com/classes/Creating-a-Japanese-Shrine-Environment-in-Unreal-Engine-5/1973635477?via=search-layout-grid
About This Class
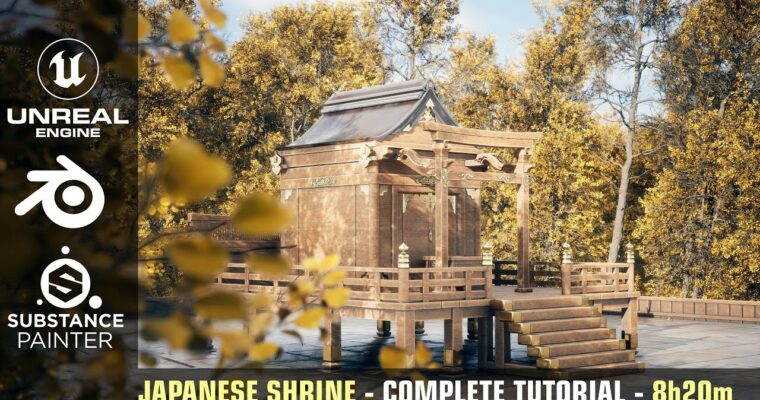
Hello Everyone and welcome to this new class. In this class, we will go over the entire process of creating this Japanese Shrine environment using Unreal Engine 5, Blender, Substance Painter.
We will go over modelling in Blender, texturing using Substance Painter and setting up the scene, lighting and materials in Unreal Engine 5.
SOFTWARES USED – (BLENDER, Substance Painter, Unreal Engine 5):
All the modelling will be done in Blender, However, the techniques used are universal and can be replicated in any other 3D modelling package. The materials and textures will be created using Substance Painter. Level art, lighting and composition will be done in Unreal Engine 5.
In this course, you will learn everything you need to know to create the final results that you see in the images and trailers. The same techniques can be applied to almost any type of environment.
This course has over 8 hours of content! (All the videos have audio commentary)
We will go over each and every step in this course together and nothing will be skipped. The course does not have any kind of timelapses so that you can follow every step easily.
We will start by gathering some reference images to gain some initial ideas and the mood for our scene. We will arrange these reference images in a free program called PureRef. After this we will move on to Blender and start modeling our shrine. We will go over the entire process of modelling this from start to finish in Blender only. We will be using reference images to closely create all the details and the ornamental style designs.
After we have modeled all our assets, we will export them to Substance Painter to start with the texturing. We will learn to create high quality and realistic materials and the key features of Substance Painter like Smart Masks, generators, smart materials etc.
After this we will import all our models into Unreal Engine and export the textures from Painter to Unreal Engine. To enhance our scene even further we will make use of the newly introduced Megascans trees that are provided to us for completely free as Unreal Engine users by Quixel. We will learn to use landscape tools, the foliage editing tools to place all these trees in our scene. We will also learn to customize the different settings of these trees like wind, seasons, leaf color, health etc.
The next step would be to setup our lighting and create a mood and atmosphere for our scene. We will make use of the new features of Unreal Engine such as Lumen to get realistic lighting for our scene, next we will set up a post-Processing volume to further enhance the visuals of our scene.
We will end this course by setting up different camera angles, taking high resolution screenshots for our portfolio and setting up a day-time lighting setup for our scene. We are going to learn a lot of things. So, I hope to see you there in the course, thank you.
Who is this course for?
Students that have basic knowledge of modelling, texturing and want to learn how to create environments. Everything in this course would be explained in detailed but some prior knowledge of the software would be helpful.



 Channel


https://www.udemy.com/course/unreal-engine-5-cpp-multiplayer-shooter/ can u add it please?
Please add this and my comment https://www.udemy.com/course/unreal-engine-5-cpp-multiplayer-shooter/