Blender to Unreal Engine Become a Dungeon Prop Artist by 3D Tudor
Release date:2022, October 5
Skill level:Beginner
Language:English
Exercise files:Yes
Course URL:https://www.udemy.com/course/blender-to-unreal-engine-become-a-dungeon-prop-artist/
What you’ll learn
- Enjoying the 3D prop and game asset modelling to game environment transition from Blender to Unreal Engine 5 – the only one out there like it for all fantasy
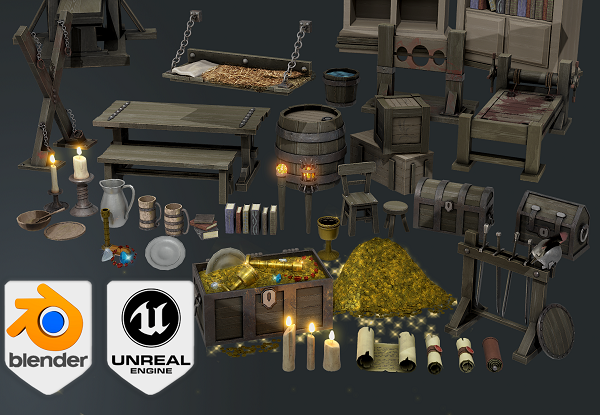
- Creating over 50 stunning medieval dungeon assets and props enabling you to build an underground dungeon environment unique to every student
- Using Blender 3 and understanding its new interface and shortcuts
- A course within a course introduction into (a) Blender basics, (b) materials and textures, (c) seams, sharps, and UVs.
- Maximising the potential of your references to develop strong game asset concepts using Pureref
- Completing a comprehensive crash course in geometry nodes in Blender
- Creating rope and chain geometry nodes with optional side bars for ease of use
- Becoming a Blender node guru by adding nodes to your imported maps to completely change the way they look and feel
- Understanding modifier stacking
- Creating larger 3D props from smaller ones to populate an environment
- Making a bucket water material using texture maps and opacity along with the gamma node in Blender
- Bringing your 3D models and props to life with custom materials, adding decals like straw, blood, and stamps
- Learning how to use HDRIs as 3D model backgrounds for your portfolio
- Utilising rendering to improve the quality of presentation for your 3D environment by rendering out in both of Blender’s rendering engines – Eevee and Cycles
- Choosing to continue your 3D modelling to game engine journey by completing the second (independent) part of the course in Unreal Engine 5
- Optimising 3D game assets ready to export them into Unreal Engine 5
- Preparing asset collections for UE5 integration and setting up material instances for them
- Exploring different transparency materials that will help you set up cut-out decals, partially transparent decals with PBR values and two side-faced textures
- Understanding how to set up built-in decal planes within your assets and how to create your decal projections that not only will be applied to an asset but wi
- Master the use of the refraction values to help you set up a variety of gems and water materials in Unreal Engine 5
- Learning how to set up and generate a variety of different collisions for your assets to help your playable character interact better with the world
- Setting up an asset pack that can be easily imported onto any Unreal Engine 5 project
- Maintaining and optimising medieval Europe aesthetics for a full medieval dungeon scene using an Unreal Engine 5 skybox
- Presenting your medieval dungeon asset pack in Unreal Engine 5 and rendering out a turntable video
- Complete the course which is going to be the first stepping stone to creating your 3D world and RPG game environment
Requirements
- To own a computer (Microsoft, Linux or Mac)
- To have downloaded Blender (available for free) and Unreal Engine 5
- A thirst to learn and excitement about 3D modelling, animation, and game engine integration
- To download all course resources including 27 unique seamless materials, 1 atlas material for the books, 1 trim sheet for gold decorations, 7 ornaments set up with PBR materials, 3 unique blood PBR materials, 2 transparency detail textures (i.e., straw and helmet feather), and 1 UE5 animation texture for the Niagara fire particle system. You will be getting a total of 297 texture maps.
Description
Course Description
Have you ever wanted to build an entire game world using 3D props and assets that will populate your space and envelop players in a medieval fantasy?
Join ‘Blender to Unreal Engine Become a Dungeon Prop Artist’ to take your 3D modelling skills up a notch! Graduate to the next level of game design through learning all about the Blender to Unreal Engine 5 (UE5) professional workflow for medieval dungeon props.
Build a small armory for your dungeon’s guard room, equipped with a couple of swords and a helmet next to a table with a candle on top, burning the night away as the guard’s sleep. And MUCH more!!
Learn how to create 50+ assets in over 30 hours!
We have designed the course from the ground up to make sure that no matter your skill level, you will easily be able to follow along and more importantly learn most of the skills to create your own 3D game prop set.
Our ‘Blender to Unreal Engine Become a Dungeon Prop Artist’ top 7:
- Learn how to create over 50 3D dungeon props from scratch
- Download over 100 unique texture maps for both Blender & Unreal Engine 5 (UE5), built exclusively for this course
- Create rope and chain geometry nodes with optional side bars for ease of use
- Join a complete guide on rendering out in both of Blender’s rendering engines – Eevee and Cycles – and master using Blender’s compositor for amazing professional renders
- Enjoy full Unreal Engine 5 (UE5) integration, giving you game-ready working 3D assets for your medieval dungeon environment and more
- Bring your 3D models and props to life with custom materials, adding decals like straw, blood, and stamps
- Become a Blender node guru by adding nodes to your imported maps to completely change the way they look and feel
I imagine you using these props in what is becoming 3D Tudor’s up-and-coming best seller, ‘Blender 3 to Unreal Engine 5 Dungeon Modular Kitbash’!
Think about it – all these assets would fit perfectly within the rooms we created, making your 3D dungeon game environment alive with the power of storytelling.
Although guillotines were introduced later than the medieval historical period our other assets are meant to depict, we thought you would enjoy learning how to make them as part of ‘Blender to Unreal Engine Become a Dungeon Prop Artist’. We will be ensuring that our model is structurally accurate. For example, we need to make sure that the structure can hold the weight of all its counterparts, including the blade.
What about creating an interior for your castle with ‘Creating a Modular Kitbash in Blender’ and using these to populate the space too and create an environment that everyone will talk about?
This course will give you access to just over 30 hours of 3D art in around 160 comprehensive lessons.
This course will see you learn all the techniques pros use and how they use them. Learn how to achieve realism using custom materials to create blood spatter that will look perfect for your torture chamber at the bottom of your dungeon!
Blender
Create the ‘Blender to Unreal Engine Become a Dungeon Prop Artist’ props and walk through the halls of your very own medieval dungeon with banners, cages, and a not-so-medieval but very torturous and iconic, guillotine.
Have you ever wanted to learn how to model gems and treasure coins to add that extra glow to your scene?
You will do just that!
‘Blender to Unreal Engine Become a Dungeon Prop Artist’ will see you build 3D props fit for the medieval dungeon of your dreams (or nightmares!), including but not limited to:
- House banners
- Wall cages
- Stocks like in Game of Thrones (GoT)
- A stretching rack
- A guillotine
- Traditional stocks
- A straw bed
- Table and chairs
- Torches
- A weapons rack
- Candles, books, parchment, gems, and other furniture
Master geometry nodes to speed up your workflow. You will be able to alter how a prop looks (i.e., its geometry) using node-based functions. We will also set up the geometry node variable menus in the modelling tab to save you time rather than going into the geometry nodes menu every time. I will also be introducing you to another hidden addon in Blender – the loop tools addon. It enables you to create circles and circles in geometry, allowing you to bridge your geometry with two clicks
Following the success of my latest courses, we will be modelling, texturing, and finalizing every individual asset before moving on to the next. Students have said that this has helped them in staying excited throughout the creation process, being able to see how their scene comes closer to the course preview step-by-step.
Of course, you could set yourself a challenge and diversify aspects of the medieval dungeon props such as changing the textures, adding different variations, or more assets such as different doors and smaller assets like chains on the wall to make your medieval dungeon more alive.
Find out how to set up materials Blender. Change them to suit your needs by adding adjustment modes and becoming a true texturing genius. For an extra touch of detail, you will learn how to use the grease pencil to draw lines to turn them into curves, and finally, into 3D mesh. This is a great technique for creating swirls and ornamental work.
Use ‘Blender to Unreal Engine Become a Dungeon Prop Artist’ to master UV editing using edge seam creation, custom projection and UV manipulation to make the best use of your seamless textures.
Instead of choosing one rendering engine over another, you will be learning how to use Blender’s Eevee and Cycles X renderers to get the most out of your prop presentation.
Unreal Engine 5
Through ‘Blender to Unreal Engine Become a Dungeon Prop Artist’ you will be learning everything right from importing individual models from Blender to having them work correctly in UE5. We will be manually importing our asset collection and setting up material instances for them. One of the most interesting parts of the UE5 part of this course will be that we will be setting up torch blueprints with realistic fire particle animation and light flicker to bring your scene to life.
We will look at how to import and use textures created specifically for Unreal Engine and use them to create the materials for our medieval dungeon props. You will find out how to change PBR texture values by directly adjusting their information from within, built in the image editor.
Next, we will set up PBR materials with adjustable parameters that will allow you to change the intensity of the normal map (e.g., adjust colour, change roughness values, and more). You will work through the different transparency materials that will help you set up cut-out decals, partially transparent decals with PBR values and two side-faced textures.
‘Blender to Unreal Engine Become a Dungeon Prop Artist’ will also be an introduction to how to set up files to create a clean UI. The skills you learn here are fully transferable to all your future builds.
One of the most exciting things about ‘Blender to Unreal Engine Become a Dungeon Prop Artist’ is that you will create collisions for your props to block out your playable character. This will help your assets fit in seamlessly within your ‘Blender 3 to Unreal Engine 5 Dungeon Modular Kitbash’, ready to test out with your UE5 character. To optimise your time, you will learn a method for placing your assets quickly within any type of game level.
Your UE5 milestone project will be to present your asset pack in Unreal Engine 5 and render out a turntable video.
Course Resources & Freebies
The ‘Blender to Unreal Engine Become a Dungeon Prop Artist’ resource pack includes 27 unique seamless materials, 1 atlas material for the books, 1 trim sheet for gold decorations, 7 ornaments set up with PBR materials, 3 unique blood PBR materials, 2 transparency detail textures (i.e., straw and helmet feather), and 1 UE5 animation texture for the Niagara fire particle system. You will be getting a total of 297 texture maps. You will be getting a total of 297 texture maps.
Join this course and come be part of a game design journey of over 30 hours of learning that will see you go away with over 50 game-ready medieval props for your dungeon in just 160 lessons.
Check out the free introduction and I am sure you won’t be able to put this course down!
To get you pumped, imagine how well this 3D props set fits in with your other 3D Tudor projects.
Be creative! Feature your medieval dungeon assets inside a medieval castle keep with ‘Creating a Modular Kitbash in Blender’. Also, think about using them in other medieval environments such as ‘Blender 3 The Ultimate Medieval Scene Course’, and adding more assets that would exist in farms such as bags of grain, a hearth, and different tables based on the skills you learned.
Pair up your guillotine with some gallows using ‘Blender to Unreal Engine 5 | 3D Props | Medieval Gallows’ to master the look of your medieval castle’s execution area. Use the full power of Blender 3 and Unreal Engine 5 (UE5) to your advantage.
Until next time, happy modelling everyone!
Neil – 3D Tudor
Who this course is for:
- Beginner 3D modellers eager to learn how to build medieval-themed AAA game-ready assets such as house banners, wall cages, stocks like in Game of Thrones (GoT), a stretching rack, a guillotine, traditional stocks, torches, and much more
- Enthusiasts of Blender who want to fast-track their understanding of its new and exciting changes
- Mid-Level 3D modellers who want to take their modelling to a new level and improve their workflow with tips and tricks
- RPG fans and dungeons and dragons (DND) players who want to walk through and experience a medieval dungeon environment
- Game designers who would like to design a set of over 50 3D game assets for an RPG medieval dungeon environment for games in Unreal Engine 5



 Channel