Ad Clicks : Ad Views : Ad Clicks : Ad Views : Ad Clicks : Ad Views : Ad Clicks : Ad Views :
Oh Snap!

It looks like you're using an adblocker. Adblockers make us sad. We use ads to keep our content happy and free. If you like what we are doing please consider supporting us by whitelisting our website. You can report badly-behaved ads by clicking/tapping the nearby 'Advertisement' X text.

SketchUp for Architecture

/

Release date:2019, February 12

Duration:05 h 36 m

Author:Paul J. Smith

Skill level:Intermediate

Language:English

Exercise files:Yes

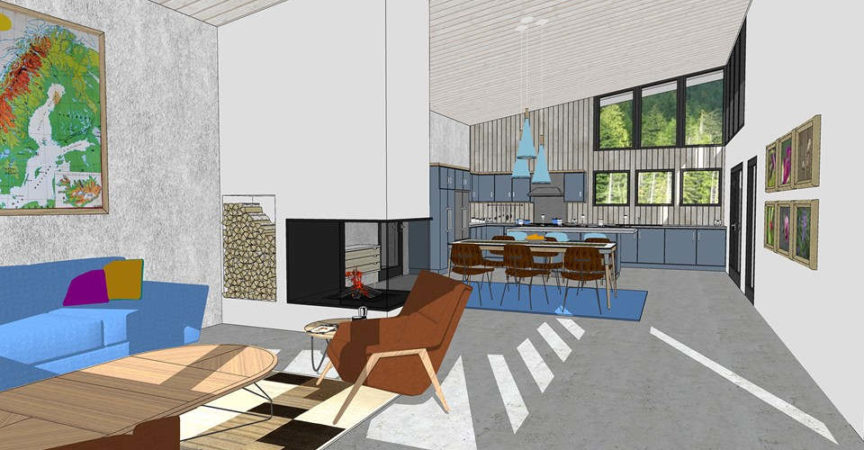
SketchUp for Architecture offers architects the information they need to get the most from SketchUp, the intuitive CAD program for transforming simple drawings into 3D presentations that will impress any client. This installment—the first in a three-part series—kicks off with an overview of the SketchUp interface and workflow and dives into a typical residential building project, taking students from creating the site plan to building the walls, floor, and roof of the house. Instructor Paul J. Smith also shows how to make models more realistic with materials and add believability with landscaping, fixtures, furnishings, and appliances. You can also see how to use styles and how to create the elevations and plans you’ll need to complete the rest of the courses in the training series. Plus, learn how to take advantage of organizational features in SketchUp such as layers and components.

Topics include:
Adjusting SketchUp settings
Creating components
Installing SketchUp plugins
Creating sweeps and revolves
Importing CAD drawings
Modeling a house
Adding walls, doors, and windows
Adding the roof
Creating textures
Applying materials to objects
Landscaping
Modeling interior details
Creating and saving styles
Creating plans and sections
Geolocating the model

Table of Contents

00. Introduction
Welcome to “SketchUp for Architecture” 2m 24s
What you should know before watching this course 1m 51s
Using the exercise files 36s

01. Setting Up SketchUp
Templates, toolbars, and model settings 4m 35s
Moving around the model 4m 31s
Understanding and creating components 6m 51s
Saving and loading components 6m 19s
What plugins are and where to find them 3m 51s

02. Working with SketchUp, Not Against It
Think like SketchUp 5m 34s
Sweeps and revolves 4m 20s
Inferencing and X-ray 5m 40s
Groups, components, and the Outliner window 6m 10s
Organizing your model with layers and scenes 4m 36s

03. Modeling the House
Introduction to modeling the house 2m 2s
Importing 2D CAD drawings 5m 17s
Adding the base 3m 48s
Building the external shell 5m 1s
Shaping the external shell slopes: Pro method 2m 56s
Shaping the external shell slopes: Make method 6m 9s
Forming the openings 5m 32s
Forming the high-level window openings 4m 24s
Adding the low-level doors and window 6m 45s
Adding the high-level windows: Front face 5m 11s
Adding the high-level windows: Side face 5m 50s
Topping off with the roof 4m 33s

04. Working with Materials
An introduction to working with materials 2m 8s
The Materials Editor: Windows interface 5m 11s
The Materials Editor: Mac interface 4m 11s
Applying materials to objects 4m 2s
Importing images as textures 5m 27s
Creating textures from scratch: Windows 3m 55s
Creating textures from scratch: Mac 3m 30s
Adding materials to walls 5m 15s
Adding materials to the roofs, doors, and windows 3m 30s
Modifying the material placement 4m 43s

05. Landscaping and External Features
Introduction to the landscaping 2m 4s
Adding the hardstanding 5m 35s
Adding the walls 3m 27s
Adding the wall coping 5m 44s
Adding the water feature 3m 18s
Adding the stepping-stones 4m 23s
Adding the path edge and infill 4m 6s
Adding the grass 4m 41s
Adding the grass border 7m 25s
Adding the external planting 3m 50s

06. Interior Furnishings
Introduction to modeling the interior fixtures 2 m 43s
Adding the chimney stack 4m 23s
Creating the fire pit 5m 6s
Creating the island unit 5m 1s
Building the low units 4m 7s
Building the high units 5m 31s
Building the left-side kitchen units 2m 13s
Adding the pelmet and base trim 5m 3s
Adding the work surface 5m 1s
Dropping in the sink top 6m 33s
Adding the cooker and hood 5m 9s
Adding the fridge 5m 26s
Decorating the west-wing interior 4m 42s
Loading the furniture and finishes 4m 56s

07. Styling the Model
Introduction to styling the model 1m 56s
The style window 4m 17s
Creating and saving a new style 5m 9s
Adding a watermark 4m 45s
Styles for section cuts 5m 11s

9. Scenes
Introduction to scenes 4m 4s
The scene window 5m 49s
Creating the elevation scenes 4m 2s
Creating the plans and sections 7m
Creating the Perspective views with shadows 4m 30s

09. Geolocating the Model
The importance of accurately locating the model 6m 14s
Mapping the shadows to the views 3m 28s
Animating a simple shadow study 5m Us

10. Conclusion
Next steps 2m 6s

Watch online or Download for Free

00. Introduction
01 – Welcome to SketchUp for Architecture
02 – What you should know before watching this course
03 – Using the exercise files

01. Setting Up SketchUp
04 – Templates, toolbars, and model settings
05 – Moving around the model
06 – Understanding and creating components
07 – Saving and loading components
08 – What plugins are and where to find them

02. Working with SketchUp, Not Against It
09 – Think like SketchUp
10 – Sweeps and revolves
11 – Inferencing and X-ray
12 – Groups, components, and the Outliner window
13 – Organizing your model with layers and scenes

03. Modeling the House
14 – Introduction to modeling the house
15 – Importing 2D CAD drawings
16 – Adding the base
17 – Building the external shell
18 – Shaping the external shell slopes – Pro method
19 – Shaping the external shell slopes – Make method
20 – Forming the openings
21 – Forming the high-level window openings
22 – Adding the internal walls
23 – Adding the low-level doors and window
24 – Adding the high-level windows – Front face
25 – Adding the high-level windows – Side face
26 – Topping off with the roof

04. Working with Materials
27 – An introduction to working with materials
28 – The Materials Editor – Windows interface
29 – The Materials Editor – Mac interface
30 – Applying materials to objects
31 – Importing images as textures
32 – Creating textures from scratch – Windows
33 – Creating textures from scratch – Mac
34 – Adding materials to walls
35 – Adding materials to the roofs, doors, and windows
36 – Modifying the material placement

05. Landscaping and External Features
37 – Introduction to the landscaping
38 – Adding the hardstanding
39 – Adding the walls
40 – Adding the wall coping
41 – Adding the water feature
42 – Adding the stepping-stones
43 – Adding the path edge and infill
44 – Adding the grass
45 – Adding the grass border
46 – Adding the external planting

06. Interior Furnishings
47 – Introduction to modeling the interior fixtures
48 – Adding the chimney stack
49 – Creating the fire pit
50 – Creating the island unit
51 – Building the low units
52 – Building the high units
53 – Building the left-side kitchen units
54 – Adding the pelmet and base trim
55 – Adding the work surface
56 – Dropping in the sink top
57 – Adding the cooker and hood
58 – Adding the fridge
59 – Decorating the west-wing interior
60 – Loading the furniture and finishes

07. Styling the Model
61 – Introduction to styling the model
62 – The style window
63 – Creating and saving a new style
64 – Adding a watermark
65 – Styles for section cuts

08. Scenes
66 – Introduction to scenes
67 – The scene window
68 – Creating the elevation scenes
69 – Creating the plans and sections
70 – Creating the Perspective views with shadows

09. Geolocating the Model
71 – The importance of accurately locating the model
72 – Mapping the shadows to the views
73 – Animating a simple shadow study

10. Conclusion
74 – Next steps

Ex_Files_SketchUp_for_Architecture.7z


Join us on
  Channel    and      Group

  • Facebook
  • Twitter
  • Google+
  • Linkedin
  • Pinterest

Leave a Comment

Your email address will not be published. Required fields are marked *