Author: Nalini Kanta Jena
Duration:23:31:00
Actual Duration:23h 31m
Release date:2018, August
Skill level:Beginner
Language:English
Exercise files:Yes
Course URL:https://www.udemy.com/stylized-character-modeling-sculpting-for-beginners/
What you’ll learn
Character Modeling & Sculpting in Zbrush
Retopology in Maya, Topogun & Zbrush
UV Unwrapping in Maya
Baking Maps in Substance painter
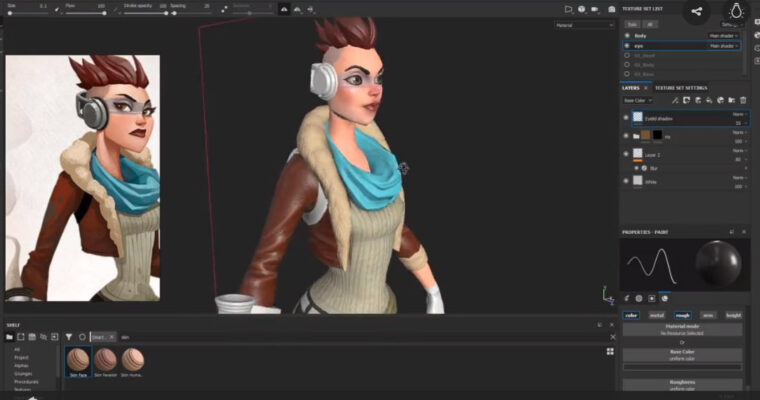
Texturing in Substance painter
Rendering in Substance Painter
Requirements
This course is for beginners so there isn’t any prior knowledge required. you can start from scratch.
You need to install Zbrush, Maya, Topogun and Substance painter for follow along.
You need to have a pen tablet for sculpting.
You need to have a strong desire and patients to learn these topics because it’s a 23 hour’s long course.
Description
Hi, Welcome to Character Modeling & Texturing For Game – Complete Pipeline Course.
In this course you will Learn to sculpt, retopo & texture an animation ready character for game in Zbrush, Maya, Topogun and Substance Painter.
Do you want to learn the full process to make a character for game ? if so then this is the course for you.
List of Major Components
Modeling and Sculpting Characters Using Zbrush
Retopology using Maya, Topogun & Zbrush
UV Unwrapping in Maya
Texturing Characters and Props Using Substance Painter
Baking Maps
Rendering in Substance Painter
Let’s see how the course is designed and what’s there for you. There would be 13 modules.
1st module – you will learn Zbrush from scratch, Sculpting and poly painting basics by working on a small stylized head project.
2nd module – I am going to start the main character project and you will learn how to start and block in the character from scratch using dynamesh and zsphere.
3rd module – you will learn how to block in the clothing of the character using different method I use in production.
4th module – you will learn how to define the face features and making it look beautiful.
5th module – you will learn how to sculpt stylized hair using zmodeler and some specific brush.
6th module – I will show you how to sculpt stylized clothing wrinkles.
7th module – you will learn all about modelling and sculpting hard surface object zmodeler, dynamesh and some other Technics
8th module – you will learn Maya Basics and this module is for absolute beginners.
9th module – I will do the character retopology in Maya, Topogun and Zbrush. We are going to start with Maya retopo and here you will learn how to use Quad draw tool for retopology. And then I am going to switch to Topogun a specialized retopo software, and you are going to learn it’s magical tools to retopo your character with speed. Then we are going to see how we can also use Zbrush to create low poly
10th module – you are going to learn character UV unwrapping using Maya 2018 new tool set. Here I am going to show you various ways to unwrap and some new powerful tools. And finally we are going to create the UV layout.
11th module – , I am going to start baking various maps such as Normal, Ambient occlusion, Curvature, position, thickness and Color ID map using Substance painter. I am also going to show you how to eliminates any errors in those maps.
12th module – we are going texture the character inside substance painter. First I am going to start with the very basics of the software and then I am going to texture the clothing, you are going to learn how to create leather jackets. Later I am going to make the character look a little dirty by adding a dirt layer. then I am going to work on the skin and the make up on the face and we are going to paint the eyes next. Then I will put some metal materials on the hard surface parts. Then you will learn how to create glowing emmisive parts. And finaly we are going to render our character with iray.
13th module – then in the final module, I am going to conclude and wrap up the course.
Ideal Students
I have designed this course keeping beginners in mind but it can be very useful for intermediate to advance character artist and students who wants to create their own characters from start to finish but struggles with it because they lack step by step guidance.
Who is the target audience?
Beginner to intermediate level 3d students and artists who wants to learn the full pipeline to create characters for game.
Curriculum
Zbrush Basic Sculpting & Poly Painting For Beginners 01:16:19
What is Zbrush? 02:27
How to Download & Install Zbrush 02:41
Download Concept Art and Resources 00:02
Interface Overview 06:52
Navigating the Canvas 03:54
Sculpting Basics – Head Blocking 11:19
Sculpting Basics – Blocking Face Features 10:47
Sculpting Basics – Refining the Features 09:57
Poly Painting the Face – Adding Base Tone 04:51
Poly Painting the Face – Adding color Zone 08:39
Poly Painting the Face – Adding Freckles 02:46
Eyeball Painting 07:59
Rendering and wrap up 04:05
Sculpting – Blocking the Body 54:06
Customizing Zbrush For Speed 05:18
Setting Reference Image in Zbrush 03:49
Different Ways to Block the Body 08:11
Block the Body Using Zsphere 11:05
Blocking the Basic Shapes with Dynamesh 08:05
Blocking the Hand Using Dynamesh 11:04
Blocking the Head and Wrap Up 06:34
Sculpting – Blocking the Clothing 34:34
Pant Blocking 03:32
Shoe Blocking 06:28
Jacket Blocking 10:18
Tshirt Blocking 03:21
Scarf Blocking 05:27
Gloves Blocking and Wrap Up 05:28
Sculpting – Detailing the Face & Body 39:08
Introduction to Sculptris Pro 02:48
Correcting Face Proportion 02:28
Making the Eyes 10:48
Detailing the Nose 03:57
Detailing the Lip 06:30
Creating the Eyebrows 06:22
Detailing the Hand and Wrap Up 06:15
Sculpting – Stylized Hair 41:40
Downloading and Installing Useful Brushes for Hair 04:45
Creating and Saving your Own Hair Blocking Brush 05:45
Using Gizmo to Bend and Manipulate Hair Clump 03:51
Blocking the Hair Style 09:01
Creating Sharp Edges for Stylized Look 07:22
Creating Hair Strand lines 04:47
Polishing Hair and Wrap up 06:09
Sculpting – Detailing the Clothing 02:20:52
Creating the Pant Belt 13:12
Adjusting Proportion at this Stage 08:55
Creating Belt Straps 16:18
Sculpting Pant Torn Part 07:25
Sculpting Pockets and Seams 08:57
Sculpting Stylized Folds 07:51
Refining Shoe Shapes 04:51
Adding Leather Folds 06:44
Modeling Strap and Buckle 12:26
Detailing the T shirt 16:04
Jacket Basic Shapes Adjustment 06:16
Fur Collar Sculpting 03:10
Adding Folds to the Jacket 10:10
Blocking the Scarf Folds 05:05
Polishing the Scarf Folds 05:23
Gloves Detailing Wrap Up 08:05
Sculpting – Hard Surface 03:42:00
Blocking the Bomb Holster 08:25
Detailing the Bomb Holster 16:05
Modeling the Scifi Bomb Clamp 16:50
Detailing the Scifi Bomb Using Panel Loop 11:40
Blocking the Head Phone 06:00
Detailing the Head Phone Ear Part 13:02
Defining the Back Part 18:23
Blocking the Back Fly Machine Strap and Body 13:44
Detailing the Fly Machine Body 18:27
Connecting the Strap to the Fly Machine 07:01
Blocking the Hand Machine Part 01 06:56
Blocking the Hand Machine Part 02 07:59
Detailing the Hand Machine Part 01 11:18
Creating the Circle 08:20
Detailing the Hand Machine Part 02 05:19
Detailing the Hand Machine Part 03 10:52
Creating the Pipe and Strap 09:23
Final Touch and Wrap up of High poly Sculpting in Zbrush Chapter 11:44
Decimating High poly Model for Retopo 16:48
Exporting Decimated Model for Maya and Wrap up 03:44
Maya Basics For Absolute Beginners 57:08
Interface Overview 09:23
Viewport Navigation 06:13
Viewport Display Modes 05:54
Creating Objects and Adjusting Inputs 07:54
Understanding Component and Object Mode 05:29
Selecting Objects and Components 07:55
Using Move, Rotate and Scale Tool 07:26
Using Layers 05:16
Saving Files and Wrap up 01:38
Retopology in Maya, Topogun and Zbrush 05:11:42
Why Retopo 08:56
Head Retopology – Part1 21:00
Head Retopology – Part2 14:50
Head Retopology – Part3 14:34
Using Topogun for Retopo 12:14
Body Retopology in Topogun- Torso Part01 15:21
Body Retopology in Topogun- Torso Part02 16:09
Body Retopology in Topogun- Torso Part03 11:22
Body Retopology in Topogun – Arm 06:31
Body Retopology in Topogun- Leg 14:33
Body Retopology in Topogun- Shoe 14:58
Body Retopology in Topogun- Hand and Fingers Part01 08:28
Body Retopology in Topogun- Hand and Fingers Part02 06:34
Body Retopology in Topogun – Leg Joint and Straps 11:07
Body Retopology in Topogun – Scarf 05:12
Retopology in Maya-Head phone 07:39
Retopology in Maya – Back Fly Machine 05:02
Retopology in Maya – Hand Machine Part01 08:27
Retopology in Maya – Hand Machine Part02 07:50
Retopology in Topogun – Hand Machine Pipe 09:43
Retopology in Zbrush – Hair Part01 07:19
Final Adjustments to the Hair 10:31
Retopology in Maya – Holster Part01 10:52
Retopology in Maya – Holster Part02 04:30
Refining the Body Low Poly 28:55
Retopology Small Parts 04:25
Clean Up Low Poly Mesh and Wrap Up 24:40
UV Unwrapping in Maya 02:42:39
Exploring UV Editor and Toolkit 09:38
Unwrapping Practice with Simple Objects 17:02
Unwrapping the Character Head 12:31
Unwrapping the Hair 09:23
Unwrapping the Head Phone 14:50
Unwrapping the Hand Machine Part01 09:47
Unwrapping the Hand Machine Part02 21:05
Unwrapping the Full Body – Hand 11:21
Unwrapping the Full Body – Leg 06:34
Unwrapping the Full Body – Torso 07:10
Unwrapping Small Parts 21:52
Crating a Rough Layout 06:33
Finalizing the Layouts 08:39
Clean Up and Exporting 06:14
Baking in Substance Painter 01:34:55
Substance Painter Overview 08:56
Understanding Maps 04:34
Baking Test Maps 09:09
Arranging Maya Files For Baking 12:09
Baking Normal Map 25:34
Baking Occlusion Map 07:54
Baking World space, Position and Curvature Map 04:07
Preparing Maya file for ID Map Baking 17:58
Baking ID Map and Wrap Up 04:34
Character Texturing in Substance Painter 02:50:56
Texturing Overview 16:25
Fixing the Symmetry Problem 07:05
Texturing the Scarf 09:56
Texturing the Leather Jacket 19:39
Texturing the Tshirt and Pant 06:01
Adding Dirt to the Character 06:32
Texturing the Leather Shoe 03:03
Texturing the Face Part01 13:00
Texturing the Face Part02 12:57
Texturing the Eyes 15:47
12.12-Texturing Metal Parts 05:23
Texturing Emissive Materials 12:29
Completing Material Assignments 06:21
Adding Dirt Patches 06:48
Adding Some Normal Details 04:55
Adding Stickering 05:52
Rendering Using Iray 18:43
Conclusion & Wrap up 05:40
Goodbye 01:00
Bonus Lecture – Next Course 04:40
Watch online or Download for Free



 Channel

Wow its super awesome to what you guys are doing on this platform enabling 3rd and 2nd world countries to learn without barrier. I have one request to pass here if you guys can give these whole course into one package to download this way it would not take much time and can be downloaded easily.
best
tech further
If you register your account on mediafile.cloud we can give you a VIP status for some reasonable time to get this downloaded.
I have register my account how can i get my VIP status?
we are not yet implement VIP functionality on online-courses website. Instead of this just get VIP subscribtion from mediafile.cloud. We store all courses there.
Thanks for motivate us to work harder )
can you add MographPlus tutorials
please specify which of courses below you more interested in:
MographPlus – Comprehensive Introduction to Corona for 3ds Max
MographPlus – Realistic Interior Visualization in VrayForC4d Industrial Style Room
MographPlus – What’s new in V-Ray 3.5 and 3.6
MographPlus – Comprehensive Introduction to Arnold for 3ds Max
Mographplus – Developing Realistic shaders in Arnold for Cinema 4d Vol. 01
Mographplus – Comprehensive Introduction to ARNOLD for Cinema 4d
Mographplus – Advanced 3d motion graphics in Cinema 4d and Realflow
Mograph+ – Comprehensive Introduction to Arnold 5 for Maya
MoGraph Mentor – Classical Animation Workflow & Techniques by Henrique Barone
Mograph Plus – The Ultimate Introduction To V-Ray for 3ds Max
Mograph Plus The Ultimate Introduction to Arnold 5 for Cinema 4d
Pluralsight – Cinema 4D Mograph Fundamentals
cmiVFX – Cinema 4D Ultimate Learning System 2.0 Volume 7 Mograph
cmiVFX – Houdini Mograph Methods (Project_Files Only)
Mograph Plus – Comprehensive introduction to VrayForC4d
FXPHD – MOG212 Production Tested Mograph: How to Work Fast and Flexible
cmivfx – Houdini Mograph Methods
Lynda – Mograph Techniques: Creating a Bouncy Cartoon Logo in CINEMA 4D
Video2brain Introducción al manejo de dinámicas y MoGraph en Cinema 4D – 2014 [Spanish]
plz upload these courses, everyone will be great full
gumroad.com/pavlovich
(especially ”intro to Zbrush part 01,02, and 03” in Eng. thanks)
can you please upload all series of- “ZBrush for Ideation Video Series by Michael Pavlovich”
and oh ya these too- “Intro to Zbrush by Michael Pavlovich”
thankyou
1. ZBrush for Ideation Video Series by Michael Pavlovich
2. Intro to Zbrush by Michael Pavlovich
on the way…
Gumroad – High Res / Game Res Creature Production (Bonus by Michael Pavlovich)
will upload too
thank you so much, I really wanted these tutorials very badly…
you have helped me a lot thanks
always welcome
HI, how i can download subttile from this video? thank you
follow this link [Udemy] Character Art School – Complete Character Drawing Course and download VTT files.
Is there anyway to get the resource files too? thank you for the course btw
can you upload a tutoroal about Speedtree creation for beginner? thankyou before for your all tuts, thats so helping me learn about CG art
can i download these videos all at once?