Ad Clicks : Ad Views : Ad Clicks : Ad Views : Ad Clicks : Ad Views : Ad Clicks : Ad Views :
Oh Snap!

It looks like you're using an adblocker. Adblockers make us sad. We use ads to keep our content happy and free. If you like what we are doing please consider supporting us by whitelisting our website. You can report badly-behaved ads by clicking/tapping the nearby 'Advertisement' X text.

Zbrush 2021 Character Likeness Sculpting Tutorial

Release date:2021, June 8

Author:Victor Yamakado

Skill level:Intermediate

Language:English

Exercise files:Yes

Are you looking for a course that explains the full process of sculpting a character likeness in ZBrush?

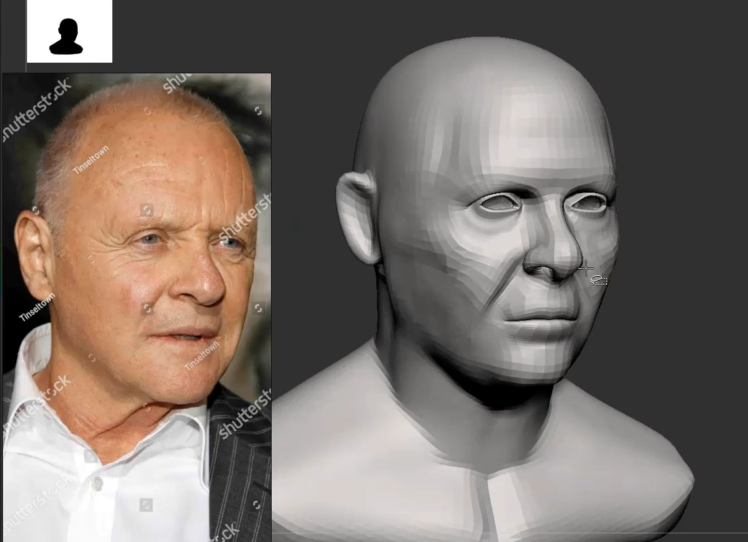
Would you like to better understand how I sculpt a realistic portrait, using just photo references and anatomical knowledge?

If this is the case, then I welcome you to Nexttut Education’s “Zbrush Character Likeness Sculpting” course.

My name is Victor Yamakado, I’m a 3d character artist with 10 years of experience in 3d art. I’ve been working for many years with Character Sculpting for collectibles and character modelling for production.

In this course, I want to share with you all the way I do for creating a complete and realistic portrait of Anthony Hopkins and make you fully introduced into this amazing journey of studying and recreating famous portraits. This surely is the most challenging skill that a 3d character modeller can have, once we needs to be always concerned on developing our perception and sculpting skills.

By sharing my process, I really want to make you open your eyes and take a whole new look at how do you perceive your references and how could you translate it in the sculpture process.

We will develop a stronger perception, by using many techniques for comparing distances, comparing a lot specific facial shapes and also understanding some of the most important features on the anatomical structures of the human face.

We will learn to identify these features in the reference and check if they are quite the same on the model.

We start by building a pretty simple and generic basemesh, focusing on a good topology for doing portraits.

Then we’re gonna to sculpt firstly the Primary forms, capturing the overall likeness on volumes and silhouettes.

After we break the symmetries and we start the fun! We’re gonna try to match even more the overall volume, but now we start to sculpt realistic skin wrinkles and folding on the face.

And finally, we’ll cover my whole process of doing the surface details like skin pores or the Tertiary forms, as they are usually called. And for this, we will focus on using just the default alphas we have on Zbrush, this way everyone will be able to make an amazing realistic skin detail, blending and fully understanding how to apply each one of them.

Not satisfied yet? Moreover, we’ll also cover how do I modelled, sculpted and detailed his cloths, how did I do his hair with fibermesh and also how to do a really nice polypainting on your model, even on a greyscale presentation, simulating skin tones and a realistic eyes painting.

This course is focused on Intermediate Zbrush users who really want to take their sculpting and perceptions skills to a next level.

If you want to join in me into this journey, so prepare your coffee and let’s start to sculpt together!

Watch online or Download for Free

1. Introduction01. Zbrush Custom User Interface
02. Reference Images
03. How can we start

2. Sculpting the Head
01. Dynamesh Generic Base
02. Dynamesh Generic Base – part 02
03. Understanding Loops and ZRemeshing Base
04. Starting to match the references
05. Comparing distances, camera angle and focal length
06. Negative spaces, silhouettes and reading volume
07. Structures on three-quarter view
08. Forms perception plus anatomical knowledge
09. Some anatomical structures
10. Understanding Cranium Structures
11. Reading Cranium Structures on References
12. Cranium Structures on Anthony
13. Measurements and Life Masks
14. Comparative Lines
15. Ears Anatomy and Structures
16. Sculpting Ears
17. Sculpting Ears – part 02
18. Starting to read asymmetries
19. Breaking Symmetry
20. Eyelids and some initial wrinkles
21. Copying more wrinkles and structures
22. Anatomical Structures around the Eyes
23. Understanding some wrinkles
24. Comparing small shapes
25. Eyebags and wrinkles
26. Comparing overall silhouettes
27. Nose Anatomy and asymmetries
28. Mouth Anatomy and fat pads
29. Sculpting the mouth
30. Mouth and chin shapes
31. Anatomy of the Neck
32. Sculpting the Neck
33. Polypainting the eyes – part 01
34. Polypainting the eyes – part 02
35. Polypainting the eyes – part 03
36. Adjusting Eyes Poly painting on Photoshop
37. Sculpting the interior Mouth
38. Sculpting teeth and gums
39. Using Spotlight as Reference
40. Matching forms with Spotlight
41. Starting to sculpt Secondary shapes
42. Sculpting some surface wrinkles
43. Wrinkles on the right side
44. Wrinkles on the left Eye bag
45. Small wrinkles around the eyes
46. Small wrinkles and breaking surface uniformity
47. Comparing small shapes
48. Others materials can change perception
49. Matching more small features
50. Comparing versions
51. Modeling the cloth – Blazer
52. Blazer collar with ZModeler
53. Modeling the T-Shirt with ZModeler
54. Collar topology adjustment and thickness on cloths
55. Adjusting Cloth Shapes and Saving Polycount
56. Sculpting wrinkles, folds and seams on clothing
57. Preparing polygroups for right UVs
58. More Cloth sculpting and detailing
59. Unwrapping UVs with UV Master
60. Correcting UVs position for detailing
61. Surface detailing with Noise Maker
62. Detailing T-Shirt
63. Refining Details on Blazer

3. Skin Detailing
01. Analysing skin pores and alphas
02. Analysing skin alphas
03. Getting more high res references
04. Starting to sculpt skin pores
05. Pores Directions
06. Overall Pores and Slash1 brush
07. More steps on pores detailing
08. More study on skin pores directions
09. Adjusting Pores intensity with layers
10. Refining wrinkles with Slash1
11. Greyscale poly painting – part 01
12. Greyscale poly painting – part 02

4. Hair Making
01. Creating hair with Fibermesh
02. Refining Hair and Creating Eyebrows
03. Some Fibermesh Parameters and Eyebrows
04. Some Render Parameters and last refinements

5. Rendering Presentation
01. Refining the eyes poly paint – part 01
02. Refining the eyes poly paint – part 02
03. Refining the eyes poly paint – part 03
04. Small refinements on overall poly paint
05. Render, lights and material settings
06. Compositing light passes on Photoshop and post-fx
05. Render, lights and material settings.srt

[Udemy] Zbrush 2021 Character Likeness Sculpting Tutorial_Subtitles.7z
[Udemy] Zbrush 2021 Character Likeness Sculpting Tutorial.7z


Join us on
  Channel    and      Group

  • Facebook
  • Twitter
  • Google+
  • Linkedin
  • Pinterest

2 Comments

  1. Hey, can you upload this course?it would be great.

    https://www.vertexworkshop.com/hard-surface-modeling-with-patrick-van-rooijen

    thank you soo much man for all the courses.

Leave a Comment

Your email address will not be published. Required fields are marked *