Ad Clicks : Ad Views : Ad Clicks : Ad Views : Ad Clicks : Ad Views : Ad Clicks : Ad Views :
Oh Snap!

It looks like you're using an adblocker. Adblockers make us sad. We use ads to keep our content happy and free. If you like what we are doing please consider supporting us by whitelisting our website. You can report badly-behaved ads by clicking/tapping the nearby 'Advertisement' X text.

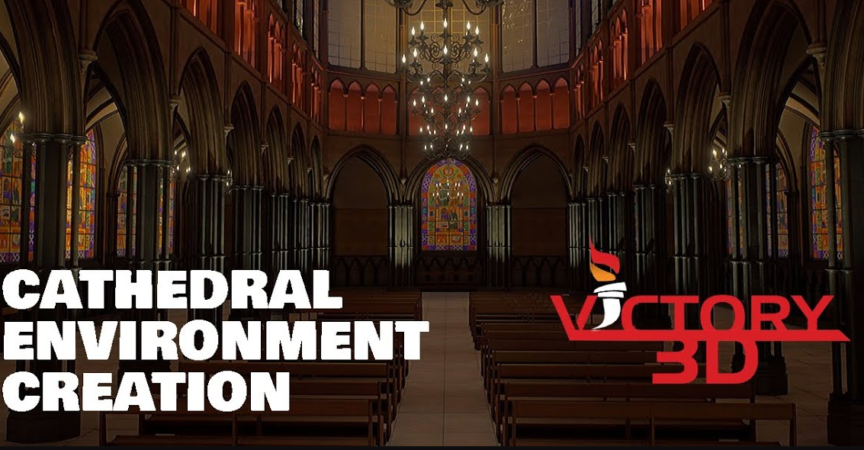
3D Game Environment Cathedral Creation

Release date:2020

Author:Emiel Sleegers

Skill level:Beginner

Language:English

Exercise files:Not Provided

In this course, we will go through the steps of creating an environment from start to finish which includes modeling, texturing, material creation, world building, lighting and post effects.

The major topics we will be covering are:

-Modeling intricate super-detailed architectural scene
-Creating tileable textures to use on our structural pieces
-Creating props with their own unique textures
-Creating detailed materials in Unreal engine
-Building a level in Unreal engine
-Creating day lighting and night lighting
-Adding post effects for our level

By the end of this course, you will be able to create an amazing game-ready interior environment. You will gain knowledge on how to create detailed modular objects, how to create clean tileable textures and how to work within unreal engine 4 to take a level to final including level art, lighting and post effects.

Watch online or Download for Free

001 – Going Over Our Reference
002 – Creating Our Blockout Part 1
003 – Creating Our Blockout Part 2
004 – Creating Our Blockout Part 3
005 – Creating Our Blockout Part 4
006 – Creating Our Blockout Part 5
007 – Creating Our Blockout Part 6
008 – Creating Our Blockout Part 7
009 – Creating Our Blockout Part 8
010 – Creating Our Blockout Part 9
011 – Creating Our Blockout Part 10
012 – Start Creating the Base Pillar
013 – Finish Creating the Base Pillar
014 – Creating Our Main Archway Part 1
015 – Creating Our Main Archway Part 2
016 – Creating Our Main Archway Part 3
017 – Creating Our Main Archway Part 4
018 – Creating Our Main Archway Part 5
019 – Creating Our Back Wall Part 1
020 – Creating Our Back Wall Part 2
021 – Creating Our Back Wall Part 3
022 – Creating Our Back Wall Part 4
023 – Creating Our Back Wall Part 5
024 – Creating Our Back Wall Part 6
025 – Creating the Ground Floor Ceiling Part 1
026 – Creating the Ground Floor Ceiling Part 2
027 – Creating the Ground Floor Ceiling Part 3
028 – Creating the Ground Floor Ceiling Part 4mp4
029 – Creating the Ground Floor Ceiling Part 5
030 – Creating the Center Walkway
031 – Creating the Top Window Part 1
032 – Creating the Top Window Part 2
033 – Creating the Top Window Part 3
034 – Creating the Main Ceiling Part 1
035 – Creating the Main Ceiling Part 2
036 – Start Optimization on Our Modular Pieces
037 – Finish Optimization on Our Modular Pieces
038 – Creating the Back of the Cathedral Part1
039 – Creating the Back of the Cathedral Part 2
040 – Creating the Back of the Cathedral Part 3
041 – Creating the Back of the Cathedral Part 4
042 – Creating the Back of the Cathedral Part 5
043 – Creating the Back of the Cathedral Part 6
044 – Creating the Back of the Cathedral Part 7
045 – Creating the Back of the Cathedral Part 8
046 – Creating the Back of the Cathedral Part 9
047 – Creating the Entrance of the Cathedral Part 1
048 – Creating the Entrance of the Cathedral Part 2
049 – Creating the Entrance of the Cathedral Part 3
050 – Creating Our Brick Material Height Map Part 1
051 – Creating Our Brick Material Height Map Part 2
052 – Creating Our Brick Material Height Map Part 3
053 – Creating Our Brick Material Normal Map
054 – Creating Our Brick Material Base Color Part 1
055 – Creating Our Brick Material Base Color Part 2
056 – Creating Our Brick Material Base Color Part 3
057 – Creating Our Brick Material Base Color Part 4
058 – Exposing the Values on Our Brick Material
059 – Final Polish on Our Brick Material
060 – Creating Our Plaster Material
061 – Creating Our Floor Material Part 1
062 – Creating Our Floor Material Part 2
063 – Unwrapping Our Modular Pieces Part 1
064 – Unwrapping Our Modular Pieces Part 2
065 – Unwrapping Our Modular Pieces Part 3
066 – Unwrapping Our Modular Pieces Part 4
067 – Unwrapping Our Modular Pieces Part 5
068 – Unwrapping Our Modular Pieces Part 6
069 – Unwrapping Our Modular Pieces Part 7
070 – Unwrapping Our Modular Pieces Part 8
071 – Unwrapping Our Modular Pieces Part 9
072 – Unwrapping Our Modular Pieces Part 10
073 – Start Importing Our Arch into Unreal Engine
074 – Creating Our Master Material in Unreal Engine Part 1
075 – Creating Our Master Material in Unreal Engine Part 2
076 – Creating Our Master Material in Unreal Engine Part 3
077 – Creating Our Master Material in Unreal Engine Part 4
078 – Setting Up Our Materials in Unreal Engine
079 – Start Creating Our Trim Sheet Material Part 1
080 – Start Creating Our Trim Sheet Material Part 2
081 – Start Creating Our Glass Windows Part 1
082 – Start Creating Our Glass Windows Part 2
083 – Preparing All Our Objects for Export to Unreal Engine Part 1
084 – Preparing All Our Objects for Export to Unreal Engine Part 2
085 – Preparing All Our Objects for Export to Unreal Engine Part 3
086 – Preparing All Our Objects for Export to Unreal Engine Part 4
087 – Start Painting Our Masks Part 1
088 – Start Painting Our Masks Part 2
089 – Start Setting Up Our Objects in Unreal Part 1
090 – Start Setting Up Our Objects in Unreal Part 2
091 – Fixing Our Lightingmap and Material Problems
092 – Creating Our Windows and Building Our Scene Part 1
093 – Creating Our Windows and Building Our Scene Part 2
094 – Creating Our Tileable Glass Texture
095 – Placing Our New Glass Material
096 – Fixing Some Lighting and UV Problems
097 – Setting Up Some Basic Lighting
098 – Balancing Our Materials Part 1
099 – Balancing Our Materials Part 2
100 – Fixing our glass materials
101 – Doing Our First Post Effect Pass
102 – Doing Our Second Lighting Pass Part 1
103 – Doing Our Second Lighting Pass Part 2
104 – Creating Our Bench Part 1
105 – Creating Our Bench Part 2
106 – Creating Our Chandelier Part 1
107 – Creating Our Chandelier Part 2
108 – Creating Our Chandelier Part 3
109 – Creating Our Chandelier Part 4
110 – Creating Our Chandelier Part 5
111 – Setting Up Our Night Scene Part 1
112 – Setting Up Our Night Scene Part 2
113 – Setting Up Our Night Scene Part 3
114 – Final Polish of Our Scene

3D Game Environment Cathedral Creation project files.7z.001
3D Game Environment Cathedral Creation project files.7z.002


Join us on
  Channel    and      Group

  • Facebook
  • Twitter
  • Google+
  • Linkedin
  • Pinterest

4 Comments

  1. Hi Strawberry!, I hope you guys are doing very well, I hope you can manage to upload all of these courses here, it would really made my year if that happens 🙂

    https://www.21-draw.com/course/anatomy-gesture/

    https://www.21-draw.com/course/draw-cartoon-character/

    https://www.21-draw.com/course/environment-design/

    https://www.21-draw.com/course/character-design/

    https://www.21-draw.com/course/lighting-shading/

    https://www.21-draw.com/course/digital-drawing-in-procreate-beginners/

    https://www.21-draw.com/course/character-driven-illustrations/

    https://www.21-draw.com/course/bring-your-characters-to-life/

    https://www.21-draw.com/course/fundamentals-of-drawing/

    https://www.21-draw.com/course/fundamentals-of-character-design/

    https://www.21-draw.com/course/stylized-figure-drawing-in-spanish/

    https://www.21-draw.com/course/drawing-female-characters/

Leave a Comment

Your email address will not be published. Required fields are marked *