Ad Clicks : Ad Views : Ad Clicks : Ad Views : Ad Clicks : Ad Views : Ad Clicks : Ad Views :
Oh Snap!

It looks like you're using an adblocker. Adblockers make us sad. We use ads to keep our content happy and free. If you like what we are doing please consider supporting us by whitelisting our website. You can report badly-behaved ads by clicking/tapping the nearby 'Advertisement' X text.

Master Hard Surface Modeling in Maya 2020

/

Release date:2020, September 17

Author:Digital Saucer Studios

Skill level:Beginner

Language:English

Exercise files:Yes

You will learn how to master hard surface modeling in Maya.

You will begin by understanding the basic concepts of modeling in Maya.

You will learn Maya’s powerful modeling tools.

You will learn where the tools are located, how to use the tools, why to use the tools and when to use the tools.

You will learn the tool options, the shortcuts, and the best and most efficient way to use the tools.

Tools you will learn include:

Bevel Tool

Insert Edge Loop Tool

Multi-Cut Tool

Mirror Tool

Bridge Tool

Extrude Tool

Boolean Tool

Slide Edge Tool

Edit Edge Flow Tool

Combine/Separate/Extract/Duplicate

And many, many more tools.

You will learn professional tips and tricks that will make you a better modeler.

You will learn the difference between bad and good geometry, how to fix bad geometry, what mistakes to avoid and how to fix common problems.

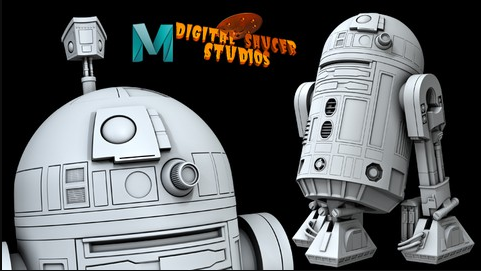
This course is project-based so you will dive into the modeling process by creating R2-D2, the famous robot from Star Wars.

First, you will learn how to block out R2-D2 from using image planes.

You will learn how to create simple primitive polygons to block out the shape and form.

You will learn how to detail the shapes and how to create supporting edges and where to place resolution in order to create the model you want to make.

You will learn that you are in control of the modeling process and that there is nothing to fear from the modeling process.

My techniques are designed for you to learn at your own pace as I go through every step from start to finish.

You will learn how to create R2-D2’s dome head, all the panels and buttons.

You will learn how to create all the panels and buttons on the body, and finally all the details on the legs.

You will learn some simple rigging techniques that will allow you to control some of R2-D2s tools, like the periscope that comes out of his head, and also a panel that slides open to reveal Luke Skywalker’s Lightsaber.

You will learn how to animate the periscope so it will look like R2-D2 is looking around.

You will learn how to animate the sliding panel so the Lightsaber can shoot out, just like in Return of the Jedi when R2-D2 threw the Lightsaber at Luke.

Finally, you will learn how to present R2-D2 as if you were showing the model to an employer, like a movie studio or a game company.

You will learn how to use lighting techniques and render R2-D2 to create a brilliant finished piece to show to professionals and/or to put on social media.

This course is in-depth with tons of tips, tricks and techniques that will give you the confidence you need to begin creating your own 3D models in Maya.

Watch online or Download for Free

1. Introduction
1. Introduction

2. Modeling the Robot Character R2-D2
001. Setting Up a New Project
001.1 Files.007z
002. Quick Tour of the Interface
003. Setting Up the Image Planes
004. Resizing the Image Planes
005. Blocking Out the Head and Body
006. Blocking Out the Leg
007. Blocking Out the Head Details Part 001
008. Blocking Out the Head Details Part 002
009. Blocking Out the Front Eye
010. Blocking Out the Head Details Part 003
011. Blocking Out Head Details Part 004
012. Blocking Out the Head Details Part 005
013. Blocking Out the Head Details Part 006
014. Blocking Out the Head Details Part 007
015. Blocking Out the Body Details Part 001
016. Blocking Out the Body Details Part 002
017. Blocking Out the Body Details Part 003
018. Blocking Out the Body Details Part 004
019. Blocking Out the Body Details Part 005
020. Blocking Out the Body Details Part 006
021. Blocking Out the Body Details Part 007
022. Blocking Out the Body Details Part 008
023. Blocking Out the Bottom
024. Blocking Out the Feet Part 001
025. Blocking Out the Feet Part 002
026. Blocking Out the Feet Part 003
027. Blocking Out the Feet Part 004
028. Blocking Out the Foot Part 005
029. Adding Details to the Head Part 001
030. Adding Details to the Head Part 002
031. Finishing the Pie Panels
032. Creating the Periscope Part 001
033. Creating the Periscope Part 002
034. Creating the Periscope Part 003
035. Creating the Periscope Part 004
036. Blocking Out the Lightsaber
037. Finishing the Lightsaber
038. Creating the Top Holoprojector
039. Creating the Radar Eye Part 001
040. Creating the Radar Eye Part 002
041. Finishing the Dome Panels Part 001
042. Finishing the Dome Panels Part 002
043. Finishing the Dome Panels Part 003
044. Creating the Back Holoprojector
045. Finishing the Dome Panels Part 004
046. Finishing the Dome Panels Part 005
047. Creating the Processor State Indicator
048. Finishing the Dome Panels Part 006
049. Finishing the Front Holoprojector
050. Creating the Large Data Port
051. Creating the Utility Arms
052. Creating the Body Panels Part 001
053. Creating the Body Panels Part 002
054. Creating the Body Panels Part 003
055. Creating the Body Panels Part 004
056. Creating the Coin Slots
057. Creating the Front Vents
058. Making Changes to Some of the Panels
059. Creating the Coin Return
060. Creating the Polarity Sink Part 001
061. Creating the Polarity Sink Part 002
062. Creating the Power Coupler
063. Creating the Octagon Port Part 001
064. Creating the Octagon Port Part 002
065. Creating the Side Panels
066. Cleaning Up the Geometry
067. Finishing the Back Panels Part 001
068. Finishing the Back Panels Part 002
069. Finishing the Back Panels Part 003
070. Finishing the Back Panels Part 004
071. Finishing the Back Panels Part 005
072. Finishing the Back Panels Part 006
073. Finishing the Back Panels Part 007
074. Finishing the Legs Part 001
075. Finishing the Legs Part 002
076. Finishing the Legs Part 003
077. Finishing the Legs Part 004
078. Finishing the Legs Part 005
079. Finishing the Legs Part 006
080. Finishing the Legs Part 007
081. Finishing the Legs Part 008
082. Finishing the Legs Part 009
083. Finishing the Legs Part 010
084. Finishing the Legs Part 011
085. Finishing the Legs Part 012
086. Finishing the Legs Part 013
087. Finishing the Legs Part 014
088. Finishing the Legs Part 015
089. Finishing the Legs Part 016
090. Finishing the Legs Part 017
091. Finishing the Legs Part 018
092. Finishing the Legs Part 019
093. Finishing the Legs Part 020
094. Finishing the Legs Part 021
095. Finishing the Legs Part 022
096. Finishing the Legs Part 023
097. Finishing the Legs Part 024
098. Finishing the Legs Part 025
099. Finishing the Legs Part 026
100. Finishing the Legs Part 027
101. Finishing the Legs Part 028
102. Finishing the Legs Part 029
103. Finishing the Legs Part 030
104. Finishing the Legs Part 031
105. Finishing the Legs Part 032
106. Finishing the Legs Part 033
107. Finishing the Legs Part 034
108. Finishing the Feet Part 001
109. Finishing the Feet Part 002
110. Finishing the Feet Part 003
111. Finishing the Feet Part 004
112. Finishing the Feet Part 005
113. Finishing the Feet Part 006
114. Finishing the Feet Part 007
115. Finishing the Feet Part 008
116. Finishing the Feet Part 009
117. Finishing the Feet Part 010
118. Finishing the Feet Part 011
119. Finishing the Feet Part 012
120. Finishing the Feet Part 013
121. Finishing the Feet Part 014
122. Finishing the Feet Part 015
123. Finishing the Feet Part 016
124. Finishing the Feet Part 017
125. Finishing the Feet Part 018
126. Finishing the Feet Part 019
127. Finishing the Feet Part 020
128. Finishing the Feet Part 021
129. Finishing the Feet Part 022
130. Finishing the Bottom Part 001
131. Finishing the Bottom Part 002
132. Finishing the Main Body Part 001
133. Finishing the Main Body Part 002
134. Finishing the Main Body Part 003
135. Finishing the Main Body Part 004
136. Finishing the Main Body Part 005
137. Finishing the Main Body Part 006
138. Cleaning Up the Scene
139. Finishing the Chest Pieces Part 001
140. Finishing the Chest Pieces Part 002
141. Finishing the Chest Pieces Part 003
142. Finishing the Head
143. Posing the Model
144. photo_studio_001_004k.7z
144. Rendering

[Udemy] Master Hard Surface Modeling in Maya 2020_Subtitles.7z


Join us on
  Channel    and      Group

  • Facebook
  • Twitter
  • Google+
  • Linkedin
  • Pinterest

7 Comments

  1. sir do you have wlops beginner fundamentals 8-13 anatomy and composition…and why i am unable to join telegram group…it do not let me entering because of some cpyrights claims

  2. Thank you so much!!!
    Can you please, upload this course?
    https://www.domestika.org/es/courses/163-tecnicas-de-grabado-digital

  3. brother i guess site is down or something on download page page is empty in every project no course is showing on download and watch page

Leave a Comment

Your email address will not be published. Required fields are marked *