Magical Energy Beam – Houdini & Nuke VFX Course by Voxyde

Release date:2023, February
Skill level:Beginner
Language:English
Exercise files:Yes
Course URL:https://voxyde.gumroad.com/l/pndia
Welcome to a new Houdini Course: Magical Energy Beam
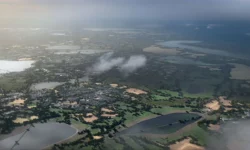
In this course, we will create this entire VFX shot from start to finish with Houdini, Nuke & Redshift!
Volumetric Clouds
We will start in Houdini by creating the clouds using geometry as a base, then we will use Volume VOPs to remove density, and twist and deform our volumes to animate the clouds.
Particle Shockwave
We will create a pyro simulation for the shockwave effect and use the velocity to drive our particles.
We will look into different ways to modify the velocity advection for the particles to create a more unique and magical look.
I will also show you some quick and easy ways to create more exciting colors with a lot of detail.
Volumetric Fog
For the fog, we’re going to create custom noise patterns that we can layer together to get a more realistic result.
Here, we’ll also go over the best way to optimize our render by splitting the fog into separate parts.
Beam FX
Finally, we will create the energy beam with some simple volume manipulation.
Terrain Creation
As a bonus, I also cover creating the terrain inside Houdini and Substance Painter.
Rendering – Redshift
In the rendering section, we will separate all our components into layers.
We will create individual light setups for everything, set up all the materials, render passes, and render everything using Redshift.
Nuke
In Nuke, we will bring all of our renders and start putting everything together.
We will separate the AOVs for each layer so we can have complete control over the final output.
We’re going to cover various topics, such as using expressions to automate animations, creating and adding 3D elements to our shot, and a bunch of general tips and tricks you can use in any project.
01 overview
02 clouds geo
03 clouds volume
04 volume deform subtract
05 volume deform push
06 volume deform twist
07 clouds finish
08 Shockwave Source Velocity Field
09 Shockwave Pyro Solver
10 Shockwave Particles Base
11 Shockwave Particles Refine
12 Shockwave Particle Color
13 Shockwave Follow Clouds
14 Shockwave Retime Fade Out
15 Fog Back
16 Fog Front
17 Beam Volume
18 BONUS Mountain Heightfield Setup
19 Download Renders
20 Cloud Render Setup
21 CLouds Lighting Setup
22 Mountain Render Setup
23 Mountain Custom AOVs
24 Shockwave Render
25 Fog Render
26 Beam Render
27 Sky Setup
28 Clouds Base
29 Clouds Refine
30 Lightning Keyframes
31 Lightning Offset Expression
32 Shockwave Comp
33 Mountain Comp
34 Fog Comp
35 Beam and Final Touches
36 Course Finish
[Gumroad] Magical Energy Beam – Houdini & Nuke VFX Course by Voxyde.7z.rar
[Gumroad] Magical Energy Beam – Houdini & Nuke VFX Course by Voxyde_Subtitles.7z