Ad Clicks : Ad Views : Ad Clicks : Ad Views : Ad Clicks : Ad Views : Ad Clicks : Ad Views :
Oh Snap!

It looks like you're using an adblocker. Adblockers make us sad. We use ads to keep our content happy and free. If you like what we are doing please consider supporting us by whitelisting our website. You can report badly-behaved ads by clicking/tapping the nearby 'Advertisement' X text.

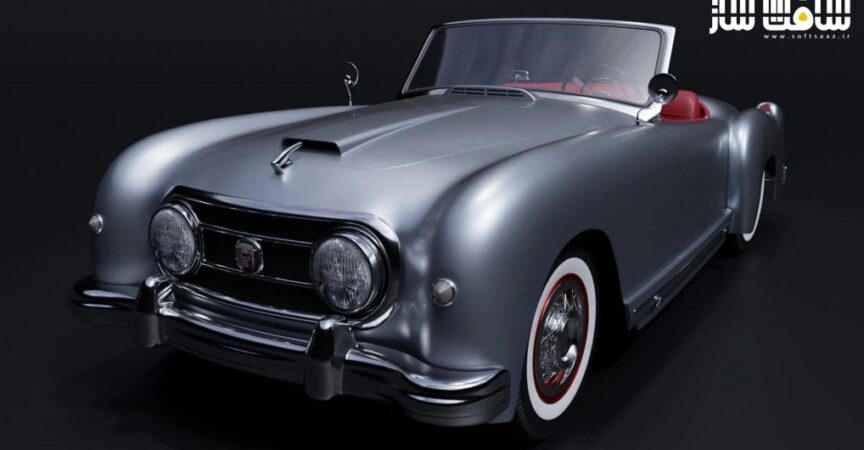
Blender 3.0 Vintage Car Creation by Darrin Lile

/

Release date:2022, February

Author:Darrin Lile

Skill level:Beginner

Language:English

Exercise files:Yes

What Will I Learn?

  • Blender 3D Modeling Tools
  • Subdivision Surface Modeling
  • Blender’s Node Editor
  • Lighting and HDR Images
  • Blender’s Cycles Renderer
  • Animating in Blender
  • Blender’s Video Sequence Editor

Requirements
You will only need Blender 3.0 for this course. No other software is required.

Description
In this course we will create a 1952 Nash-Healey Roadster. This is a rare gem of a car; only about 500 were ever made. But we’re going to create one using Blender 3.0, from the first polygon to the final rendered animation. If you’ve ever wanted to create realistic, detailed models of complex objects, then this course is for you. Not only will you learn modeling tools and techniques, but you will also learn how to use reference images, stay organized, and manage a large project in Blender.

We will begin with the body of the car, creating the underlying shape. And then, using Blender’s Shrink Wrap modifier, we will mold each panel to that shape, so we get a precise fit between each of the pieces. Next we will work on modeling the various external parts of the car. We will create the chrome details using Blender’s Subdivision Surface modifier. And we will create the tire treads and spoked hubcaps using the Array Modifier. We will then model the various pieces of the car’s interior, keeping an eye on our reference images to bring the details to life.

When the modeling is complete, we will create materials and textures for the car, using Blender’s Node Editor. And finally, we will light and render the scene using the Cycles render engine. We’ll also have some fun animating the camera around the car and create a short video using Blender’s Video Sequence Editor.

Learn fundamental Blender tools and techniques while creating this rare classic car, with “Blender 3.0 Vintage Car Creation.”

Who is the target audience?
Beginner Blender artists with some knowledge of the user interface.

Watch online or Download for Free

01 – Working with Reference Images
01. Course Overview
02. Preparing the Reference Images
03. Setting Up Reference Images in Blender

02 – Creating the Car Body
01. Beginning the Modeling
02. Modeling the Hood
03. Extruding the Hood Vent
04. Using the Shrinkwrap Modifier for Smoothing
05. Beginning the Front Fender
06. Continuing the Fender
07. Beginning the Side of the Car
08. Continuing with the Side
09. Connecting the Fender and Hood
10. Extending the Hood to the Cab
11. Beginning the Back of the Car
12. Starting the Rear Fender
13. Working on the Rear Fender
14. Finishing the Back
15. Creating the Exterior Panels
16. Conforming the Front Panels
17. Finishing the Panels

03 – Modeling the External Pieces of the Car
01. Modeling the Grill Rim
02. Creating the Headlights
03. Grill Rim Redux
04. Modeling the Grill Bars and Emblem
05. Creating the Front Bumper
06. Modeling the Front Turn Signal
07. Using the Boolean Modifier
08. Using Blenders Path Tool
09. Creating the Windshield with NURBS Surfaces
10. Modeling the Windshield Frame
11. Creating the Hood Ornament
12. Beginning the Rear Bumper
13. Finishing the Rear Bumper
14. Beginning the Tail Lights
15. Finishing the Tail Lights
16. Modeling the Rear Fender Lights
17. Creating the License Plate Light
18. Creating the Trunk Latch

04 – Creating the Spoked Wheels
01. Beginning the Wheels
02. Modeling the Hub Caps
03. Beginning the Hub Cap Spokes
04. Using the Array Modifier for the Spokes

05 – Modeling the Interior of the Car
01. Modeling the Cab Trim
02. Beginning the Seats
03. Working On the Seats
04. Continuing the Seats
05. Finishing the Seats
06. Beginning the Dashboard
07. Finishing the Dashboard Base
08. Adding the Interior Floor
09. Modeling the Interior Door Panel
10. Beginning the Steering Wheel
11. Continuing the Steering Wheel
12. More Work On the Steering Wheel
13. Finishing the Steering Wheel
14. Adding Details to the Dash
15. Adding More Details to the Dash
16. Modeling the AM Radio
17. More Details to the Dashboard
18. Beginning the Glove Compartment
19. Finishing the Glove Compartment
20. Modeling the Gas Pedal
21. Using the Spin Tool
22. Creating Details Under the Dash
23. Modeling the Rear View Mirror
24. Modeling the Gear Shift
25. Creating the Door Latch
26. Finishing the Door Latch
27. Finishing the Interior Modeling

06 – Creating the Undercarriage of the Car
01. Modeling the Oil Pan
02. Working on the Rear Axle
03. Continuing the Undercarriage
04. More Work on the Undercarriage
05. Modeling the Wheel Wells
06. Finishing the Undercarriage

07 – Creating the Tire Treads
01. Beginning the Tire Tread
02. Finishing the Tire Treads

08 – Adjustments, Tweaks, and Fixes
01. Adding the Side Trim
02. Finishing the Side Trim
03. Adding Thickness to the Car Body
04. Adjusting the Undercarriage and Bumper Plate
05. Final Fixes for the Tires
06. Making More Adjustments and Fixes
07. Finishing the Fixes and Adjustments

09 – Creating the Materials and Textures
01. Beginning to Add Materials
02. Assigning Multiple Materials to an Object
03. Adding Materials to the Tires and Wheels
04. Adding Materials to the Interior
05. Finishing the Chrome Material
06. Creating Textures for the Seats
07. Adding More Materials for the Interior
08. Creating the Floor Texture
09. Adding Textures to the Radio and Dials
10. Adding the Textures for the Headlights and Emblem
11. Making the Car Paint Material
12. Creating a Glass Material
13. Adding Materials to the Tail Lights
14. Creating the Materials for the Undercarriage

10 – Rendering the Scene
01. Getting the Car Ready for Rendering
02. Setting Up the Interface for Rendering
03. Rendering Images of the Car
04. Using Depth of Field and Glare
05. Rendering an Animation
06. Using the Video Sequence Editor
07. Exporting Video File of the Animation
08. Adding the N Logo To the Hub Caps
09. Conclusion
[Udemy] Blender 3.0 Vintage Car Creation by Darrin Lile.7z
[Udemy] Blender 3.0 Vintage Car Creation by Darrin Lile_Subtitles.7z


Join us on
  Channel    and      Group

  • Facebook
  • Twitter
  • Google+
  • Linkedin
  • Pinterest

Leave a Comment

Your email address will not be published. Required fields are marked *