Ad Clicks : Ad Views : Ad Clicks : Ad Views : Ad Clicks : Ad Views : Ad Clicks : Ad Views :
Oh Snap!

It looks like you're using an adblocker. Adblockers make us sad. We use ads to keep our content happy and free. If you like what we are doing please consider supporting us by whitelisting our website. You can report badly-behaved ads by clicking/tapping the nearby 'Advertisement' X text.

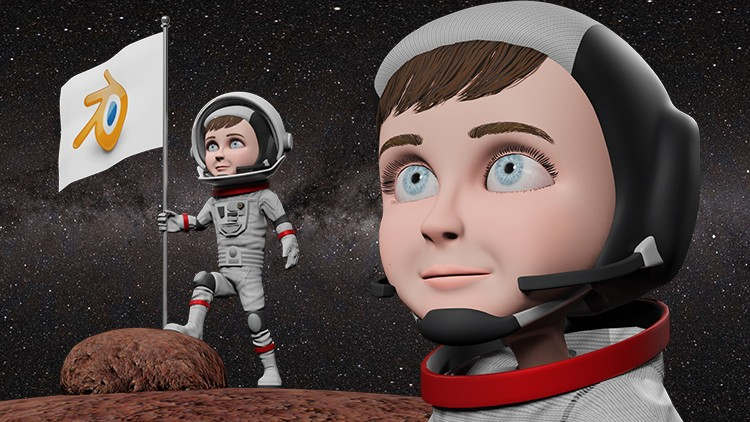
Blender 2.8 Character Creation by Darrin Lile (1080p Update)

/

Release date:2019, March

Duration:16 h 33 m

Author: Darrin Lile

Skill level:Beginner

Language:English

Exercise files:Yes

What Will I Learn?
Create a 3D Character with Blender 2.8
Use the Sculpt Tools in Blender 2.8
Bake a Normal Map
Create PBR Materials with the Eevee Render Engine
Use Krita to Paint Textures
Rig a 3D Character in Blender 2.8
Light and Render a Turntable Animation with Eevee

Requirements
This course uses Blender 2.8 and Krita
The instructor uses a Wacom graphics tablet in the sculpting and texturing portions of the course

Description
Blender 2.8 is here! And it’s time to explore this new frontier of 3D animation with Blender 2.8 Character Creation. This course takes you through everything you need to know to create your own 3D characters.

You’ll learn how to:
Model a 3D Character
Use the Sculpt Tools in Blender 2.8
Bake a Normal Map and apply it to a low poly object
Create PBR Materials with the new Eevee Render engine
Use Krita to paint textures
Rig a 3D Character in Blender 2.8
Light and Render a Turntable Animation with Eevee

In this course you’ll use Blender 2.8 to model the character’s face with proper edge flow, so it will animate believably. You’ll learn how to create hands and feet, as well as the character’s space suit and helmet. We’ll use the Blender 2.8 sculpting tools to create the wrinkles and folds of the space suit. Then you will learn how to bake a normal map to capture the high resolution detail, and apply it to a lower poly version.

We use the new Eevee render engine in Blender 2.8 to create PBR materials for the character. We will also create UV maps so that we can apply textures, to add greater detail to the model. You’ll learn how to paint eyelashes and eyebrows in Krita, and map the textures using transparency in Blender.

When the character has been modeled and textured, we will then turn our attention to rigging. You’ll learn how to create the underlying skeleton, or armature, that will control the character. And we will pose the character in the scene. We will then go over how to create lights and a turntable animation.

Blender 2.8 is an exciting milestone in the history of Blender. And there’s no better time to start learning its new tools and workflows. So join me as we explore the amazing new frontiers of Blender 2.8 Character Creation!

Who is the target audience?
Beginner Blender users who would like to create their own 3D characters

Watch online or Download for Free

01-Introduction
01-Welcome to the Course
02-A Brief Introduction to Blender 2.8
02-Modeling the Body
01-Importing Reference Images
02-Beginning the Face
03-Establishing the Face Loops
04-Completing the Loop Mask
05-Adjusting the Face
06-Creating the Top of the Head
07-Modeling the Eyes
08-Placing the Eyes
09-Creating the Side of the Head and Neck
10-Modeling the Ears
11-Creating the Nostrils
12-Beginning the Lips
13-Extruding the Inner Mouth
14-Creating the Gums
15-Beginning the Teeth
16-Finishing the Teeth
17-019-Modeling the Eyelids
03-Modeling the Body
01-Extruding the Torso
02-Creating the Legs
03-Modeling the Arms
04-Beginning the Fingers
05-Continuing the Fingers
06-Extruding the Hand
07-Modeling the Thumb
08-Connecting the Hand
09-Beginning the Foot
10-Finishing the Feet
11-Beginning the Body Suit
12-Finishing the Body Suit
04-Creating the Space Suit
01-Beginning the Space Suit
02-Creating the Sole of the Boot
03-Modeling the Boots
04-Creating the Glove
05-Continuing the Space Suit
06-Working on the Breastplate and Belt
07-Finishing the Breastplate and Belt
08-Creating the Knee and Elbow Pads
09-Preparing to Sculpt
10-Beginning the Legs
11-Sculpting the Upper Legs and Hips
12-Sculpting the Torso and Arms
13-Sculpting the Boots
14-Sculpting the Gloves
15-Finishing the Sculpting
05-Modeling the Helmet and Cap
01-Beginning the Helmet
02-Continuing the Helmet
03-Adding Thickness to the Helmet
04-Finishing the Helmet
05-Starting the Snoopy Cap
06-Continuing the Snoopy Cap
07-Modeling the Cap Mics
08-Creating the Chin Strap
06-UV Mapping and Baking
01-Beginning to Organize the Model
02-Finishing the Organization
03-UV Mapping the Suit
04-UV Mapping the Cap
05-UV Mapping the Head
06-Baking a Normal Map
07-Creating Materials and Textures
01-Assigning Materials for the Suit
02-Assigning Materials to the Head
03-Adjusting the Materials
04-Adding Textures to the Suit and Eyes
05-Texturing the Snoopy Cap
06-Beginning to Texture the Face
07-Finishing the Face Textures
08-Texture Painting Details on the Suit
08-Creating the Eyebrows, Eyelashes, and Bangs
01-Modeling the Eyelashes
02-Texturing the Eyelashes
03-Beginning to Texture the Eyebrows
04-Finishing the Eyebrow Textures
05-Modeling and UV Mapping the Bangs
06-Texturing the Bangs
09-Rigging the Character
01-Preparing the Character for Rigging
02-Creating the Armature and Adjusting Joints
03-Placing the Joints of the Hands
04-Adjusting the Joints of the Face
05-Placing the Joints for the Mouth and Eyes
06-Generating the Rig and Binding the Mesh
07-Parenting the Eyes and Teeth
08-Adjusting Weights of the Face
09-Testing the Face Controls
10-Adjusting the Neck and Chest Weights
11-Painting the Weights of the Hand
12-Painting Weights for the Elbows and Knees
13-Weight Painting the Torso and Hips
14-Weight Painting the Boots and Testing the Rig
10-Lighting and Rendering the Scene
01-Posing the Character
02-Lighting the Scene
03-Setting Up the Transparent Glass Material
04-Animating the Camera
05-Rendering the Animation
06-Conclusion and Thank You
[Udemy – Pact] Blender 2.8 Character Creation by Darrin Lile (1080p Update)_Subtitles.7z

Section 01 Introduction
01. Welcome to the Course
02. A Brief Introduction to Blender 2.8

Section 02 Modeling the Head
03. Importing Reference Images
04. Beginning the Face
05. Establishing the Face Loops
06. Completing the Loop Mask
07. Adjusting the Face
08. Creating the Top of the Head
09. Modeling the Eyes
10. Placing the Eyes
11. Creating the Side of the Head and Neck
12. Modeling the Ears
13. Creating the Nostrils
14. Beginning the Lips
15. Extruding the Inner Mouth
16. Creating the Gums
17. Beginning the Teeth
18. Finishing the Teeth
19. Modeling the Eyelids

Section 03 Modeling de Body
20. Extruding the Torso
21. Creating the Legs
22. Modeling the Arms
23. Beginning the Fingers
24. Continuing the Fingers
25. Extruding the Hand
26. Modeling the Thumb
27. Connecting the Hand
28. Beginning the Foot
29. Finishing the Feet
30. Beginning the Body Suit
31. Finishing the Body Suit

Section 04 Creating the Space Suit
32. Beginning the Space Suit
33. Creating the Sole of the Boot
34. Modeling the Boots
35. Creating the Glove
36. Continuing the Space Suit
37. Working on the Breastplate and Belt
38. Finishing the Breastplate and Belt
39. Creating the Knee and Elbow Pads
40. Preparing to Sculpt
41. Beginning the Legs
42. Sculpting the Upper Legs and Hips
43. Sculpting the Torso and Arms
44. Sculpting the Boots
45. Sculpting the Gloves
46. Finishing the Sculpting,mp4

Section 05 Modeling the Helmet and Cap
47. Beginning the Helmet
48. Continuing the Helmet
49. Adding Thickness to the Helmet
50. Finishing the Helmet
51. Starting the Snoopy Cap
52. Continuing the Snoopy Cap
53. Modeling the Cap Mics
54. Creating the Chin Strap

Section 06 UV Mapping and Baking
55. Beginning to Organize the Model
56. Finishing the Organization
57. UV Mapping the Suit
58. UV Mapping the Cap
59. UV Mapping the Head
60. Baking a Normal Map

Section 07 Creating Materials and Textures
61. Assigning Materials for the Suit
62. Assigning Materials to the Head
63. Adjusting the Materials
64. Adding Textures to the Suit and Eyes
65. Texturing the Snoopy Cap
66. Beginning to Texture the Face
67. Finishing the Face Textures
68. Texture Painting Details on the Suit

Section 08 Creating the Eyebrows, Eyelashes, and Bangs
69. Modeling the Eyelashes
70. Texturing the Eyelashes
71. Beginning to Texture the Eyebrows
72. Finishing the Eyebrow Textures
73. Modeling and UV Mapping the Bangs
74. Texturing the Bangs-mp4

Section 09 Rigging the Character
75. Preparing the Character for Rigging
76. Creating the Armature and Adjusting Joints
77. Placing the Joints of the Hands
78. Adjusting the Joints of the Face
79. Placing the Joints for the Mouth and Eyes
80. Generating the Rig and Binding the Mesh
81. Parenting the Eyes and Teeth
82. Adjusting Weights of the Face
83. Testing the Face Controls
84. Adjusting the Neck and Chest Weights
85. Painting the Weights of the Hand
86. Painting Weights for the Elbows and Knees
87. Weight Painting the Torso and Hips
88. Weight Painting the Boots and Testing the Rig

Section 10 Lighting and Rendering the Scene
89. Posing the Character
90. Lighting the Scene
91. Setting Up the Transparent Glass Material
92. Animating the Camera
93. Rendering the Animation
94. Conclusion and Thank You
Final-Video-Turntable-Animation

Blender 2.8 Character Creation by Darrin Lile Ex.Files.7z


Join us on
  Channel    and      Group

  • Facebook
  • Twitter
  • Google+
  • Linkedin
  • Pinterest

19 Comments

  1. Can you find those course ? Wanted it so badly

    http://www.heavypoly.com/blender-online-class

    https://academy.cgboost.com/p/blender-2-8-launch-pad

    Anyways thank you for the free courses,more course to come! ๐Ÿ™‚

    • Dear. you can please for the love of huminity send me or tell the way how to get the reference images which are being used in ”Blender 2.8 Character Creation by Darrin Lile” course? I can’t find them here. Only videos are available. And also how to improve the quality of the video? It seems the quality of the videos is 720.

      • All images and other course files are in the archive, which is below: Blender 2.8 Character Creation by Darrin Lile Ex.Files.7z

  2. Can you find those course ? Wanted it so badly

    http://www.heavypoly.com/blender-online-class

    https://academy.cgboost.com/p/blender-2-8-launch-pad

    Anyways thank you for the free courses,more course to come! ๐Ÿ™‚

  3. Hello, thank you for sharing this course, i have a problem when downloading at the end process its suddenly disconnect or very slow…

    • Howdy, we resolve the problem with the cloud – we have enlagded the channel. Hope it’s all really!

  4. Hi,
    Thank you so much for uploading this course, I’ve been scorching the internet the last few weeks searching for tutorials on character creation. Haven’t found one up to the latest update of blender like this one is yet. The problem though; we need the reference photos first which isn’t available anywhere. I thinK I found the downloads at the bottom of the skillshare course but I somehow can’t download it; https://www.skillshare.com/classes/Blender-2-8-Character-Creation/2053793853/projects

    • Same issue. if you have found the images then please send me or tell the way how to get the reference images which are being used in ”Blender 2.8 Character Creation by Darrin Lile” course

      • All images and other course files are in the archive, which is below: Blender 2.8 Character Creation by Darrin Lile Ex.Files.7z

  5. There is a double video 68 is the exact same as 69 69 should be about modeling the eyelashes not texture painting on the suit and yes i have checked exact same video both equal length times and same content

Leave a Comment

Your email address will not be published. Required fields are marked *