Ad Clicks : Ad Views : Ad Clicks : Ad Views : Ad Clicks : Ad Views : Ad Clicks : Ad Views :
Oh Snap!

It looks like you're using an adblocker. Adblockers make us sad. We use ads to keep our content happy and free. If you like what we are doing please consider supporting us by whitelisting our website. You can report badly-behaved ads by clicking/tapping the nearby 'Advertisement' X text.

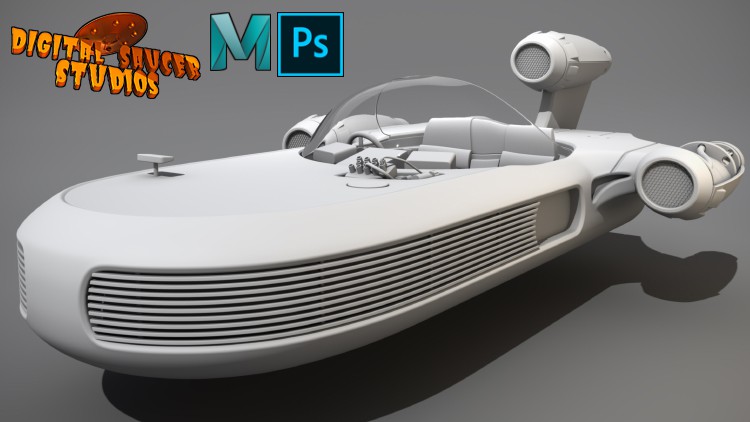
Maya 3D Masterclass – Modeling a 3D Sci-Fi Vehicle in Maya by Natale Palazzo (Digital Saucer Studios)

/

Release date:2020, December

Duration:23 h 13 m

Author:Digital Saucer Studios

Skill level:Beginner

Language:English

Exercise files:Yes

Your course offers an extensive 23-hour exploration of Maya’s modeling tools, centering around the creation of the iconic Landspeeder from Star Wars. Here’s an overview of what the course covers:

The initial focus is on the three fundamental modeling tools in Maya: the Bevel Tool, Multi-Cut Tool, and Extrude Tool. These tools serve as the foundational knowledge for the subsequent in-depth modeling sessions.

The course delves deeply into creating the Landspeeder, systematically breaking down the modeling process. It starts with blocking out the basic shape, meticulously constructing the main body or chassis, wings, and cockpit area.

Following the initial blocking phase, the course progresses to adding intricate details to every component of the Landspeeder. This includes refining the turbine engines, cockpit, repulsor vents, and other intricate parts, with a focus on comprehensive detailing.

Throughout the course, the instructor shares their modeling techniques, offering clear and precise instructions that are easy to follow. They explain the reasoning behind each technique, enhancing the learning experience.

Beyond modeling, the course extends into setting up the camera and lighting within the Maya environment. The final segment focuses on rendering the Landspeeder, allowing students to produce a professional-quality model suitable for their showreel or portfolio.

By following this comprehensive course, aspiring 3D modelers can deepen their understanding of Maya’s modeling tools and techniques, gaining mastery in 3D modeling within the software.

Watch online or Download for Free
01- Introduction

01. Promo
02. Introduction
03. Quick Introduction to Modeling Set-up
04. Bevel Too
05. Multi-Cut Tool
06. Extrude Tool

02- Modeling

07. Setting Up the Image Planes
08. Blocking Out the Chassis
09. Creating the Front Bevel
10. Extruding the Wing
11. Modeling the Wing Part 1
12. Modeling the Wing Part 2
13. Modeling the Wing Part 3
14. Creating the Bottom Bevel
15. Creating Bevels for the Wing
16. Adding More Resolution to the Model
17. Creating the Cockpit with Boolean
18. Cleaning Up Front Cockpit Geometry
19. Cleaning Up Back Cockpit Geometry
20. Creating the Top Curved Bevel
21. Creating the Bottom Curved Bevel
22. Creating the Tail Fin Part 1
23. Creating the Tail Fin Part 2
24. Creating the Tail Fin Part 3
25. Creating the Turbine Engine Part 1
26. Creating the Turbine Engine Part 2
27. Creating the Turbine Engine Part 3
28. Creating the Turbine Engine Part 4
29. Creating the Turbine Engine Part 5
30. Creating the Turbine Engine Part 6
31. Creating the Turbine Engine Part 7
32. Creating the Turbine Engine Part 8
33. Creating the Turbine Engine Part 9
34. Creating the Turbine Engine Part 10
35. Creating the Turbine Engine Part 11
36. Creating the Turbine Engine Part 12
37. Creating the Turbine Engine Part 13
38. Creating the Damaged Engine Part 1
39. Creating the Damaged Engine Part 2
40. Creating the Damaged Engine Part 3
41. Creating the Damaged Engine Part 4
42. Creating the Damaged Engine Part 5
43. Creating the Damaged Engine Part 6
44. Creating the Damaged Engine Part 7
45. Creating the Damaged Engine Part 8
46. Creating the Damaged Engine Part 9
47. Creating the Damaged Engine Part 10
48. Creating the Front Panel Part 1
49. Creating the Front Panel Part 2
50. Creating the Front Panel Part 3
51. Creating the Front Panel Part 4
52. Creating the Repulsor Vents Part 1
53. Creating the Repulsor Vents Part 2
54. Creating the Repulsor Vents Part 3
55. Creating the Back Vent Part 1
56. Creating the Back Vent Part 2
57. Creating the Bevels for the Vents
58. Creating the Cockpit Part 1
59. Creating the Cockpit Part 2
60. Creating the Cockpit Part 3
61. Creating the Cockpit Part 4
62. Creating the Cockpit Part 5
63. Creating the Cockpit Part 6
64. Creating the Cockpit Part 7
65. Creating the Seats Part 1
66. Creating the Seats Part 2
67. Creating the Center Channel
68. Creating the Monitors
69. Creating the Steering Wheel
70. Creating the Head Rest
71. Creating the Gear Box
72. Creating the Gear Stick Part 1
73. Creating the Gear Stick Part 2
74. Creating the Cockpit Floor Part 1
75. Creating the Cockpit Floor Part 2
76. Creating the Cockpit Floor Part 3
77. Creating the Control Panel Part 1
78. Creating the Control Panel Part 2
79. Creating the Control Panel Part 3
80. Creating the Control Panel Part 4
81. Creating the Central Channel Controls
82. Creating the Windshield
83. Bevelling, Fixing and Mirroring
84. Creating the Front Engine Part 1
85. Creating the Front Engine Part 2
86. Creating the Front Engine Part 3
87. Creating the Front Engine Part 4
88. Creating the Front Engine Part 5
89. Creating the Rear Repulsor Part 1
90. Creating the Rear Repulsor Part 2
91. Creating the Rear Repulsor Part 3
92. Creating the Rear Repulsor Part 4
93. Creating the Rear Repulsors Part 5
94. Creating the Rear Repulsors Part 6
95. Cleaning Up the Scene
96. Making the Landspeeder Real World Size
97. Creating Displacement Maps Part 1
98. Creating Displacement Maps Part 2
99. Making Final Adjustments to the Model Before Rendering

03- Shading, Lighting and Rendering

100. Setting Up the Camera
101. Creating the Background
102. Creating the Background Texture
103. Texturing the Background
104. Creating a Second Background Texture
105. Creating Shaders for the Landspeeder
106. Creating the Glass and Reflective Lighting
107. Creating a Side Light
108. Setting Up the Final Render
109. Finishing Up in Photoshop

[Udemy] Maya 3D Masterclass – Modeling a 3D Sci-Fi Vehicle in Maya by Natale Palazzo (Digital Saucer Studios).7z

[Udemy] Maya 3D Masterclass – Modeling a 3D Sci-Fi Vehicle in Maya by Natale Palazzo (Digital Saucer Studios)_Subtitles.7z


Join us on
  Channel    and      Group

  • Facebook
  • Twitter
  • Google+
  • Linkedin
  • Pinterest

4 Comments

  1. Hi, could you upload these courses?
    https://coloso.global/en/products/illustrator-allenerie-us
    https://www.21-draw.com/course/fun-animal-characters/

  2. If you could please upload this course i’d be very grateful! Thanks

    https://www.udemy.com/course/habilidades-fundamentais-de-desenho/

Leave a Comment

Your email address will not be published. Required fields are marked *