Ad Clicks : Ad Views : Ad Clicks : Ad Views : Ad Clicks : Ad Views : Ad Clicks : Ad Views :
Oh Snap!

It looks like you're using an adblocker. Adblockers make us sad. We use ads to keep our content happy and free. If you like what we are doing please consider supporting us by whitelisting our website. You can report badly-behaved ads by clicking/tapping the nearby 'Advertisement' X text.

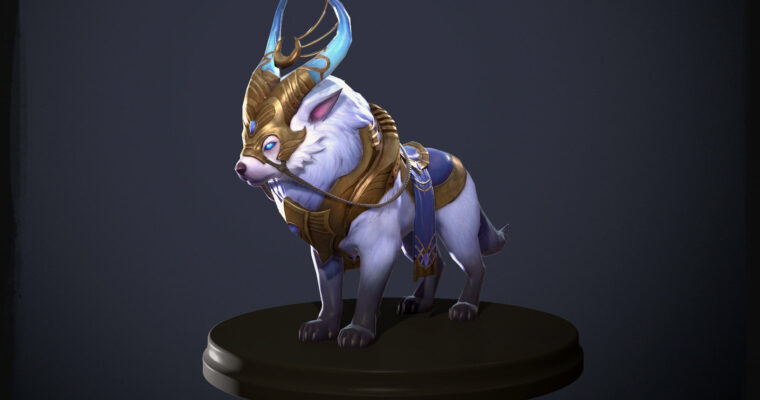
Creating An MMO Game Character

/

Release date:2014

Author:Chris Bennett

Skill level:Beginner

Language:English

Exercise files:Yes

  • This Model was created and used as a teaching aid for the course I taught though Uartsy.com
    Concept by Carlyn Lim
    Broadly speaking the course covered the following topics:

    How to create a fully realized production ready professional 3D character model from a 2D concept.

  • Core artistic principals that will boost & aid your content creation.
  • Technical skills such as ZBrush sculpting methods, hand painted texture processes in 3D-Coat, & efficient game asset creation techniques.
  • Boost the quality of your art through professional peer reviewed critiques.
  • Plus time saving production methodologies & more!
Watch online or Download for Free
Project 1 Getting Started & Planning Your Asset

01 Introduction
02 Choosing a Concept
03 Planning your Concept
04 Shape Language and Material Type
05 Shape Relationship and Line Flow
06 Color, Sculpting Planes, and Feeling
07 Accessories, Symmetry, and Contrast
08 Breaking Down Subtools
09 Q&A Session
10 Technical Limitations Part 1
11 Technical Limitations Part 2
12 Technical Limitations Part 3
13 Base Mesh Discussion
14 Base Mesh in Production
15 Sculpting the Base Mesh Part 1
16 Sculpting the Base Mesh Part 2
17 Sculpting the Base Mesh Part 3
18 Sculpting the Base Mesh Part 4
19 Sculpting the Base Mesh Part 5

Project 2 Sculpting Theory

01 Introduction
02 Anatomy References
03 Proportions
04 Using a Relaxed Pose
05 Planes and Major Shapes
06 Silhouette
07 Muscle Forms
08 Beginning on the Legs and Rapid Prototyping
09 Working the Feet
10 Establising Planes of the Feet
11 Working the Legs
12 Forming the Planes of the Legs
13 Refining the Legs
14 Working on the Head
15 Forming the Planes of the Head
16 Continuing the Head and Advice on Work flow
17 Shaping the Horns
18 Shaping the Mane and Question on Job Entry

Project 3 Sculpting Continued

01 Introduction
02 Shaping the Mane
03 T-Pose vs. Modified Poses
04 Save File Types and Continuing the Mane
05 Positioning the Armor
06 Placing Landmarks on Armor
07 Retopologizing Shoulder Armor
08 Low Poly Edge Creasing
09 Bringing New Low Poly Mesh Back to Zbrush
10 Adding Form to Saddle pt.1
11 Adding Form to Saddle pt. 2
12 Refining Back Armor Adding Tail Accessory
13 Refining the Tail Accessory
14 Symmetry and Horns
15 Assignment Goals

Project 4 Final Sculpting & Polypaint

01 Introduction
02 Exporting Zbrush Model Pieces into Maya
03 Importing UV Models and Tiling a Mask Pt.1
04 Importing UV Models and Tiling a Mask Pt. 2
05 Tiling Details on Specific Areas of Models
06 Creating Custom Alphas
07 Subdividing Meshes for Detailing
08 Starting Detail on Head Armor
09 Marking Armor Features
10 Painting in Guidelines
11 Masking to Sculpt Front Features
12 Cleaning Up Extruded Detail on Helmet
13 Detailing and Knowing the Intention of the Model
14 Character Stylization
15 Mesh Grouping for Export
16 Dynameshing Model Pieces and Future Work on Character
17 Questions and Closeout

Project 5 Retopology

01 Introduction
02 Planning Out The Retopology Process Part 1
03 Planning Out The Retopology Process Part 2
04 Retopologizing The Leg
05 Covering Hotkeys and Tools in TopoGun
06 Accounting For Leg Deformation Part 1
07 Accounting For Leg Deformation Part 2
08 Retopologizing The Body and Hind Leg
09 Retopologizing The Saddle Part 1
10 Retopologizing The Sattel Part 2
11 Retopologizing The Face Part 1
12 Retopologizing The Face Part 2
13 Retopologizing The Mane
14 Retopologizing The Armor
15 Retopology Resources
16 Questions and Closeout

Project 6 UVs and Baking

01 Introduction and Starting UV Unwrap
02 Unwrapping in UV 1 to1 Space
03 Finishing Decoration and Seperate Head
04 Manage UV Texture Space
05 Stacking UV
06 Seperating the Rest of the Body
07 Closeout
08 Further Shell Fixes in Maya
09 Useing Headus for Visualising Texture Space
10 Conneting UV Shells
11 UV Packing Pt. 1
12 UV Packing Pt. 2
13 Mirror Low Poly Model and Use of Baking Cage
14 Setting up the Bake Cage
15 Bakeing Maps to Intended Render
16 XNormal Map Bakeing
17 Previewing Bakes on Model
18 Closeout

Project 7 Texturing Continued

01 Using an Ambient Occlusion Map
02 Creating and Using a Cavity Map
03 Creating Selection Sets
04 Establishing Base Colors
05 Breaking Up Flat Colors
06 Adjusting Selection Sets in 3D Coat
07 Establishing Value Gradients on the Body
08 Adding Subtle Shading to the Eyes and Nose
09 Refining Body Gradients
10 Introducing Color Variation
11 Motteling the Metal Texture
12 Using Overlay Layers in 3D Coat
13 Painting Theory Discussion
14 Gloss and Specular Map Explanation
15 Creating the Gloss Map

Project 8 Rendering & Presentation

01 Marmoset Toolbag Shader Channels
02 Creating and Previewing Gloss Map in Marmoset
03 Metallic and Glow Channels
04 Previewing Metal and Glow Channels
05 Useing Textures to Break up Metallic Highlights
06 Refineing the Metallic Highlight Channels
07 Changing Viewing Enviorments and Continueing Channel Refinement
08 Additional Metallic Work
09 General Work Time on Characters
10 Useing Fur Textures to Break up Specular
11 Useing Cloth Textures to Break up Specular
12 Seperating the Cloth and Gems in Specular Map
13 Breaking up the Specular Pattern on Saddle
14 Fixing the Specular on Rope and Additional Enviorment Viewing
15 Final Specular Map Touchups and Closeing

BONUS

Chris_Youngmin_david

[Uartsy] Creating An MMO Game Character.7z
[Uartsy] Creating An MMO Game Character_Subtitles.7z


Join us on
  Channel    and      Group

  • Facebook
  • Twitter
  • Google+
  • Linkedin
  • Pinterest

Leave a Comment

Your email address will not be published. Required fields are marked *