Ad Clicks : Ad Views : Ad Clicks : Ad Views : Ad Clicks : Ad Views : Ad Clicks : Ad Views :
Oh Snap!

It looks like you're using an adblocker. Adblockers make us sad. We use ads to keep our content happy and free. If you like what we are doing please consider supporting us by whitelisting our website. You can report badly-behaved ads by clicking/tapping the nearby 'Advertisement' X text.

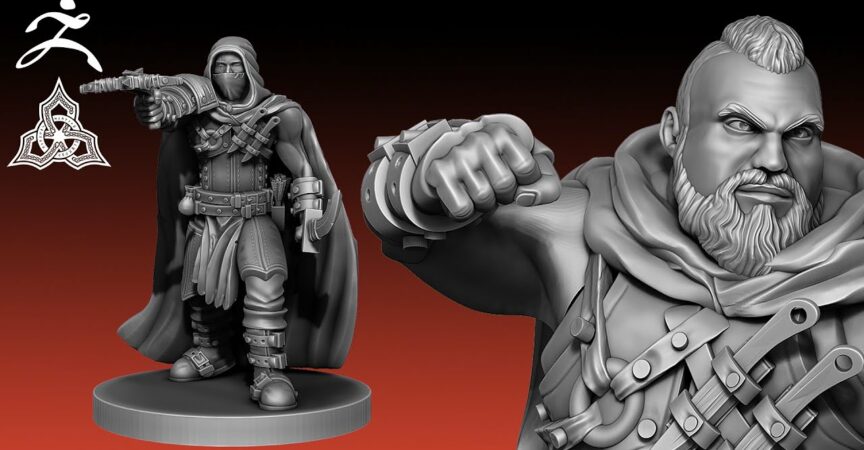
Sculpt 3D Printable Rogues with Zbrush and Autodesk Maya

/

Release date:2020, June

Author:Christian McNachtan

Skill level:Beginner

Language:English

Exercise files:Yes

What you’ll learn:

  • Learn how to digitally sculpt in the industry leading software: zbrush
  • Learn how to navigate zbrush
  • Learn to use many brushes: what each does and when to use them
  • Learn how to create many various weapons and armors
  • Learn how to pose your characters
  • Learn how to optimize your characters for 3d printing
  • Learn beginning skills of hard surface modeling in the industry leading software: Autodesk Maya
  • Learn to navigate Autodesk Maya
  • Learn how to export beautiful renders of your models

Requirements:
Must be able to speak the English Language
Must have a computer with internet access
You will need access to Zbrush – free 30 day trial is available for first time users
You will need access to Autodesk Maya – free 30 day trial is available for first time users
A drawing tablet is highly recommended

Description:
Created with the absolute first timer in mind, this course will teach you to become proficient in many of Autodesk Maya and Zbrush’s more complex features – some of which are unknown to more advanced users. By the end of this course, you will have the knowledge and skills to create professional-quality 3D models fit for 3D printing and sales.

This course builds on our previous course: “Sculpting Male Characters in Zbrush”, but it is not necessary to have taken that class before this one. This course is completely approachable to a first time beginner using Zbrush and Autodesk Maya.

Join our lead 3D Modeler Josh O’hala as he recreates the exact same Rogue models that we sell to customers as well as unique models created just for this course. You will be guided through our professional production pipeline:

  • You will learn how to become comfortable navigating Zbrush.
  • You will learn how to add simple geometry to your project which will be used later.
  • Learn to create many weapons and Armors
  • Learn to create various accessories to bring your Rogues to life
  • You will learn how to use many commonly used brushes as well as specialized brushes to create beautiful and accurate sculpts.
  • The lessons learned will be reinforced as Josh guides you through creating many Rogue models.
  • You will learn how to pose your Rogues to create many variations of models.
  • You will learn how to optimize your models for 3D printing.
  • You will learn the process of making your model 3D printable.
  • and much more! visit us on youtube (runeforge studios) for examples of our models and tutorials.

Who this course is for:

  • This course is intended for anyone who wants to learn how to create professional quality digital sculptures.
  • This course is intended for anyone who wants to learn how to create their own models for 3D printing.
  • This course is intended for anyone who wants to learn how to create their own miniatures for tabletop games.
Watch online or Download for Free
01 – Introduction

01 – Introduction
02 – What youll need
03 – What youll need Part 2
04 – Before We Get Started

02 – Creating Sword and Dagger base mesh with Autodesk Maya

05 – Opening Maya
06 – Modeling Keybinds
07 – Importing Reference Images
08 – Shaping the Sword Blade
09 – Creating the Sharp Edge
10 – Smoothing and Sharpening Edges
11 – Creating Sword Handle
12 – Turning Sword into Dagger

03 – Creating Throwing knife Base Mesh in Maya

13 – Throwing Knife

04 – Creating Large Crossbow Base Mesh in Maya

14 – Large Crossbow Part 1
15 – Large Crossbow Part 2

05 – Creating Hand Crossbow Base Mesh in Maya

16 – Hand Crossbow Part 1
17 – Hand Crossbow Part 2

06 – Getting Started in Zbrush

18 – Opening Zbrush
19 – General Navigation
20 – Dynamesh and Zremesher
21 – General Use Brushes

07 – Enhancing Sword in Zbrush

22 – Sword Part 1
23 – Sword Part 2

08 – Enhancing the Dagger in Zbrush

24 – Dagger

09 – Enhancing the Throwing Knife in Zbrush

25 – Throwing Knife

10 – Enhancing Heavy Crossbow in Zbrush

26 – Heavy Crossbow Part 1
27 – Heavy Crossbow Part 2
28 – Heavy Crossbow Part 3
29 – Heavy Crossbow Part 4
30 – Crossbow Bolt Part 1
31 – Crossbow Bolt Part 2

11 – Enhancing Hand Crossbow in Zbrush

32 – Hand Crossbow Part 1
33 – Hand Crossbow Part 2
34 – Hand Crossbow Part 3

12 – Sculpting a Bow in Zbrush

35 – Bow Part 1
36 – Bow Part 2
37 – Bow Part 3

13 – Creating a Base Mesh Tool

38 – Bringing in Human Base Mesh

14 – Sculpting the Hood

39 – Hood Part 1
40 – Hood Part 2
41 – Hood Part 3

15 – Sculpting the Chest Armor

42 – Chest Armor Part 1
43 – Chest Armor Part 2
44 – Chest Armor Part 3
45 – Chest Armor Part 4

16 – Sculpting Pouch and Coin Purse

46 – Sculpting the Side Pouch
47 – Sculpting the Coin Purse

17 – Sculpting Shoulderpads

48 – Shoulderpads

18 – Sculpting the Handguards

49 – Handguards Part 1
50 – Handguards Part 2

19 – Sculpting Boots

51 – Boots Part 1
52 – Boots Part 2

20 – Sculpting the Belt

53 – Belt

21 – Sculpting the Leg Guards

54 – Leg Guards Part 1
55 – Leg Guards Part 2

22 – Sculpting the Crotch Flap

56 – Crotch Flap

23 – Prepping Your Assets

57 – Importing the Weapons
58 – Combining the Props
59 – Lowering Poly Count

24 – Sculpting Quivers

60 – Sculpting Arrow Quiver
61 – Sculpting Bolt Quiver

25 – Posing Legs for First Position

62 – Posing the Legs Part 1
63 – Posing the Legs Part 2
64 – Touch ups

26 – Sculpting the Cloak

65 – Cloak Part 1
66 – Cloak Part 2
67 – Cloak Part 3
68 – Cloak Part 4

27 – Dagger and Sword Pose

69 – Dagger and Sword Pose Part 1
70 – Dagger and Sword Pose Part 2

28 – Dagger and Hand Crossbow Pose

71 – Dagger and Hand Crossbow Pose Part 1
72 – Dagger and Hand Crossbow Pose Part 2
73 – Dagger and Hand Crossbow Pose Part 3

29 – Fat Rogue

74 – Prepping Fat Rogue Part 1
75 – Prepping Fat Rogue Part 2
76 – Prepping Fat Rogue Part 3
77 – Prepping Fat Rogue Part 4
78 – Prepping Fat Rogue Part 5
79 – Posing Fat Rogue Part 1
80 – Posing Fat Rogue Part 2
81 – Posing Fat Rogue Part 3
82 – Posing Fat Rogue Part 4

30 – Muscular Rogue

83 – Prepping Muscular Rogue Part 1
84 – Prepping Muscular Rogue Part 2
85 – Posing Muscular Rogue Part 1
86 – Muscular Pose Part 2
87 – Muscular Pose Part 3
88 – Muscular Pose Part 4

31 – Dadbod Rogue

89 – Prepping the Dadbod Rogue
90 – Prepping the Dadbod Rogue Part 2
91 – Posing the Dadbod Rogue Part 1
92 – Posing the Dadbod Rogue Part 2

32 – Strongman Rogue

93 – Prepping the Strongman Rogue
94 – Posing the Strongman Rogue Part 1
95 – Posing the Strongman Rogue Part 2
96 – Posing the Strongman Rogue Part 3

33 – Finishing Touches

97 – Dynameshing and Decimating
98 – Sizing and Placing on Bases

34 – Rendering

100 – Rendering a Turntable
99 – Render Settings

35 – Preparing for 3D Printing

101 – Making Ready for 3D Print
102 – Sizing Repairing and Printing

[Udemy] Sculpt 3D Printable Rogues with Zbrush and Autodesk Maya.7z
[Udemy] Sculpt 3D Printable Rogues with Zbrush and Autodesk Maya_Subtitles.7z


Join us on
  Channel    and      Group

  • Facebook
  • Twitter
  • Google+
  • Linkedin
  • Pinterest

1 Comments

Leave a Comment

Your email address will not be published. Required fields are marked *