Advanced Photomontage in Photoshop – Create Imaginary Worlds

Release date:2022
Skill level:Beginner
Language:English
Exercise files:Yes
Course URL:https://www.domestika.org/en/courses/3376-advanced-photomontage-in-photoshop-create-imaginary-worlds/final_project_lessons
About the final project for: Advanced Photomontage in Photoshop: Create Imaginary Worlds
ADVANCED PHOTOMONTAGE IN PHOTOSHOP: CREATE IMAGINARY WORLDS
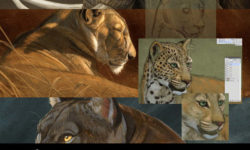
“Congratulations! You have reached the end of this Domestika course. I hope you’ve enjoyed walking through my creative process. By using the ideas and guidance I have given you throughout this course, you’re now free to go ahead with your own composition. This could mean finishing the image you started while completing the course tasks or you could begin a brand new project! Either way, I strongly suggest you take the time to gather inspiration and make a unique piece of your own. Make sure to keep track of your progress with different pictures of each step. It’d be great if you could also explain the choices you’ve made along the way and tell me if you have any doubts. This will help me understand your creative process and guide you better if you need advice. Let’s revisit the necessary steps to complete your project. Photograph or source all the material for your project in one place to help pre-visualize your image. You can also create sketches, notes, and mood boards to inspire your work and start planning out your ideas for the concept and composition. Draft an environment for your project by combining the main landscape images and creating a sense of depth going from the background to the foreground, including an interesting sky as a backdrop and main light source in your image. Add foreground details around the edges to fill the frame and make your image more dynamic. Then, use narrative elements and surreal features enhanced with special effects to create a world and tell the story of your project.
Convert the project from daylight to a nighttime scene by replacing the sky and then integrating the new composition with color and lighting adjustments. Finish creating 2 complete versions of the project showing day versus night images.
Lastly, experiment with different options to combine the day and night images together in interesting ways, and create a juxtaposition using overlays and shapes. Complete the project by adding foreground characters and final visual effects.
I can’t wait to see the imaginary world you will come up with, so don’t forget to share it in the forum. You can do so by clicking on “Create your project”. I’ll be more than happy to answer any of the questions you might have along the way! I’ll try getting back to you as soon as possible. In the meantime, participate in the forum, comment on others’ work, and interact with the community! See you there. ”
PARTIAL TRANSCRIPTION OF THE VIDEO
“ Final Project As we’ve reached the end of the course, I thank you for following through and learning these new techniques and ideas that you can apply to your work and create interesting new projects. One thought I wanted to leave you with is there are a million different ways to do the same thing in Photoshop, but remember, these are just tools that you can use. What matters is the final product, which is the work itself. Anybody can learn how to use these techniques of digital collage in Photoshop and get good, but what will make your work unique and interesting is your personal experie…”
01. About Me
02. Influences
03. Photography for Compositing
04. Drafting an Environment 1
05. Drafting an Environment 2
06. Composition and Light 1
07. Composition and Light 2
08. Building an Imagined World 1
09. Building an Imagined World 2
10. Creating Depth and Detail 1
11. Creating Depth and Detail 2
12. Creating Depth and Detail 3
13. Foreground Framing 1
14. Foreground Framing 2
15. Storytelling Elements 1
16. Storytelling Elements 2
17. Alternative Versions 1
18. Alternative Versions 2
19. Alternative Versions 3
20. Completing the Vision 1
21. Completing the Vision 2
22. Completing the Vision 3
23. Final project
[Domestika] Advanced Photomontage in Photoshop – Create Imaginary Worlds.7z
[Domestika] Advanced Photomontage in Photoshop – Create Imaginary Worlds_Subtitles.7z