Ad Clicks : Ad Views : Ad Clicks : Ad Views : Ad Clicks : Ad Views : Ad Clicks : Ad Views :
Oh Snap!

It looks like you're using an adblocker. Adblockers make us sad. We use ads to keep our content happy and free. If you like what we are doing please consider supporting us by whitelisting our website. You can report badly-behaved ads by clicking/tapping the nearby 'Advertisement' X text.

Creating Weapons in Maya

/

Release date:2021, October 15

Author:Digital Saucer Studios

Skill level:Beginner

Language:English

Exercise files:Yes

What you’ll learn:

  • How to use Maya’s modelling tools.
  • How to use a displacement map and a texture map.
  • How to set up a Skydome Light using Maya’s Arnold Renderer.
  • How to become a competent and professional modeller in Maya.

Requirements:
You need to have a basic understanding of Maya.

Description:

This course is divided into three chapters.
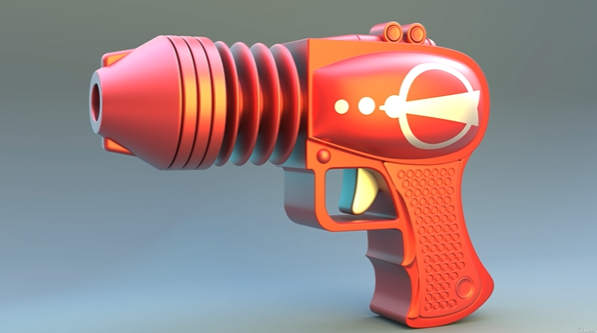
First, you will learn how to model a viking shield, then a viking sword, and finally, a ray gun.
This course will take you through some of Maya’s more common modelling tools, and will show you how to use them effectively, the options used, and how to use shortcuts.
You will understand the basic concept of 3D modelling in Maya.
This course is a step-by-step tutorial and is recorded live, so you will be taught the modelling process every step of the way.

Some of Maya’s more common modelling tools include:

Bevel Tool
Extrude
Mirror
Multi-Cut Tool
Insert Edge Loop Tool
Slide Edge Tool
And many more tools.

As an extra bonus, I will also teach you how to use the Arnold render to get a beautiful, professional looking render of the final ray gun model.

In Arnold, I will show you how to use the Skydome Light with a HDRI texture, which creates a realistic lighting scene.

Also, I will show you how to add extra lights to create a more appealing final render of your model.
You will also be shown how to use a displacement map, and how to texture the ray gun in Photoshop.
This course is a must for anybody wanting to be come confident in modelling in Maya.

Who this course is for:
This course is for beginners and those with some knowledge of Maya.

Watch online or Download for Free
01. Introduction

01. Introduction

02. CHAPTER ONE Modelling a Viking Shield

01. Creating a New Project
02. Setting up the Image Plane
03. Creating the Metal Rings
04. Creating the Shield Center
05. Creating the First Plank
06. Creating the Second Plank
07. Creating the Third and Fourth Planks
08. Creating the Fifth and Sixth Planks
09. Creating the Bolts
10. Creating Thickness for the Center Part
11. Cutting Out Holes in the Planks
12. Creating Thickness for the Wood
13. Creating Thickness for the Metal Parts
14. Creating Bolts for Inside of the Shield
15. Creating the Handle 1
16. Creating the Handle 2
17. Smoothing the Metal Rings
18. Grouping the Bolts
19. Smoothing the Planks 1
20. Smoothing the Planks 2
21. Smoothing the Planks 3
22. Smoothing the Planks 4
23. Smoothing the Center Piece
24. Smoothing the Handle
25. Cleaning up the Scene

03. CHAPTER TWO Modelling a Viking Sword

01. Setting Up the Image Plane
02. Creating the Blade 1
03. Creating the Blade 2
04. Creating the Blade 3
05. Creating the Blade 4
06. Creating the Blade 5
07. Creating the Blade 6
08. Creating the Guard 1
09. Creating the Guard 2
10. Creating the Guard 3
11. Creating the Grip 1
12. Creating the Grip 2
13. Creating the Grip 3
14. Creating the Grip 4
15. Creating the Pommel 1
16. Creating the Pommel 2
17. Creating the Pommel 3

04. CHAPTER THREE Modelling, Texturing and Rendering a Ray Gun

01. Setting Up the Image Plane
02. Creating the Muzzle 1
03. Creating the Muzzle 2
04. Creating the Muzzle Fins
05. Creating the Barrel 1
06. Creating the Barrel 2
07. Creating the Barrel 3
08. Creating the Stock 1
09. Creating the Stock 2
10. Creating the Stock 3
11. Creating the Stock 4
12. Creating the Trigger Guard 1
13. Creating the Trigger Guard 2
14. Creating the Trigger 1
15. Creating the Grip 1
16. Creating the Grip 2
17. Creating the Grip 3
18. Creating the Grip 4
19. Creating the Grip 5
20. Creating the Grip 6
21. Creating the Grip 7
22. Creating the Grip 8
23. Creating the Main Grip 1
24. Creating the Main Grip 2
25. Creating the Grip Button 1
26. Creating the Grip Button 2
27. Creating Thickness and Adding Support Edges 1
28. Adding Support Edges 2
29. Adding Support Edges 3
30. Adding Support Edges 4
31. Adding Support Edges 5
32. Finishing the Trigger
33. Creating Some Detail 1
34. Creating Some Detail 2
35. Creating UVs for the Grip
36. Creating the Displacement Map in Photoshop
37. Displacement Map in Maya 1
38. Displacement Map in Maya 2
39. Displacement Map in Maya 3
40. Displacement Map in Maya 4
41. Texturing and Rendering the Gun 1
42. Texturing and Rendering the Gun 2
43. Texturing and Rendering the Gun 3
44. Texturing and Rendering the Gun 4
45. Texturing and Rendering the Gun 5
46. Creating the Final Render
47. Rendering with a Background

[Udemy] Creating Weapons in Maya.7z
[Udemy] Creating Weapons in Maya_Subtitles.7z


Join us on
  Channel    and      Group

  • Facebook
  • Twitter
  • Google+
  • Linkedin
  • Pinterest

Leave a Comment

Your email address will not be published. Required fields are marked *