


3ds Max Fundamentals – 3D Modeling and Look Development

Release date:2021, June 18
Skill level:Beginner
Language:English
Exercise files:Yes
Course URL:https://www.udemy.com/course/3ds-max-fundamentals-3d-modeling-and-look-development/
In this online course, you will learn the fundamentals of 3D skills using 3ds Max. Including different techniques of 3D modeling, composing materials and textures, and in-depth UV Unwrapping techniques. This course is designed for beginners to intermediate-level users. So if you have never used 3ds Max before, don’t worry, because the lessons at the beginning of this course are designed just for you. The curriculum is carefully crafted so you can master 3ds Max quickly and yet seamlessly.
The curriculum overview
You will learn a lot of things in this course. There is just too much to cover in this short description. For more detailed information, you can check the curriculum section. But, just to give you a quick overview of what you will learn. There are a total of 13 chapters in this course outside the introduction chapter.
In the first chapter, you will be introduced to 3ds Max’s UI. You will learn different ways to navigate the viewport and utilize the display settings. In the second chapter, you will learn basic object operations such as how to create objects, and how to modify them. You will also learn object selection, object transformation, and so on. In the third chapter, we will focus on scene management. You will learn how to use the “Scene explorer”. Then using layers, groups, etc.
Starting from the fourth chapter, we will focus on 3D modeling. In this chapter, you’ll learn polygonal modeling techniques related to each of the sub-object types. We will cover sub-object selection techniques. Then we will also discuss 3D modeling concepts such as “Normal direction” and “Backface culling”, etc. At the end of this chapter, we will have a project modeling a table lamp product called “Atollo”.
In chapter five, we will focus on precision modeling techniques. We will start with the basics of measurement units. Learn different snapping features, and then learn various tools for aligning objects, and so on. There are 3 projects in this chapter. First, we will model a stool called “Tamtam”. Then we model a side table product called “Etna”. And on the last project, we will model another side table product called “Lack”.
Next, in chapter six, we’re going to build a kitchen counter product called “Werk”. We’ll cover everything from setting up the references. Then modeling the base frame, then the panels, and so on. Until we have a finished model.
In chapter 7, we will focus on spline-based modeling techniques. You will learn the basics such as creating, selecting, and converting spline vertices. Then we move on to learn various techniques of spline editing. After that, you will learn how to turn splines into 3D models. There are a total of 7 projects in this chapter alone. First, you will model a simple S letter logo. Then in the next project model a circular classic ornament. And then model a tileable 3D pattern. Then, you will model a vase product called “Echasse”. Then you will create a crown molding object. In the next project, you will model a table lamp product called “Diana”. And then finally you will create a roman column.
In chapter 8, we will focus on subdivision modeling techniques which are very useful for creating organic-like objects. And then learn compound-based modeling techniques, which basically combine existing 3D objects to create new ones. There are 3 projects in this chapter. The first project is creating a teacup model. Then the second project is creating a washbasin. In the third project, you will create a stool product called “Alma”.
Chapter 9 is a project chapter. In this chapter, we will build a chair product called “Papilio Shell” using subdivision, compound-based modeling techniques, and other related techniques that we have discussed earlier.
Starting from chapter 10, we will shift our focus from 3d modeling to look development. In this chapter you will learn the basics of rendering, and how to use the physical material. We are also going to cover different methods of environment lighting. At the end of this chapter, we will apply what we’ve learned to add lighting and materials to the chair product that we modeled before in the previous chapter.
In chapter 11, we will focus on texturing and basic UV mapping techniques. You will learn different types of textures, from procedural textures, image textures, PBR textures, Substance textures, etc. At the end of this chapter, you will do another project. You will add material and PBR textures onto the kitchen table product that we have modeled in the earlier chapter.
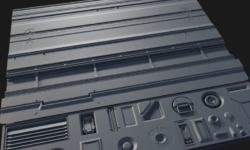
Chapter 12 focuses on the nitty-gritty of UV unwrapping techniques. After learning the tools provided, we will explore different approaches to unwrap 3D objects. From the automatic method, projection method, peel seams method, and so on. In this chapter, we will have 2 projects. The first is creating a low poly barrel. And second is creating a product packaging.
In chapter 13, we will have the last project related to look development, which is creating a chair product called “San Marco”. Because each part of the model is different, we will use different UV unwrapping techniques that best suit the model’s part. Here is the result of the final project.
The outcome
After completing the course, in sha Allah, you will have a solid foundation on how to use 3ds Max. You’ll gain a significant amount of 3D modeling and look development skills. Not to mention you will understand a lot of important concepts around 3D computer graphics. I hope you find this course interesting and beneficial.
01. INTRODUCTION
01. Introduction
02. Conventions and disclaimer
02. USER INTERFACE
01. 3ds Max UI
02. Viewport navigation
03. Alternative navigation methods
04. Display settings and startup file
03. BASIC OBJECT OPERATIONS
01. Create and modify objects
02. Object selection
03. Transformation
04. Pivot point
05. Transformation settings
06. Modifier
07. Object duplication
04. SCENE MANAGEMENT
01. Managing objects
02. Scene explorer
03. Layer management
04. Selection set and group
05. EDITABLE POLY MODELING
01. Primitive vs Editable
02. Editable poly basic operations
03. Sub-object basic selection
04. Ring and Loop selection
05. Selection conversion and preferences
06. Normal direction and backface culling
07. Edge modeling techniques
08. Cut and slice techniques
09. Surface smooth shading
10. Capping holes and Edge extrusion
11. Bridge
12. Polygon modeling techniques
13. Project Oluce Atollo table lamp
06. PRECISION MODELING
01. Measurement unit
02. Project Tamtam stool
03. Scale modes
04. Resetting transformation
05. Resizing objects precisely
06. Snapping
07. Smart Extrude
08. Project Etna side table
09. Aligning objects
10. Project Lack side table
07. PROJECT KITCHEN COUNTER
01. What we are going to create
02. Setting up the references
03. Modeling the base frame
04. The feet and top surface
05. The panels and handles
08. SPLINE MODELING
01. Introduction to spline
02. Line creation and spline vertex types
03. Spline creation exercise
04. Adding and deleting
05. Spline modification
06. Spline Boolean
07. Cross-insert, Weld, and Trim
08. Extrude modifier
09. Project S letter logo
10. Project Circular ornament
11. Project Tileable 3D pattern
12. Lathe modifier
13. Project Echasse vase
14. Bevel profile modifier
15. Project Crown molding
16. Project Abbyson Diana table lamp
17. Project Roman column
09. SUBDIVISION AND COMPOUND MODELING
01. Subdivision modeling introduction
02. Project Teacup
03. Using non-quad polygons
04. Avoiding concave polygons
05. Project Washbasin
06. Introduction to 3D Boolean
07. Advanced reference image setup
08. Project Alma 2525 JR stool
09. Conform introduction
10. PROJECT PAPILIO SHELL CHAIR
01. What we are going to create
02. Setting up 3 sided reference
03. The seat
04. The legs
05. The support
11. LOOK DEVELOPMENT BASICS
01. Renderer basics
02. Material basic concepts
03. Material editor
04. Material browser categories
05. Assigning and picking materials
06. Sample slots
07. Material library
08. Multi sub-object material
09. ActiveShade
10. Color models
11. Bit depth and high-range images
12. Environment lighting
13. Daylight system
14. Basic material parameters
15. Transparency and Clearcoat
16. Emission and Sub-surface
17. Project Chair product rendering
12. TEXTURING
01. Procedural textures
02. Non-color maps
03. Bump and displacement basics
04. Texture and UV mapping
05. Projection UV mapping
06. UV tiling and Real-world size
07. Acquiring PBR textures
08. PBR texture types
09. Applying PBR textures Part 1
10. Applying PBR textures Part 2
11. Normal texture issues
12. Project Kitchen table texturing
13. Using Substance textures
13. UV UNWRAPPING
01. Unwrap UVW modifier
02. Automatic UV unwrapping
03. UV selection techniques
04. UV editing shortcuts
05. Seams and coordinate system
06. Lock, Hide, and Freeze
07. Break, Weld, and Stitch
08. Quick transform
09. Project Low poly barrel unwrapping
10. Rendering UV template
11. Project Low poly barrel texturing
12. Unwrapping with Peel
13. Project Perfume packaging
14. PROJECT S.MARCO CHAIR
01. Project Driade S Marco Part 1
02. Project Driade S Marco Part 2
03. Project Driade S Marco Part 3
[Udemy] 3ds Max Fundamentals – 3D Modeling and Look Development.7z
[Udemy] 3ds Max Fundamentals – 3D Modeling and Look Development_Subtitles.7z


Hi.payment Options are not showing on my account>How can I buy premium membership?
Hi this video is cannot be viewed and downloaded , can you fix it?
16. Project Abbyson Diana table lamp
Thanks
This one is fixed up!