Ad Clicks : Ad Views : Ad Clicks : Ad Views : Ad Clicks : Ad Views : Ad Clicks : Ad Views :
Oh Snap!

It looks like you're using an adblocker. Adblockers make us sad. We use ads to keep our content happy and free. If you like what we are doing please consider supporting us by whitelisting our website. You can report badly-behaved ads by clicking/tapping the nearby 'Advertisement' X text.

ZBrush – Modeling Footwear

/

Release date:2017, June 8

Duration:03 h 29 m

Author:Ryan Kittleson

Skill level:Intermediate

Language:English

Exercise files:Yes

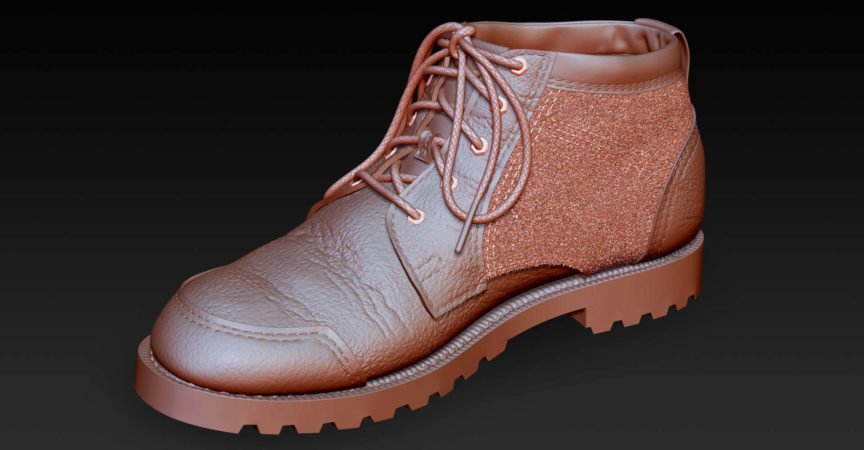
Digitally sculpting a shoe in ZBrush can sometimes seem a bit daunting. The finished product should be precise, but follow the natural curves of an organic shape. In this course, learn how to leverage the unique tools in ZBrush to digitally sculpt realistic footwear. Ryan Kittleson takes you through the steps of accurately modeling a shoe, explaining how to create the sole, cut the tread pattern, make the upper basic shape, and create the laces. Plus, he shares how to add fine details such as stiches and leather and fabric textures. Upon wrapping up this course, you’ll be equipped with the tools and techniques you need to create nearly any kind of footwear—not just the shoe sculpture shown in the course.
Topics include:
Creating the sole
Modeling the basic sole shape
Making a template for the repeating treads
Tweaking the sole geometry
Making the basic upper shape
Creating the laces
Making a shoelace brush
Adding the fine details
Sculpting specific leather detail
Sculpting the irregularities
Making fuzzy suede texture

Table of Contents

Introduction
Welcome 55s
Preparing 55s
Exercise files 41s
What to know 1m 9s
1. Creating the Sole
Importing reference images 6m 15s
Modeling the basic sole shape 6m 14s
Extruding the sole and tread thickness 5m 4s
Tapering the tread 3m
Creasing hard edges 4m 21s
Adjusting the reference images 4m 18s
Making a template for the repeating treads 10m 1s
Duplicating the tread with array mesh 5m 6s
Cutting the tread pattern 9m 40s
Tweaking the tread 6m 15s
Bending the sole 5m 26s
Tweaking the sole geometry 3m 52s
2. Making the Upper
Making the basic upper shape 7m 51s
Drawing out the patch placement 7m 29s
Extracting the simple patches 6m 59s
Extracting more complex patches 6m 4s
Making the tongue 5m 1s
Making the cuff 4m 1s
Forming the heel tab 9m 40s
Finishing the upper elements 5m 51s
3. Creating the Laces
Making a lace grommet 6m 17s
Placing the grommets with insert mesh 4m 11s
Making a shoelace brush 6m 14s
Drawing out the laces 7m 7s
Tweaking the shape of the laces 7m 27s
Creating the aglets 5m 49s
4. Adding the Fine Details
Sculpting the irregularities 6m
Adding leather texture 3m 52s
Sculpting specific leather detail 3m 30s
Adding fabric textures 5m 17s
Sculpting stitches 4m 56s
Making stitches with insert mesh 5m 55s
Making fuzzy suede texture 8m 54s
Adding stitches around the welt 3m 36s
Making the final adjustments 3m 33s
Conclusion
Next steps 27s

Watch online or Download for Free

00. Introduction
01 – Welcome
02 – Preparing
03 – Exercise files
04 – What to know

01. Creating the Sole
05 – Importing reference images
06 – Modeling the basic sole shape
07 – Extruding the sole and tread thickness
08 – Tapering the tread
09 – Creasing hard edges
10 – Adjusting the reference images
11 – Making a template for the repeating treads
12 – Duplicating the tread with array mesh
13 – Cutting the tread pattern
14 – Tweaking the tread
15 – Bending the sole
16 – Tweaking the sole geometry

02. Making the Upper
17 – Making the basic upper shape
18 – Drawing out the patch placement
19 – Extracting the simple patches
20 – Extracting more complex patches
21 – Making the tongue
22 – Making the cuff
23 – Forming the heel tab
24 – Finishing the upper elements

03. Creating the Laces
25 – Making a lace grommet
26 – Placing the grommets with insert mesh
27 – Making a shoelace brush
28 – Drawing out the laces
29 – Tweaking the shape of the laces
30 – Creating the aglets

04. Adding the Fine Details
31 – Sculpting the irregularities
32 – Adding leather texture
33 – Sculpting specific leather detail
34 – Adding fabric textures
35 – Sculpting stitches
36 – Making stitches with insert mesh
37 – Making fuzzy suede texture
38 – Adding stitches around the welt
39 – Making the final adjustments

05. Conclusion
40 – Next steps

CONTENT.md
Ex_Files_ZBrush_Modeling_Footwear.7z
info.txt


Join us on
  Channel    and      Group

  • Facebook
  • Twitter
  • Google+
  • Linkedin
  • Pinterest

Leave a Comment

Your email address will not be published. Required fields are marked *