Ad Clicks : Ad Views : Ad Clicks : Ad Views : Ad Clicks : Ad Views : Ad Clicks : Ad Views :
Oh Snap!

It looks like you're using an adblocker. Adblockers make us sad. We use ads to keep our content happy and free. If you like what we are doing please consider supporting us by whitelisting our website. You can report badly-behaved ads by clicking/tapping the nearby 'Advertisement' X text.

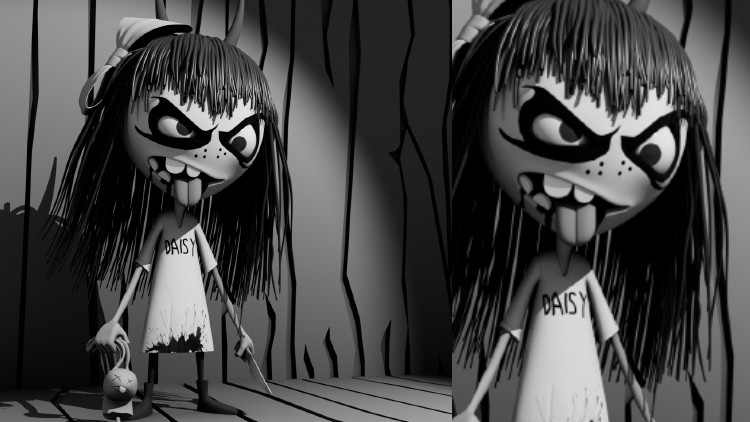
Creating a Stylized Horror Character in Maya 2022 by Digital Saucer Studios

/

Release date:2024, May

Duration:16 h 18 m

Author:Digital Saucer Studios

Skill level:Beginner

Language:English

Exercise files:Yes

You will begin by familiarizing yourself with the Maya interface, learning the basic concepts and essential modeling tools. Understanding how to navigate the camera and select objects is crucial.

Next, you’ll start the modeling process. You’ll create a human character by modeling the head, eyes, mouth, teeth, tongue, and the rest of the body, including the arms, hands, and legs. You’ll learn the importance of topology and how to achieve a great-looking result with a proper topological workflow.

We will then move on to the UV mapping process, a vital step in 3D model creation. Creating UV maps allows you to paint textures and apply them to your model. The texturing process will be done in Photoshop.

Afterward, we’ll return to Maya, where you’ll learn how to apply the texture maps to your 3D models using shaders from Maya’s Hypershade menu.

Finally, we will create a background and set up a camera to render the character. You’ll understand how lights work in Maya and how to use them to create a visually appealing scene. In the end, you’ll learn how to produce a final render, resulting in a stunning image.

Watch online or Download for Free
[Udemy] Creating a Stylized Horror Character in Maya 2022 by Digital Saucer Studios
1. Introduction

01. 001- Meet Daisy
02. 002- Some Basics
03. 003- Selecting Components

2. Modelling

02. 005- Creating a New Project
03. 006- Setting up the Image Plane
04. 007- Starting on the Head
05. 008- Starting on the Tee Shirt
06. 009- Creating the Sleeves
07. 010- Finishing the Tee Shirt
08. 011- Finishing the Neck and Tee Shirt
09. 012- Creating the Tee Shirt Collar
10. 013- Creating the Legs
11. 014- Starting on the Boot
12. 015- Finishing the Boot
13. 016- Creating the Arm and Starting the Fingers
14. 017- Continuing the Fingers
15. 018- Creating the Thumb and Palm
16. 019- Creating the Knife
17. 020- Starting the Dead Bunny
18. 021- Finishing the Bunny Ears
19. 022- Starting the Bunnys Mouth and Eyes
20. 023- Using Quad Draw to Create the Bunnys Facial Topology Part 1
21. 024- Using Quad Draw to Create the Bunnys Facial Topology Part 2
22. 025- Using Quad Draw to Create the Bunnys Facial Topology Part 3
23. 026- Using Quad Draw to Create the Bunnys Facial Topology Part 4
24. 027- Using Quad Draw to Create the Bunnys Facial Topology Part 5
25. 028- Connecting the Ears and Body to the Bunnys Head
26. 029- Creating the Tongue and Adding Thickness to the Mouth and Eyes
27. 030- Using Quad Draw to Create the Girls Head
28. 031- Finishing Quad Drawing the Girls Head
29. 032- Creating the Mouth
30. 033- Creating the Teeth
31. 034- Creating the Tongue
32. 035- Creating the Right Eye
33. 036- Creating the Left Eye
34. 037- Creating the Iris for the Eye
35. 038- Creating the Horns
36. 039- Creating the Nose (Optional)
37. 040- Attaching the Thumb Part 1
38. 041- Attaching the Thumb Part 2
39. 042- Attaching the Hand to the Arm
40. 043- Creating New Bunny Ears Part 1
41. 044- Finishing the New Bunny Ears
42. 045- Finishing the Arm
43. 046- Finishing the Hand Part 1
44. 047- Finishing the Hand Part 2
45. 048- Finishing the Hand Part 3
46. 049- Finishing the Hand Part 4
47. 050- Creating the Spine
48. 051- Creating the Blood
49. 052- Making the Blood Bigger
50. 053- Positioning the Knife in the Hand
51. 054- Starting on the Hair
52. 055- Continuing the Hair Part 1
53. 056- Continuing the Hair Part 2
54. 057- Finishing the Hair
55. 058- Starting on the Bow
56. 059- Continuing the Bow
57. 060- Finishing the Bow
58. 061- Cleaning up the Scene

3. Texturing

01. 062- Creating the Camera Angle
02. 063- Starting on Creating the Background
03. 064- Finishing the Background
04. 065- Making Additional Changes
05. 066- Creating the UV Map for the Tee Shirt
06. 067- Texturing the Tee Shirt
07. 068- Creating the Tee Shirt Texture Shader
08. 069- Creating the UV Map for the Knife
09. 070- Texturing the Knife
10. 071- Creating the Knife Texture Shader
11. 072- Creating the UV Map for the Head
12. 073- Texturing the Head
13. 074- Creating the Head Texture Shader
14. 075- Texturing the Rest of the Character and Background

4. Lighting and Rendering

01. 076- Lighting the Scene Part 1
02. 077- Creating Ambient Occlusion
03. 078- Continuing Lighting the Scene Part 1
04. 079- Continuing Lighting the Scene Part 2
05. 080- Finishing the Lighting
06. 081- Setting up the Final Render

[Udemy] Creating a Stylized Horror Character in Maya 2022 by Digital Saucer Studios.7z

[Udemy] Creating a Stylized Horror Character in Maya 2022 by Digital Saucer Studios_Subtitles.7z


Join us on
  Channel    and      Group

  • Facebook
  • Twitter
  • Google+
  • Linkedin
  • Pinterest

Leave a Comment

Your email address will not be published. Required fields are marked *