Ad Clicks : Ad Views : Ad Clicks : Ad Views : Ad Clicks : Ad Views : Ad Clicks : Ad Views :
Oh Snap!

It looks like you're using an adblocker. Adblockers make us sad. We use ads to keep our content happy and free. If you like what we are doing please consider supporting us by whitelisting our website. You can report badly-behaved ads by clicking/tapping the nearby 'Advertisement' X text.

Creating a Robot Character in Maya 2022 by Digital Saucer Studios

/

Release date:2024, May

Duration:13 h 49 m

Author:Digital Saucer Studios

Skill level:Beginner

Language:English

Exercise files:Yes

This course begins with mastering the fundamental basics of Maya, including navigating the viewport with Maya’s 3D camera, locating essential modeling tools, and manipulating objects within your scene.

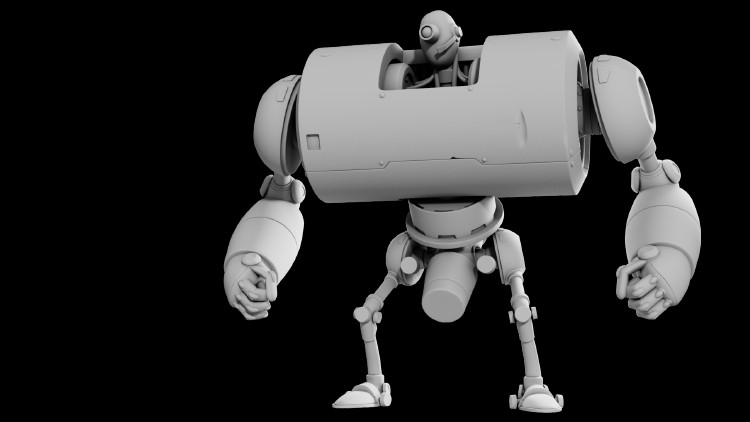
Next, you’ll delve into Maya’s core modeling tools to create a 3D character. Through repeated use of these tools, you’ll gain the experience necessary to become proficient and confident in your modeling skills. The character you’ll create is a humanoid robot with a single eye, two arms, two legs, and a cylindrical body.

Following that, you’ll learn efficient workflow techniques such as duplicating and mirroring body parts. These methods will streamline your modeling process. Lastly, you’ll explore posing techniques to add character and personality to your creation.

In the final stages, you’ll discover how to effectively use Maya’s lighting tools to illuminate your character, and you’ll render your model using Maya’s built-in renderer, Arnold. These techniques will empower you to craft compelling and visually appealing characters within Maya.

Watch online or Download for Free
[Udemy] Creating a Robot Character in Maya 2022 by Digital Saucer Studios
1. Introduction

01. 001- Introduction to the Character
02. 002- Where to Find the Modelling Tools
03. 003- Navigating, and Views
04. 004- Object Mode
05. 005- Component Mode
06. 006- Resolution and Topology

2. Modelling

01. 007- Creating a New Project
02. 008- Starting on the Body
03. 009- Importing the Image and Resizing the Body
04. 010- Mirroring the Body
05. 011- Splitting the Body Part 1
06. 012- Splitting the Body Part 2
07. 013- Starting on the Shoulder
08. 014- Detailing the Shoulder
09. 015- Finishing the Shoulder
10. 016- Starting the Arm
11. 017- Starting the Elbow
12. 018- Finishing the Elbow
13. 019- Continuing the Arm Part 1
14. 020- Finishing off the Arm
15. 021- Starting on the Hand
16. 022- Starting on the Fingers
17. 023- Duplicating and Positioning the Fingers
18. 024- Creating the Thumb
19. 025- Continuing the Hand
20. 026- Continuing the Fingers Part 1
21. 027- Continuing the Fingers Part 2
22. 028- Finishing the Fingers
23. 029- Continuing the Thumb Part 1
24. 030- Continuing the Thumb Part 2
25. 031- Finishing the Thumb and the Entire Hand
26. 032- Starting the Spine
27. 033- Continuing the Spine Part 1
28. 034- Continuing the Spine Part 2
29. 035- Finishing off the Spine
30. 036- Starting the Groin
31. 037- Continuing the Groin Part 1
32. 038- Continuing the Groin Part 2
33. 039- Finishing the Groin
34. 040- Starting on the Head
35. 041- Finishing the Head and Eye
36. 042- Starting the Mouth Piece
37. 043- Finishing the Mouth Piece
38. 044- Starting on the Hip
39. 045- Continuing the Hip
40. 046- Finishing the Hip
41. 047- Starting on the Leg
42. 048- Continuing the Leg Part 1
43. 049- Continuing the Leg Part 2
44. 050- Finishing the Leg
45. 051- Starting on the Foot
46. 052- Continuing the Foot Part 1
47. 053- Continuing the Foot Part 2
48. 054- Continuing the Foot Part 3
49. 055- Finishing the Foot and Grouping the Legs
50. 056- Creating the Spinal Chord
51. 057- Posing and Mirroring the Arms
52. 058- Finishing the Body Part 1
53. 059- Finishing the Body Part 2
54. 060- Starting on the Internal Machinery
55. 061- Continuing the Internal Machinery Part 1
56. 062- Continuing the Internal Machinery Part 2
57. 063- Continuing the Internal Machinery Part 3
58. 064- Finishing the Machinery
59. 065- Cleaning Up the Scene and Finishing Touches

3. Lighting and Rendering

01. 066- Setting up the Camera Shot
02. 067- Creating the Arnold Material
03. 068- Creating a Directional Light
04. 069- Creating the Skydome Light
05. 070- Creating the Ambient Occlusion
06. 071- Creating the Back Lights
07. 072- The Final render

[Udemy] Creating a Robot Character in Maya 2022 by Digital Saucer Studios.7z

[Udemy] Creating a Robot Character in Maya 2022 by Digital Saucer Studios_Subtitles.7z


Join us on
  Channel    and      Group

  • Facebook
  • Twitter
  • Google+
  • Linkedin
  • Pinterest

Leave a Comment

Your email address will not be published. Required fields are marked *