")
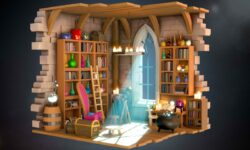
Blender 4 – The Modular and Kitbash Environment Guide by Neil Bettison (3D Tudor)

Release date:2024, August
Duration:23 h 59 m
Author:Neil Bettison (3D Tudor)
Skill level:Beginner
Language:English
Exercise files:Yes
Dive deep into the world of 3D modeling and environment creation with our comprehensive course, ‘Blender 4: The Modular and Kitbash Environment Guide’. Whether you’re just starting or looking to elevate your skills, this course will take you from basic modeling to professional-level environment design in Blender.
Are you ready to master the art of 3D environment creation?
Course Overview
This summer, embark on an exciting journey into the heart of an ancient Aztec temple surrounded by lush, untamed landscapes. Our course, ‘Blender 4: The Modular and Kitbash Environment Guide’, unlocks the full potential of Blender’s powerful toolkit. Whether you’re aiming to create stunning 3D environments for games, films, or your portfolio, this course is your gateway to mastering professional-level modeling.
Imagine creating intricate Aztec architecture, sprawling terraces, and grand staircases—all rendered in exquisite detail. What if you could create this yourself?
In this course, you’ll learn to harness the power of Blender’s Geometry Nodes to add life to your scenes with rich foliage and dynamic environments. You’ll be guided step-by-step, from the fundamentals of grey boxing to advanced geometry nodes and shader creation.
Key Features of ‘Blender 4: The Modular and Kitbash Environment Guide’:
- Master Grey Boxing: Learn to efficiently plan and structure 3D environments using grey boxing techniques, ensuring your scenes are well-organized and functional from the start.
- Comprehensive Resource Pack: Enhance your creativity with nearly 100 high-quality assets, including trees, vines, foliage, terrain plants, custom shaders, and geometry nodes—everything you need to streamline your workflow.
- Create 50+ Modular Parts: Design a wide variety of modular elements, from roofs to water features, enabling you to kitbash intricate Aztec temples and sprawling towns.
- Advanced Geometry Nodes: Unlock the power of geometry nodes for efficient procedural modeling, drastically speeding up your project creation.
- Professional-Grade Lighting: Master dynamic day and night lighting setups, including sun, moon, and star environments, to elevate the realism of your scenes.
- Advanced Compositing Techniques: Take your renders to the next level with Blender’s compositor, integrating passes like ambient occlusion, gloss, and color balance for professional-quality results.
With over 50 modular parts, advanced geometry nodes, and a massive resource pack included, you’ll have everything you need to build stunning 3D worlds!
Course Highlights
‘Blender 4: The Modular and Kitbash Environment Guide’ will take you on a spellbinding exploration of an Aztec temple, enshrouded in the mystical glow of moonlight and secluded by dense jungle foliage. Each element is meticulously placed to tell a story of ancient grandeur and forgotten worlds.
Your objective for this project is to design and model a large-scale, detailed 3D environment. You’ll start from the ground up, building and assembling modular assets using kitbashing techniques.
Blender Basics:
- Introduction to Blender’s interface and essential tools.
- Familiarize yourself with the extensive resource pack, including human reference models, material shaders, and custom geometry nodes.
As you venture closer, the towering temple rises majestically against a backdrop of starry skies, its ancient stones casting long shadows over intricately carved staircases that lead to forgotten sanctuaries.
Grey Boxing and Scene Setup:
- Master grey boxing techniques to block out scenes and set up basic lighting.
- Use ambient occlusion materials to add depth to your scenes from the start.
The temple, lit by flickering torches and the luminous moon overhead, reveals a series of platforms and terraces, each telling a story of civilizations long past but not forgotten.
Modular Part Creation:
- Learn to create over 50 modular parts, such as roofs, supports, and intricate water features, to build expansive environments.
- Apply advanced techniques for sculpting and detailing modular assets.
Enveloped in a thick jungle canopy, the sounds of the nocturnal wilderness blend with the visual feast of flora that drapes over the weathered architecture.
Advanced Geometry Nodes:
- Dive deep into geometry nodes, understanding their function and how to use parameters to control them.
- Use Blender’s powerful Geometry Nodes to effortlessly populate scenes with rich plant life, generating realistic flora dynamically.
Shader Creation and Animation:
- Build and animate shaders that replicate materials like water, wood, and stone.
- Master everything from basic setups to complex shader animations using drivers and color ramps.
Lighting and Compositing:
- Create dynamic lighting setups for day and night scenes, utilizing Blender’s powerful toolkit.
- Elevate your renders with advanced compositing, integrating multiple passes for professional-quality images.
Asset Management and Rendering:
- Organize and manage assets like a pro using Blender’s asset manager and collections.
- Learn to use both Eevee and Cycles render engines to achieve stunning results.
Resource Pack
Receive a comprehensive resource pack to support your learning journey, including:
- Nearly 100 trees, vines, foliage, and terrain plants.
- A high-resolution moon image and two animated waterfalls with custom shaders.
- A detailed human reference model and 24 material shaders.
- 8 custom geometry nodes, including fire, stackers, stone blocks, stairs, archways, planks, and foliage scatter.
Summing It All Up
Imagine standing amidst a dense jungle, the air filled with the whispers of ancient spirits. Your path, lit only by the moon’s glow, leads to an awe-inspiring Aztec temple.
By the end of ‘Blender 4: The Modular and Kitbash Environment Guide’, you’ll have the skills to create detailed, optimized, and expansive environments in Blender. Transform your 3D modeling aspirations into reality with this course and take your portfolio to the next level.
Start your journey today with ‘Blender 4: The Modular and Kitbash Environment Guide’ and become a 3D modeling expert.
[Udemy] Blender 4 – The Modular and Kitbash Environment Guide by Neil Bettison (3D Tudor)
01. Introduction
02. Section 2 Getting Started with Blender and Resources
01. Lesson 1 – Introduction to [Resource Pack] for Aztec City Modeling
02. Lesson 2 – Mastering Basic Blender Navigation Techniques
03. Lesson 3 – Complete Guide to Referencing in Blender
04. Lesson 4 – Setting Up References for the Aztec Scene in Blender
05. Lesson 5 – Blender Basics Introduction to 3D Modeling
03. Section 3 Greyboxing the Aztec Temple
01. Lesson 6 – Starting the Aztec Temple Greyboxing the Stairs
02. Lesson 7 – Modeling Simple Arches in Greybox
03. Lesson 8 – Using Circles in Greyboxing for Aztec Architecture
04. Lesson 9 – Ambient Occlusion Shaders Setup in Blender
05. Lesson 10 – Creating Pillars in the Aztec Greybox
04. Section 4 Expanding the Aztec City Greybox
01. Lesson 11 – Finishing the Greybox Temple Front
02. Lesson 12 – Greyboxing the East Wing of the Aztec City
03. Lesson 13 – Incorporating Realism into Greyboxing
04. Lesson 14 – Designing the Temple Pool in Greybox
05. Lesson 15 – Understanding Levels in 3D Modeling
05. Section 5 Finalizing the Greybox and Reference Setup
01. Lesson 16 – Completing the East Wing Greybox
02. Lesson 17 – Starting the Aztec Market Area Greybox Techniques
03. Lesson 18 – Building Complexity in the Greybox Model
04. Lesson 19 – Creating Realistic Working Environments in Blender
05. Lesson 20 – Finishing the West Wing of the Temple Greybox
06. Section 6 Building Modular Assets
01. Lesson 21 – Enhancing the Interest in Your Scene
02. Lesson 22 – Finalizing the Greybox Model
03. Lesson 23 – Exploring Different Perspectives and Angles in Blender
04. Lesson 24 – Completing the Greybox for the Aztec Scene
05. Lesson 25 – Setting Up and Using References in Blender
07. Section 7 Asset Management and Initial Assembly
01. Lesson 26 – Creating Your First Modular Pieces in Blender
02. Lesson 27 – Working with Seams and Sharps in Blender
03. Lesson 28 – Introduction to Blender Shaders
04. Lesson 29 – How to Create a Sky Texture in Blender
05. Lesson 30 – Blender UV Mapping Techniques
08. Section 8 Advanced Modeling Techniques
01. Lesson 31 – Organizing with Blender Collections
02. Lesson 32 – Tutorial on Blenders Asset Manager
03. Lesson 33 – Creating Initial Asset Manager Parts
04. Lesson 34 – Crafting the Pillars for the Aztec City
05. Lesson 35 – How to Create Stone Slabs in Blender
09. Section 9 Working with Arches and Complex Structures
01. Lesson 36 – Cleaning Up Your Asset Pack in Blender
02. Lesson 37 – Exploring Geometry Nodes in Blender
03. Lesson 38 – Easy Techniques for Creating Stairs in Blender
04. Lesson 39 – Bringing Models to Life with Details
05. Lesson 40 – Key Modular Pieces and Supports in Blender
10. Section 10 Utilizing Booleans and Geometry Nodes
01. Lesson 41 – Modeling Angles for Aztec Architecture
02. Lesson 42 – Integrating Modular Pieces into the Scene
03. Lesson 43 – Planning and Creating Arches in Blender
04. Lesson 44 – Managing Polygon Count in 3D Models
05. Lesson 45 – Creating Arches with Geometry Nodes
11. Section 11 Roof Construction and Texturing
01. Lesson 46 – Working with Booleans in Blender
02. Lesson 47 – Creating More Complex Meshes in Blender
03. Lesson 48 – Finalizing the Arches Pack for the Aztec City
04. Lesson 49 – Working with GeoStacker in Blender
05. Lesson 50 – Finishing the Bamboo Roofs in the Aztec Scene
12. Section 12 Completing Roofs and Structural Supports
01. Lesson 51 – Starting the Roof Pack in Blender
02. Lesson 52 – Crafting More Complex Roof Structures
03. Lesson 53 – Using the Knife Tool for Precision Modeling
04. Lesson 54 – Creating Roof Parts that Fit Together Seamlessly
05. Lesson 55 – Understanding Normals and Their Usage in Blender
13. Section 13 Modeling Windows and Bridges
01. Lesson 56 – Adding Materials to the Roof Structures
02. Lesson 57 – Completing the Roof Pack for the Aztec City
03. Lesson 58 – Integrating Supports into the Greybox Model
04. Lesson 59 – Working with Stone Blocks for Aztec Architecture
05. Lesson 60 – Utilizing Modular Pieces Effectively in Blender
14. Section 14 Creating and Texturing Props
01. Lesson 61 – Modeling Windows for the Aztec Scene
02. Lesson 62 – Naming and Finalizing the Window Models
03. Lesson 63 – Creating Bridges in Blender for the Aztec City
04. Lesson 64 – Completing the Bamboo Bridge Model
05. Lesson 65 – Creating Stone Floors with Geometry Nodes
15. Section 15 Finalizing the Prop Pack
01. Lesson 66 – Starting the Prop Pack for the Aztec Scene
02. Lesson 67 – Easy Techniques for Creating Vases in Blender
03. Lesson 68 – Modeling Unique Props for the Aztec City
04. Lesson 69 – The Best Way to Create Barrels in Blender
05. Lesson 70 – Applying Materials to the Prop Models
16. Section 16 Animating and Enhancing Water Features
01. Lesson 71 – Dealing with Seams in Blender
02. Lesson 72 – Finalizing the Prop Pack for the Aztec City
03. Lesson 73 – Creating the Swimming Pool for the Aztec Temple
04. Lesson 74 – Utilizing Volume Shaders for Water Effects
05. Lesson 75 – Designing an Aztec Fountain in Blender
17. Section 17 Developing the Temple Interior and Pool Area
01. Lesson 76 – Fixing Geometry Nodes Issues in Blender
02. Lesson 77 – In-depth Discussion on Waterfall Shaders
03. Lesson 78 – Animating Shaders for Dynamic Effects
04. Lesson 79 – Creating a Waterfall Feature in Blender
05. Lesson 80 – Finalizing the Water Feature Pack
18. Section 18 Detailing the Aztec Architecture
01. Lesson 81 – Integrating Water Features into the Aztec Environment
02. Lesson 82 – Designing Internal Spaces for the Aztec Temple
03. Lesson 83 – Finishing the Pool Area in the Aztec Scene
04. Lesson 84 – Adding the Temple Base to the Scene
05. Lesson 85 – Integrating Roof Structures into the Scene
19. Section 19 Finishing the Temple Structures
01. Lesson 86 – Modeling Doors for the Aztec Architecture
02. Lesson 87 – Maintaining the Aztec Aesthetic in Modeling
03. Lesson 88 – Troubleshooting Door Shader Issues
04. Lesson 89 – Crafting the Temple Door for the Aztec City
05. Lesson 90 – Breaking Models into Parts for Optimization
20. Section 20 Large Market and Warehouse Construction
01. Lesson 91 – Finalizing the Temple Door Model
02. Lesson 92 – Starting the Market Pack for the Aztec City
03. Lesson 93 – Modeling the Small Market Building
04. Lesson 94 – Basic Guide to Sculpting Cloth in Blender
05. Lesson 95 – Finishing the Small Market Building
21. Section 21 Detailing and Texturing Market Elements
01. Lesson 96 – Starting the Large Market Building
02. Lesson 97 – Creating Doorways for the Market Building
03. Lesson 98 – Texturing the Large Market Building
04. Lesson 99 – Modeling the Warehouse for the Aztec City
05. Lesson 100 – Creating Door Arches in Blender
22. Section 22 Enhancing the Market Area
01. Lesson 101 – Simulating Cloth as Door Overhang
02. Lesson 102 – Adding Texture Detail to Door Overhang
03. Lesson 103 – Placing Door Assets in the Scene
04. Lesson 104 – Replacing Greybox Blocks with Final Assets
05. Lesson 105 – Adding Pillar Supports to the Aztec Scene
23. Section 23 Suspension Bridges and Structural Refinements
01. Lesson 106 – Working on Balcony Placement in the Aztec City
02. Lesson 107 – Adjusting Kitbash Blocks for Better Fit
03. Lesson 108 – Continuing Work on Large Structure Pieces
04. Lesson 109 – Detailing the Market Section of the Aztec City
05. Lesson 110 – Adding Small Details and Props to the Market Area
24. Section 24 Detailing and Texturing the Temple Entrance
01. Lesson 111 – Integrating Suspension Bridge Attachments
02. Lesson 112 – Placing Supports and Arches in the Aztec City
03. Lesson 113 – Modeling Tower Details for the Aztec Temple
04. Lesson 114 – Refining Indoor Parts and Door Placement
05. Lesson 115 – 3D Modeling the Entrance for the Aztec Temple
25. Section 25 Rooftops and Final Architectural Details
01. Lesson 116 – Adding Detail to the Entrance Area
02. Lesson 117 – Focusing on the Entrance Archway Design
03. Lesson 118 – Creating Stone Face Decorations for the Door
04. Lesson 119 – Adding Decorative Details to the Archway Top
05. Lesson 120 – Texturing the Entrance Area in Blender
26. Section 26 Completing and Placing Rooftops
01. Lesson 121 – Creating Stone Borders for the Aztec City
02. Lesson 122 – 3D Modeling the Rooftops in Blender
03. Lesson 123 – Creating Variations of Rooftops for the Aztec Scene
04. Lesson 124 – Designing Decorative Rooftops for the Aztec Temple
05. Lesson 125 – Creating Radial Symmetrical Rooftop Decorations
27. Section 27 Torch and Fire Elements Creation
01. Lesson 126 – Texturing the Rooftops in Blender
02. Lesson 127 – Placing Rooftops in the Aztec City Scene
03. Lesson 128 – Plant Pot Placement in the Aztec Environment
04. Lesson 129 – Using Boolean for Door Section Cutouts
28. Section 28 Finalizing Torch Placement and Fire Effects
01. Lesson 130 – Fixing Boolean Mesh Issues in Blender
02. Lesson 131 – Connecting Blocks After Boolean Operations
03. Lesson 132 – Fixing Additional Boolean Holes
04. Lesson 133 – 3D Modeling a Torch and Brazier for the Aztec Scene
05. Lesson 134 – Designing the Face of a Tiki Torch
06. Lesson 135 – Adding Side Decorative Details to the Torch
29. Section 29 Optimizing and Organizing Your Scene
01. Lesson 136 – Crafting a Decorative Base for the Torch
02. Lesson 137 – Creating Wall Attachments for the Torch
03. Lesson 138 – Texturing Torches in Blender
04. Lesson 139 – Placing Fire Geometry Nodes for Realism
05. Lesson 140 – Tweaking Fire Geometry Node Parameters
30. Section 30 Placing Foliage and Natural Elements
01. Lesson 141 – Positioning Fire Torches in the Scene
02. Lesson 142 – Using Array Modifiers for Fire Brazier Patterns
03. Lesson 143 – Crafting Additional Decorative Supports
04. Lesson 144 – Texturing the Fire Brazier
05. Lesson 145 – Adding Fire Geometry Nodes to the Brazier
31. Section 31 Final Foliage Placement and Terrain Sculpting
01. Lesson 146 – Torch Placement in the Aztec City Scene
02. Lesson 147 – Continuing Light Placement for the Aztec Environment
03. Lesson 148 – Blender Optimization Tutorial for Large Scenes
04. Lesson 149 – Organizing Assets into Collections in Blender
05. Lesson 150 – Continuing Asset Cleanup in Blender
32. Section 32 Completing Terrain and Background Setup
01. Lesson 151 – Foliage Placement in the Aztec Environment
02. Lesson 152 – Positioning Vine Foliage on Overhangs
03. Lesson 153 – Continuing Vine Placement in the Aztec City
04. Lesson 154 – Plant Placement in Pots for the Aztec Scene
05. Lesson 155 – Working with Fern Placement in Blender
33. Section 33 Final Plant and Landscape Placement
01. Lesson 156 – Final Foliage Placements in the Aztec City
02. Lesson 157 – Adding Trees Within the Aztec City
03. Lesson 158 – Sculpting the Terrain Platform in Blender
04. Lesson 159 – Optimizing Terrain for Large Environments
34. Section 34 Finalizing the Skydome and Lighting
01. Lesson 160 – Vertex Painting the Terrain in Blender
02. Lesson 161 – Weight Painting Plants onto the Platform
03. Lesson 162 – Continuing Plant Placement in the Aztec Scene
04. Lesson 163 – Camera Setup and Large Scale Landscape Design
05. Lesson 164 – Modeling and Texturing Large Scale Terrain
06. Lesson 165 – Weight Painting Trees for Realism
35. Section 35 Rendering and Post-Processing
01. Lesson 166 – Placing Small Terrain Platforms with Large Landscapes
02. Lesson 167 – Working on the Skydome for the Aztec Scene
03. Lesson 168 – Basics of Blender Eevee and Cycles Render
04. Lesson 169 – Blender Camera Setup and Turntables Tutorial
05. Lesson 170 – Creating a Day Scene Lighting in Blender
36. Section 36 Final Touches and Scene Completion
01. Lesson 171 – Designing Night Scene Lighting for the Aztec City
02. Lesson 172 – Refining Night Scene Lighting and World Shader
03. Lesson 173 – Rendering Out the Day Scene in Blender
04. Lesson 174 – Compositing the Day Scene in Blender
05. Lesson 175 – Enhancing Gloss and Glare in the Compositor
37. Section 37 Compositing and Enhancing Visuals
01. Lesson 176 – Color Correcting the Day Scene in Blender
02. Lesson 177 – Compositing Night Scene Lighting Effects
[Udemy] Blender 4 – The Modular and Kitbash Environment Guide by Neil Bettison (3D Tudor).7z.rar