Ad Clicks : Ad Views : Ad Clicks : Ad Views : Ad Clicks : Ad Views : Ad Clicks : Ad Views :
Oh Snap!

It looks like you're using an adblocker. Adblockers make us sad. We use ads to keep our content happy and free. If you like what we are doing please consider supporting us by whitelisting our website. You can report badly-behaved ads by clicking/tapping the nearby 'Advertisement' X text.

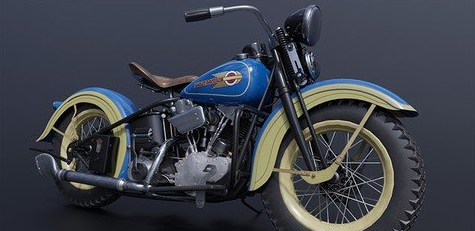
Blender 3 Motorcycle Creation by Darrin Lile

/

Release date:2022, November

Author:Darrin Lile

Skill level:Beginner

Language:English

Exercise files:Yes

What you’ll learn

  • 3D Modeling with Blender
  • UV Mapping
  • Texturing in Substance Painter
  • Lighting and Rendering in Blender
  • Editing Video in Blender

Requirements
This course uses Blender 3 and Adobe Substance Painter.

Discription
In this course we will use Blender and Substance Painter to create a classic 1936 Harley-Davidson Knucklehead motorcycle. You will learn about 3D modeling and UV mapping in Blender, as well as creating materials and textures in Substance Painter. We will also go over lighting and rendering in Blender; and even use Blender’s Video Sequence Editor to edit our final video.

What do I get?
This course contains 116 videos totaling more than 18 hours of content. You will also have access to the course project files which include the Blender scene files, the reference images, and HDR images.

What will we do?
We will begin by setting up our reference images in Blender. We will import side, front, and back views to help us with the creation and placement of our 3D models. You’ll learn about Blender’s modifier stack, how uniform scale can improve the effectiveness of Blender’s tools, and some tips and tricks about staying organized during a large project such as this.
Once the modeling is complete, we will work on UV mapping each of the objects that make up the motorcycle. You’ll learn about the different methods of UV mapping that Blender has to offer, and how to efficiently pack your UV islands within the UV texture space.
Then it’s time to export our model out of Blender and bring it into Substance Painter for texturing. You’ll learn how to use layer masks, and generators, and grunge maps to create detailed, realistic textures. And when the textures are complete, you’ll learn how to export Color, Normal, Metallic, and Roughness maps that are compatible with Blender and set them up to the appropriate materials.

Finally, we will use HDR images to light the scene and then render multiple shots that can be edited together in Blender Video Sequence Editor.

Why should I get this?
If you’ve ever wanted to create detailed, realistic objects in Blender then this course is for you. You’ll learn all of the modeling techniques and texturing tools you’ll need to create impressive, complex models for games and animations. This is a comprehensive course that takes you from the first polygon to the final render and gives you all the tools you need to create your own amazing projects.

Who is Course for?
Beginner 3D artists interested in learning more about Blender and Substance Painter

Watch online or Download for Free
1. Introduction

01. Course Overview
02. Reference Images and Scene Scale
03. Setting Up the Reference Images

2. Modeling the Front of the Motorcycle

01. Beginning the Chassis of the Bike
02. Continuing the Chassis
03. Finishing the Chassis
04. Blocking In the Gas Tank
05. Beginning the Seat
06. Blenders Modifier Stack
07. Blocking in the Tires
08. Beginning the Fender
09. Creating the Fenders
10. Modelng the Headlight
11. Creating the Handlebars
12. Beginning the Front Brackets
13. Continuing the Front Brackets
14. Finishing the Front Brackets
15. Beginning the Horn
16. Finishing the Horn
17. Modeling the Front Coils
18. Adding Detail to the Horn
19. Modeling the Front Fork
20. Modeling the Fork Bracket
21. Connecting the Chassis Piece
22. Modeling the Handlebar Connection
23. Adding Details to the Handlebars
24. More Details on the Handlebars
25. Continuing with Connecting Details
26. Finishing Details Around the Handlebars

3. Modeling the Midsection of the Motorcycle

01. Beginning the Speedometer
02. Continuing the Speedometer
03. Finishing the Speedometer
04. Beginning the Chain Cover
05. Finishing the Chain Cover
06. Beginning the Oil Tank and Battery
07. Finishing the Oil Tank and Battery
08. Creating the Air Cleaner Cover
09. Beginning the Knuckleheads
10. Finishing the Knuckleheads
11. Between the Cylinders
12. Beginning the Engine Cylinders
13. Finishing the Engine Cylinders
14. Beginning the Engine Case
15. Beginning the Case Cover
16. Finishing the Engine Case Cover
17. Modeling the Rod Bases
18. Finishing the Engine Case
19. Beginning the Transmission
20. Continuing the Transmission
21. Finishing the Transmission
22. Beginning the Kickstart Pedal
23. Finishing the Kickstart Pedal
24. Beginning the Exhaust Pipes
25. Modeling the Tool Box
26. Beginning the Circuit Breaker
27. Continuing the Circuit Breaker
28. Finishing the Circuit Breaker
29. Continuing the Exhaust Pipes
30. Connecting the Exhaust Pipes
31. Beginning the Rocker Clutch Pedal
32. Finishing the Rocker Clutch Pedal
33. Beginning the Engine Guard
34. Finishing the Engine Guards
35. Beginning the Gear Shift
36. Continuing the Gear Shift
37. Adding to the Transmission
38. Finishing the Gear Shift Connections

4. Modeling the Tires and Wheels

01. Beginning the Wheels and Spokes
02. Finishing the Wheels and Spokes
03. Beginning the Tire Treads
04. Finishing the Tire Treads

5. Finishing the Modeling

01. Beginning the Drive Chain
02. Finishing the Drive Chain
03. Modeling the Tail Pipe
04. Using the Boolean Modifier on the Gas Tank
05. Appending Objects Into Your Scene
06. Applying the Modifiers and Converting the Paths
07. Special Cases When Applying Modifiers

6. UV Mapping the Motorcycle

01. A Quick Introduction to UV Mapping
02. UV Mapping the Exhaust Pipes
03. Beginning the UV Map of the Fenders
04. Finishing the UVs of the Fenders
05. UV Mapping the Chassis
06. UV Mapping the Wheels and Tires
07. UV Mapping the Horn and Handlebars
08. UV Mapping the Headlight and Gas Tank
09. UV Mapping the Front Fork and the Oil Tank
10. UV Mapping the Engine
11. UV Mapping the Transmission and Circuit Breaker
12. UV Mapping the Chain and Chain Cover
13. Finishing the UV Maps

7. Texturing in Substance Painter

01. Creating the Materials in Blender
02. Exporting to Substance Painter
03. Using the Poly Fill Tool
04. Texturing the Chassis and Front Fork
05. Using a Generator in Substance Painter
06. Continuing with the Black Metal
07. Fixing UV Errors and Reimporting
08. Adding Materials to the Handlebars
09. The Chain Guard and Exhaust Pipes
10. Using Generators, Groups, and Grunge
11. Using the Generator to Add Dirt
12. Texturing the Fenders and Taillight
13. Painting the Trim on the Fenders
14. Painting Normal Information
15. Adding a Decal to the Gas Tank
16. Texturing the Speedometer and Headlight
17. Exporting the Texture Maps

8. Rendering in Blender

01. Assigning the Texture Maps in Blender
02. Adding an HDR Image in Blender
03. Adjusting the Lighting and Rendering an Image
04. Setting up to Render an Animation
05. Rendering an Animation in Blender
06. Editing Video Clips in Blender
07. Rendering the Edited Video
08. Conclusion

Blender 3 Motorcycle Creation Project Files

02.1 Project Files.7z
Blender Scene Files.7z
HDRIs.7z
Reference Images.7z
Textures.7z.001
Textures.7z.002
Textures.7z.003

[Udemy] Blender 3 Motorcycle Creation_Subtitles.7z


Join us on
  Channel    and      Group

  • Facebook
  • Twitter
  • Google+
  • Linkedin
  • Pinterest

Leave a Comment

Your email address will not be published. Required fields are marked *