Environment Creation in Unreal Engine 4

Release date:2022, September
Skill level:Beginner
Language:English
Exercise files:Yes
Course URL: https://www.uartsy.com/course/environment-creation-in-unreal-engine-4
Uartsy – Environment Creation in Unreal Engine 4 with high-speed direct link. These awesome Uartsy – Environment Creation in Unreal Engine 4 made by Uartsy and the first update Released In 2020.
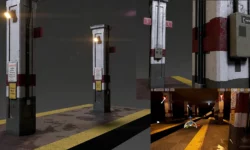
Environment artists set the tone for the entire game world and are critical to building games that keep us entranced for hours on end. The best environments immerse us in the story and make us feel like we’re truly part of these fantasy worlds.
In this course from world-renowned artist and favorite ZBW instructor, David Lesperance, you will learn to create those stunning, memorable environments using the very same techniques and programs that the pros use, including Unreal Engine 4.
The 5 most important lessons:
- How to get started creating 3D assets for fully immersive video game environments
- How to take your environment art to a whole new level with advanced modeling and sculpting techniques
- How to set up your 3D environmental assets and create a functioning game world in Unreal Engine 4
- Tips for setting the mood and capturing the feeling of a given scene in your game
- Plus more professional tips and best practices for environment artists working in game production
Project 01 Basics of Modeling for Games
01 Introduction to Texel Density
02 Introduction to Map Sizes
03 General Guidelines for Enhancing Resolution
04 Texel Density Continued
05 Introduction to Subdivision Modeling
06 Subdivision Modeling Part 2
07 Subdivision Modeling Part 3
08 Modeling with Booleans
09 Spline Modeling
10 Whats Next
11 Basic High-Poly Modeling Part 1
12 Basic High-Poly Modeling Part 2
13 Edge Creasing
Project 02 Building a Design Kit, Starting the Hallway Model and setting up Collision
01 Blocking In a Hallway Asset
02 Modeling the Level Design Kit Part 1
03 Modeling the Level Design Kit Part 2
04 Modeling the Level Design Kit Part 3
05 Checking Texture Scale
06 Building Low Poly Models
07 Spline Modeling
08 Low Poly Modeling Continued
09 Checking the Model and Breaking Repetition
10 Modeling the Hallway Ceiling
11 Adjusting Scale
12 Checking the Model in Unreal
13 Setting Up Collision Part 1
14 Setting Up Collision Part 2
Project 03 Creating UV’s in Headus and 3DS Max
01 Introduction
02 Relaxing UVs
03 UVing Part 1
04 UVing Part 2
05 UVing Part 3
06 UVing Part 4
07 UVing Part 5
08 Combining Geo
09 Beginning to Pack UV Islands
10 Continuing to pack UVs
11 Packing More UVs and Tesselating the Object
12 Packing UVs and Baking Normals
13 Using Quixel Suite for Texturing
14 Continuing to Texture and Modeling Pannels
15 Continuing to Model the Pannel
16 Making Desings on the Fly
Project 04 Tuning Texture Maps
01 Setting up Material Shading Atributes in Unreal4
02 Modeling Interior Bulkheads
03 Creating a Lock Mechanism for Our Hatch
04 Creating Small Assets For the Hatch
05 Continuing to Add to the Hatch Structure
06 Modeling in Detail Pieces
07 Connecting and Positioning Assets
08 Modeling in Engineering Components
09 Adding Detail Quick using Boolians
10 Accurately Positioning Assets into the Scene
11 Implimenting more Structual Details
12 Testing our Assets in Unreal4
13 Creating Detailed Iterations
14 Evaluating Surface Normals
15 Digging Deeper into Surface Normals
16 Stitching, Breaking and cutting UVs
17 More UVs
Project 05 Stacking UVs and Creating Light Maps
01 Stacking UVs in UV Layout Part 1
02 Stacking UVs in UV Layout Part 2
03 Offsetting Stacked UVs
04 Ripping Maps Using Xnormals
05 Importance of Stacking
06 Setting up for Texturing
07 Layer Blending Options
08 Cleaning up AO and Map Size Discussion
09 Creating Masks in 3Ds Max
10 Adding Stains
11 Adding Rust
12 Adjusting Values
13 Fixing the Pipe Bottoms
14 Adding More Value Variation
15 Creating a Roughness Mask
16 Plugging in New Maps
17 Setting up Light Maps
18 Trouble Shooting
Project 06 Spline Modeling and UV’ingThe Sci Fi Crate
01 Creating Game Assets
02 Spline Modeling Game Assets P1
03 Spline Modeling Game Assets P2
04 Detailing Game Assets P1
05 Detailing Game Assets P2
06 Adding Functional Ornate Details P1
07 Adding Functional Ornate Details P2
08 Constructing The Game Asset P1
09 Constructing The Game Asset P2
10 Adjusting Existing and Creating new Handles Hinges and Bolts P1
11 Adjusting Existing and Creating new Handles Hinges and Bolts P2
12 UVing the Game Asset P1
13 UVing the Game Asset P2
14 Creating Texture Maps For the Game Asset
Project 07 Creating Realistic Fabric in Marvelous Designer
01 Intro
02 Setting Up the Tarp in Marvelous Designer
03 Bringing the tarp into 3DS Max
04 Modifying the topology of the tarp in 3DS Max
05 Baking Tarp Maps In 3Ds Max
06 Modifying the UVs of the tarp in 3DS Max
07 Adjusting the Tarp to Fit Over the Crate
08 Creating Texture Maps for the Tarp Part 1
09 Creating Texture Maps for the Tarp Part 2
10 Creating Texture Maps for the Tarp Part 3
11 Bringing the Tarp Into Unreal
12 Creating a Roughness Map for the Tarp
13 Creating a Detail Map for the Tarp
14 Adjusting the Tarp Material in Unreal
15 Modifying the Textures to Work Better in the Scene
16 Adjusting the Scenes Lighting and Surface Attributes
17 Refining the Tarps Edge
18 Modifying Scene Lighting and Assets Maps
19 Reworking the Crates Emissive Texture
20 Integrating the Modified Crate and Adjusting the Scenes Lighting
21 Capturing a Screenshot
Project 08 Creating a Tileable Floor Asset
01 Introduction and Project Setup
02 Setting Up Zbrush Scene
03 Adding Detail to Tiles
04 Adding Detail to Tiles Part 2
05 Adding Detail to Tiles Part 3
06 Premultiplying and Decimating the Mesh
07 Generating UVs and Adjusting in Max
08 Cleaning Mesh and AO Setup
09 Baking Texture Maps
10 Ripping and Adjusting Maps
11 Applying Normal Map
12 Layering Passes
13 Tweaking UVs and Cavity Pass
14 Adding Color and Texture Variation
15 Detailing with a Color Overlay
16 Bringing the Scene into Unreal
17 Enhancing your Texture Detail
18 Giving Grit to the Tiles
19 Adding Detail with ZBrush
20 Settingup Diffuse Detail and Normal Maps
21 Placing the Tiles in UDK
22 Modifying the Spec Map
23 How to Achieve Photo Real Textures
24 Finalizing the Tiles
Project 09 Texturing in Quixel Suite and Better Understanding Light Maps
01 Understanding Light Maps
02 Fixing Overlapping Uvs
03 Up Resing Light Maps
04 Tweaking Light Map Resolution
05 Unreal Lighting Overview
06 Lighting Summary
07 Saving Out Each Panel
08 Baking out Maps with xNormals
09 Establishing a Base Material In DDO
10 Masking By Material ID
11 PBR Discussion
12 Trouble Shooting DDO
13 Adding More Material Variation
14 Changing Colors
15 DDO Maps Explained
16 AO Discussion
17 Adding Dirt
18 Adjusting Masks
19 Final Material Settings
Project 10 Creating a Prop From a Concept
01 Calling Out Unique Assets
02 Modeling with Concept Reference
03 Understanding the Workflow
04 Modeling Montage
05 Seeing your Model in a Practicle Sense
06 Knowing your Industry
07 Modeling Montage
08 Rendering and Refining the Model
09 Final Tweaks
10 Introduction to Atlasing
11 Implementing Atlasing
12 Examples of Altasing
13 Furthers Showing the Speed of Atlas Texturing
14 Making an Atlas Texture
Project_Files.7z
[Uartsy] Environment Creation in Unreal Engine 4_Subtitles.7z