LAB Color Foundations Part 1 – Photoshop
Release date:2014, November 19
Duration:00 h 08 m
Author:Patrick Inhofer
Skill level:Beginner
Language:English
Exercise files:Yes
Starting with Photoshop
In a previous Insight I shared with you my enthusiasm for the new option in DaVinci Resolve 11 to color correct within the LAB color space.
That Insight also showed the Resolve interface quirks when working within LAB. Many of the traditional tools we use in RGB don’t work as we expect in LAB (the color wheels) and some—they don’t work at all, such as Saturation (which increase both Saturation and Contrast – since it exerts influence on the L channel, as well as the A and B channels).
Having explored which tools to use and which to avoid—the next step in developing a battle plan for LAB color correction in DaVinci Resolve?
Deciding: What’s the first tool we should manipulate in LAB color?
When teaching color correction, this is always the first question I strive to answer… what tool should I touch first?
The answer lies in the types of images that LAB is traditionally thought to work best with…
Images without significant color balance issues
Images that tend to have washed out color pallets.
Images with expanses of similar colors that would benefit from enhanced color separation.
Generally, images that match those criteria are traditionally thought to be solid candidates for LAB colorspace grading. As we’ll see later in this series—those are not the only types of images we’ll be considering for LAB color grading, but it’s the best place to start.
The Canyon Conundrum Meets Sunbelt Express
The Canyon Conundrum is the subtitle of the book that’s the basis for this series of Insights—and it starts with canyon shots as being ideal representations of images suitable for color correction in LAB:
Canyons have large expanses of similar colored bluffs, plains and cliffs.
Reds run into rust run into browns run into yellows. Teasing out these colors can be a challenge—unless you’re working in LAB, which is ideally suited to it.
Sunbelt Express is an indie feature I color graded and managed to secure the rights to use a small portion of that film here on Mixing Light. And guess what? Half the film was shot in the Arizona desert! I’ve become very familiar with the Canyon Conundrum and the difficulty in pulling an interesting image from vast expanses of similar colors.
Sunbelt Express is the perfect vehicle to begin our exploration of LAB color correction.
LAB. Meet LOG.
As you watch this Insight, keep in mind that Sunbelt Express was shot on an Arri Alexa in ProRes444 as LogC. This means two things to us:
1) The starting point is flat and desaturated – Which also happens to be a criteria for the most effective use of grading within the LAB colorspace. Later in this series we’ll take a look at how LAB does on material recorded LOG but is quite colorful—and see if that proves to be a limitation… or not.
2) We’ve got terrific color fidelity – ProRes444 means our color channels are recorded at the same sample rate as the Luminance channel. Thus, we should be able to hit these images pretty hard before exposing codec macro blocking. As you’ll see, noise never became an issue on this shot… in LAB or in Part 2 of this Insight, in RGB.
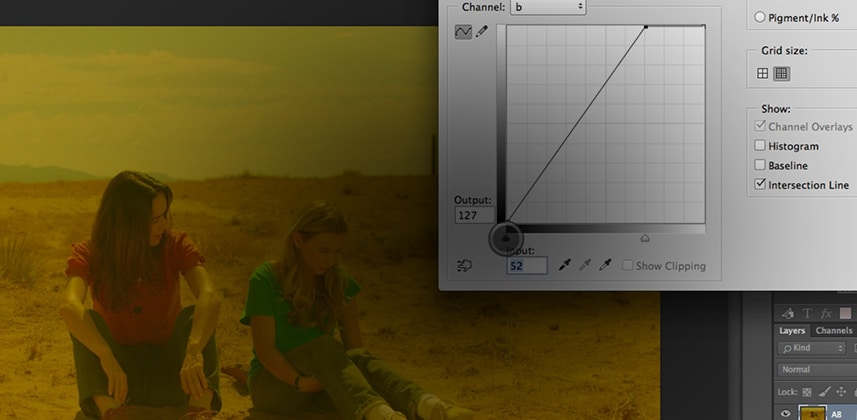
The Basic LAB Contrast Curve
In this Insight, we’ll start with the most basic of LAB moves… increasing the color contrast of our images. And you’ll start by seeing how our Photoshop colleagues perform this move in Photoshop.
I’m going to limit myself just to increasing color contrast.
Why? Because my point of starting in Photoshop is showing how there’s a fundamental difference between how Photoshop Curves work and how Davinci Resolve Curves work. And this limits the extreme moves you can do in Photoshop that aren’t as effective in Resolve.
In Part 2 of this Insight we’ll move into DaVinci Resolve and also add a nice contrast curve to add a lot more pop to image, compared to what we execute in Photoshop.


 Channel


