ZBrush Masterclass Volume 1

Release date:2018
Duration:03 h 25 m
Author:Jesse Sandifer
Skill level:Beginner
Language:English
Exercise files:Yes
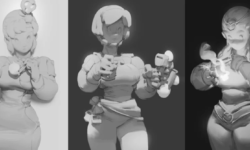
The Sharkyan: Inventing Creative Characters In this video, we will be diving into the world of creating highly detailed characters. To start we will create a block of digital thumbnails. Then we enter ZBrush 4R2 where we will discuss using new features mixed with traditional sculpting techniques that will enable us to create new characters quickly. Here at cmiVFX we maintain a current training library for the latest versions of popular software titles. When it comes to high end CG and VFX training, there is only once choice… cmiVFX!
Chapter Descriptions
Chapter 1: Generating Quick Thumbnails
This first chapter we’ll utilize a fun and free online doodling program called ScribblerToo to create some basic thumbnails for character ideas. We will go over what thumbnails are intended for and how they really help to kick off the design phase.
Chapter 2: Thumbnails to Concepts
Once we have a good variety of thumbnails created, we can then open them up in Photoshop to create some quick line art to describe basic forms and possible design features for our character.
Chapter 3: ZBrush 4R2 Intro
Now that we have our basic design thoughts roughed out, we can move into our favorite program for sculpting characters, ZBrush 4R2. Before beginning The Sharkyan, we will discuss my favorite brushes, alphas, matcaps, and keyboard shortcuts, among others. Also we will have an overview of the basics of interfacing with your object.
Chapter 4: Dynamesh!
An exciting new feature introduced in the 4R2 release, Dynamesh gives us the ability to not worry about topology at all and just focus on creating our character in a very intuitive and streamlined way. We will use it to take a sphere and turn it into a simple t-pose mesh that is ready for refining. Introducing Dynamesh into your workflow will improve your process in such a dramatic way.
Chapter 5: Blocking
This is the meat of the character sculpting process. Having a focused attack on building up forms is key for good character creation. We will focus on adding important shapes, utilizing both human and shark anatomy, and go over how to start implementing certain design features that will give it the personality and demeanor that starts to breathe life into The Sharkyan.
Chapter 6: Adding Silhouette
It’s always important to make an interesting silhouette so your character will pop off the screen. In this early process of getting The Sharkyan off the ground, it’s never too late to add silhouette adjustments that reinforce overall design intent and make it a stronger piece.
Chapter 7: Exploring Head Designs
The face of any character has so much to do with it’s personality and attitude. Using layers, we will explore a few head design possibilities and show off what mixing layers can do for design discoveries. This will segue us into the next dvd in the series where we finish out the detailing and final sculpting on The Sharkyan.