Release date:2019, December 7
Author:HASHEM ALSHAER
Skill level:Beginner
Language:English
Exercise files:Yes
This project-based RealFlow course is geared towards the technically inclined independent or resident studio artist. The learning structure used in this video allows all users to be able to follow its content from start to end.
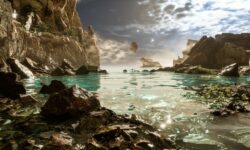
Taught by Hashem Alshaer, this course covers a conceptually high-end visual effects scene. It uses heavily researched techniques to apply a well-focused art-directed look on an epic stormy water simulation, including a high waves beach scene and a big whale jump out and back into a large ocean surface. A variety of RealFlow tools are used to get the required plan executed with precision while maintaining creative freedom, but we also will have the chance to complete the whale scene and get the final result including lighting, rendering to the final comp!
The course utilizes RealFlow’s Hybrido simulation tools, as well as its secondary particle systems (white particles), to create a highly detailed stormy ocean plus an impact of a large whale into the stormy water surface. White particles driven by Hybrido’s main body of water and external ocean forces will be used to create multiple layers of splashes, foam, mist and wave effects.
The techniques used in this course can be applied to any big water simulation scenario for indy projects, feature film, and commercial work. Learn how to create high-end quality big water effects using your home PC obtaining assets from the CG programs you’re already using!
The course also covers shading, lighting, and rendering to create final images, allowing users to apply what they have learned and build their own similar scenes.
Table of Contents
CLASS 1: WHY REALFLOW?
You will learn more about RealFlow’s advantages over other dynamics and simulation platforms, as well as explore its layout and some of its hidden and unique tools.
CLASS 2: FOUNDATIONS
You will learn the typical steps needed to establish big water scenes such as oceans and seas (along with creature interaction with the water). How to setup the RealFlow scene in the correct way to reduce later import and export problems.
CLASS 3: BEACH ROLLING WAVE PROJECT, PART 1
Learn about the advantages of using the standalone RealFlow application over RealFlow plugins. Preparation for the first project begins by importing geometry from 3D software into the RealFlow environment. We setup our first Hybrido liquid domain to learn how to generate our first wave using ocean force node.
CLASS 4: BEACH ROLLING WAVE PROJECT, PART 2
We set up the collision objects and prepare the main body of water to generate white particles. The particles include the first splash particle layer, the second splash dumb particles layer, and a foam particle layer.
CLASS 5: BEACH ROLLING WAVE PROJECT, PART 3
It’s time to start preparing for the mesh displacement using two methods. One is via the RealWave node, creating spectrum waves and noise patterns, and the other is by using the Hybrido displacement shader and its realtime wave feedback system. We will then recover the hidden foam particles which disappeared from the ocean surface after displacement by snapping particles to the water surface using a foam snapping script. Finally, we increase the liquid resolution and simulation steps.
CLASS 6: WHALE PROJECT, PART 1
For the rest of the course, we will be working on our main project scenario: a whale jumping out and back into a stormy big ocean. You will learn how to prepare the 3D scene in order to export animation to RealFlow and then how to import the whale animation into RealFlow. You will learn more about RealFlow scene setup and scene scale and set up the whale collision.
CLASS 7: WHALE PROJECT, PART 2
In addition to the Hybrido setup of the main water body, we run our first low resolution simulation and study the interaction between the whale body and the water.
CLASS 8: WHALE PROJECT, PART 3
We add more than one ocean force to the water to generate much more interesting stormy ocean waves. We then run another low resolution simulation after adding the ocean wave forces to set up the water body initial state.
CLASS 9: WHALE PROJECT, PART 4
It’s time to start adding the first layer of splash (Hybrido liquid splash), second layer of splash (dumb particles splash), and the foam particles. We once again use RealWave’s spectrum waves and noise pattern method to add the small ocean waves (displacement setup) before we run the final high resolution simulation using command line.
CLASS 10: WHALE PROJECT, PART 5
We review the final simulation results and then start meshing the main water body after adding the displacement details. We export Alembic mesh sequence files (where liquid attributes and properties are included). We then utilize the Stitch Alembic utility to convert the Alembic sequence into one Alembic file to be able to import it into our 3D application. We also cover a bit more more about setting up the mist in RealFlow.
CLASS 11: WHALE PROJECT: V-RAY
We import the main water body mesh into our choice of 3D platform using the V-Ray proxy importer and work on aligning its axis with the animated whale. We also cover the differences between importing Bin files and Alembic files as well as cover Alembic Stitching issues. We cover rendering RealFlow elements using V-Ray and Krakatoa, including the ocean mesh and the white particle systems using Vray and Krakatoa. An introduction to V-Ray for shading and rendering the main ocean water body mesh, V-Ray lights, and render passes.
CLASS 12: WHALE PROJECT: KRAKATOA
You will learn how to setup Krakatoa particle shader and lights, as well as explore Krakatoa Matte objects and motion blur. You will then import the splash and foam particle layers using PRT loader, adding lights, and rendering the results.
Watch online or Download for Free


Please! Upload other course of this site. Vvvvery very thankful for this couse. Please upload this one.
https://gno.empower-xl.com/community/index.cfm/course/details/course_id/E03824189C59C081336F9B0D4208E8B4/attr_id/CATG/attr_value/ALL/loc/9B5CFBC21D53FBF017063E153726BD39
Please upload any “Fl Studio 20” course or music production course
Please