

")
Create Stunning Scenes in Blender LiveLessons – Techniques for Modeling and Rendering 3D Images (Part One)

Release date:2018, June
Duration:17 h 00 m
Author:Oliver Villar
Skill level:Intermediate
Language:English
Exercise files:Yes
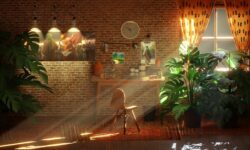
This video training takes you through the entire process of organizing, modeling, texturing, lighting, rendering, and compositing a scene in Blender, the popular open source and free 3D-creation suite.
This course shows different techniques and explains not only how to use them, but why they can be useful in different situations. Step-by-step screencast videos guide the viewer through the entire process.
After watching this course, artists will know how to take a scene from a concept or idea to its finished result and use different modeling and texturing methods, each of which can be useful for the creation of different types of objects. They’ll also know how to light and render a scene to achieve realistic looking images. On top of that, viewers will be able to use techniques to work in teams, like scene and objects linking, so various people can simultaneously work on the same scene.
About the Instructor
Oliver Villar is a Spanish digital artist with more than 10 years of experience. In 2010, he discovered his passion for teaching, and he’s funded blendtuts.com and blendtuts.es, which are sibling websites where he teaches 3D design online for English and Spanish audiences. He’s a Blender Foundation Certified Trainer and author of the book Learning Blender: A Hands-On Guide for Creating 3D Animated Characters. After years working as a freelancer and for companies, Oliver is now fully dedicated to the creation of educational content, currently working as the co-director of Luke’s Escape, a 3D animated short film, created with Blender in collaboration with an international team.
Learn How To
- Create a complete 3D scene from start to finish
- Successfully plan the creation process
- Use linked libraries to have an efficient workflow
- Use different techniques to model, unwrap, texture, and shade a set of objects
- Light, render, and composite a scene to achieve a beautiful result
Who Should Take This Course
People who are familiar with the basics of Blender, but want to learn the full 3D-creation process and improve their skills.
Course Requirements
Basic understanding of the Blender interface, navigation, and operations
Familiarity with Photoshop, Gimp, Krita, or any image editor’s basic features
Lesson 1: Planning the Project
This lesson explains the preproduction process, shows how to plan the project, and covers the different stages that the viewer goes through during the creation of the scene.
Lesson 2: Building the Foundation
In this lesson, you learn how to create the base for the scene and understand what you need to get started.
Lesson 3: Modeling the Scene
This lesson helps you learn different modeling workflows to generate the 3D meshes of a set of objects that make up a scene.
Lesson 4: The Magic of Library Linking
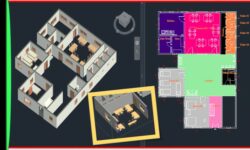
This lesson covers the process of linking objects between scenes to show an efficient workflow and the benefits of working in separate files, as opposed to creating everything within a single file. It also teaches interesting linking techniques, such as a customized levels of detail method.
Lesson 5: Unwrapping the Objects
This lesson shows the process of unwrapping needed to direct the projections of textures on 3D models.
Lesson 6: Basic Scene Lighting
This lesson shows you how to set up a basic lighting that will set the mood and general look of the scene, which will also influence the coming stages of the creation process.
Lesson 7: Shading the Objects
In this lesson, you learn how to create materials to give objects a realistic and believable look, controlling all visual aspects of the surface objects.
Lesson 8: Texturing the Objects
This lesson covers how textures can be used to control the look of materials and give variation and more realism to objects.
Lesson 9: Final Lighting and Retouches
Now you can explore the process of adding last-minute retouches and final lighting to the scene, which is possible after all the materials are in place.
Lesson 10: Render Setup
This lesson includes the tips to set up the final render so you can get good quality/speed balance.
Lesson 11: Compositing the Final Result
After the render is done, all the parts of the scene can be mixed and adjusted to get a definitive look. To do that, you use Blender node compositing.
01 – Create Stunning Scenes in Blender – Introduction
02 – Learning objectives
03 – 1.1 The importance of planning
04 – 1.2 Plan the project
05 – 1.3 Learn different working strategies
06 – 1.4 Configure Blender
07 – 1.5 Block the scene idea (Part 1)
08 – 1.6 Block the scene idea (Part 2)
09 – Learning objectives
10 – 2.1 Understand the scene-creation process
11 – 2.2 Set up the project folders
12 – 2.3 Create the base file
13 – 2.4 Create the project file
14 – 2.5 Link objects in the project file
15 – Learning objectives
16 – 3.1 Selection tools
17 – 3.2 Modeling tools
18 – 3.3 Modeling basics
19 – 3.4 Modeling with subdivisions
20 – 3.5 Modeling the jar
21 – 3.6 Modeling the cup
23 – 3.8 Modeling the box (Part 1)
24 – 3.9 Modeling the box (Part 2)
25 – 3.10 Modeling the candle
26 – Learning objectives
27 – 4.1 Introduction to library linking and appending
28 – 4.2 Overview of the Blender Outliner
29 – 4.3 Linking inside a file
30 – 4.4 Linking from other files
31 – 4.5 Linking objects and groups
32 – 4.6 Create levels of detail with linked groups
33 – 4.7 Use the Simplify option to improve performance
34 – 4.8 Add details to the full scene
35 – Learning objectives
36 – 5.1 Introduction to unwrapping (Part 1)
37 – 5.2 Introduction to unwrapping (Part 1)
38 – 5.3 Unwrapping the jar
39 – 5.4 Unwrapping the cup
40 – 5.5 Unwrapping the box
41 – 5.6 Unwrapping the candle
42 – 5.7 Unwrapping the bottle
43 – Learning objectives
44 – 6.1 Introduction to lights
45 – 6.2 Study lighting
AVC, 1280×720, 16:9, 30.000 fps, 37.1 Kbps ~ 387 Kbps
AAC, 48.0 KHz, 64.0 Kbps, 2 channels


thank you admin
Si pueden subir curso en español
Could you plz upload the second part of this course – “Create Stunning Scenes in Blender LiveLessons – Techniques for Modeling and Rendering 3D Images”?