

")
VFX ZEN v.2 (Russian, Eng sub)

Duration:20:47:00
Actual Duration:20h 47m
Release date:2021, November 24
Skill level:Beginner
Language:English
Exercise files:No
Course URL:https://volnitsa.net/vfx-zen
The core concept of Zen involves expediting one’s professional development.
Teaching a few tricks, the necessary buttons, and swift exporting to social media platforms like Instagram or TikTok is just the tip of the iceberg. A true master, who is unafraid of challenges, and well-versed in the alternatives available, can deftly navigate any potential obstacles that may arise during their work.
To put it briefly and concisely, it means “software knowledge and alternatives in the pipeline, practical work experience, peculiarities and pitfalls of VFX artist’s job, useful networking.
Who is our course for?
VFX-ZEN is designed with beginners in mind, so there’s no prerequisite training required in motion, tracking, or 3D courses! You’ll have access to ample learning materials and receive feedback throughout the course, and you won’t be navigating it alone, as you’ll be working alongside the author and fellow colleagues. If you’re eager to create captivating videos and are interested in exploring a career in VFX artistry, then come and discover the Zen of VFX with us!
For VFX monks who have already mastered tracking, keying, and 3D, this course will still hold value and interest. Zen delves into advanced techniques and insider secrets across various software platforms, drawing from the author’s extensive experience in the field. You’ll also have the opportunity to collaborate with intriguing colleagues and gain new insights into VFX art direction.
What can you expect from this course?
In a nutshell, you’ll gain a comprehensive understanding of the software and alternative options available to you, hands-on work experience, insights into the unique features and potential challenges of being a VFX artist, and valuable networking opportunities. All of this will be presented in an engaging and accessible manner, without any unnecessary jargon or formalities.
Unique Features
- Prepared Footage: Tracking is a significant aspect of this course, which is why we have carefully selected suitable footage (without copyright or watermarks), with a horizontal format, 422:0 fps, and a flat profile to enable color grading.
- Art Direction: As previously mentioned, the course is divided into two parts: the foundation and the “advanced block”. The latter part involves intensive learning through three weeks of practice and art direction provided by the course author. While feedback will initially be given remotely, we will later analyze commercial projects and sharpen our skills through hands-on experience.
- Dynamic Learning Format: In addition to regular lessons, this course features webinars, master classes, and streams, providing an engaging and interactive learning experience.
Which Software Will Be Covered in the Course?
Rather than focusing on a specific software bundle, this course provides a range of problem-solving techniques, offering various options and approaches to overcome obstacles. We’ll cover a variety of software, including Cinema 4D, Blender, Redshift, Octane, After Effects, Photoshop, Lockdown, Mocha Pro, Meshroom, and PFTrack. By taking this approach, we aim to provide a solid foundation for professional growth. Initially, we’ll be working with Cinema 4D + Redshift/Octane, After Effects, and Photoshop. Additional videos featuring Blender + Cycles X will be added in the blocks involving 3D work (first, second, and fourth), and we’ll also explore Substance Painter and Marvelous Designer as part of our master classes.
There are a total of six comprehensive chapters in this course, comprising four primary chapters and two extended ones with a more extensive practical component. Our curriculum is based on the ideology of “Teaching professions, not just buttons,” which means that we’ll be presenting a range of tools and their analogs, offering various options to solve problems. We’ll explore different software, which will be discussed in more detail below (excluding intermediate plugins).
Chapter 1. Still life
Our objective is to produce a static composition, or still life, that is impossible to replicate in reality. For instance, we could capture a shot of a broken coffee cup suspended in mid-air, with the liquid and steam frozen in place. We’ll capture this composition from various angles using a camera.

Here’s an overview of the first chapter’s behind-the-scenes process:
- Begin by preparing the video material, including adding markers and survey shots, optimizing camera settings (if using a smartphone), and denoising footage.
- Next, use Cinema 4D to track the footage, create objects, and compose the scene. Choose an appropriate HDRI and apply the PBR shading model.
- Adjust materials, lighting, and AOV with Redshift.
- Set up materials and render passes with Octane, ensuring a linear workflow and choosing appropriate color spaces in AE. Apply color correction and effects as needed.
- Finally, assemble the scene in After Effects.
In addition to these steps, there will be a master class on color spaces, gamma, formats, and codecs. The chapter will also cover creating a scene and exporting previs and camera data from Cinema 4D.
Chapter 2. Use the Force
Let’s explore how to incorporate digital characters into our video (such as stormtroopers!), and how to animate them interacting with live-action footage using Jedi force effects.
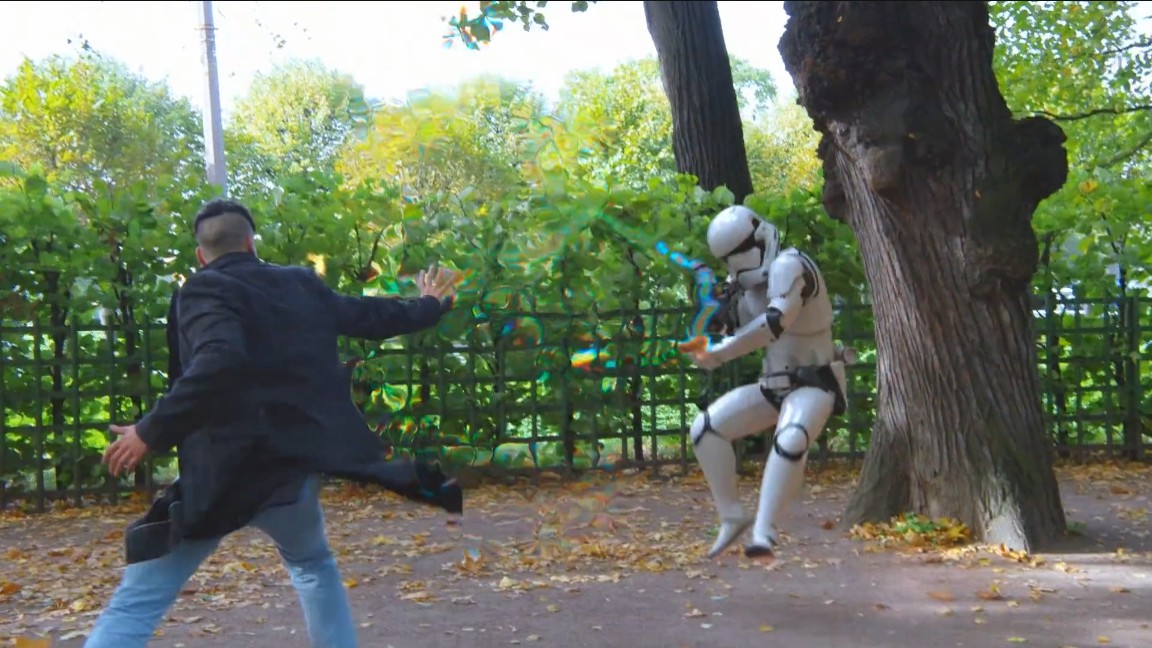
- Asset preparation: Find a suitable model and prepare it for use in Cinema 4D. Rig it with Mixamo and set up animations. Adjust textures and materials on the character.
- Video preparation: Remove unnecessary elements from the footage using Mocha, Rotobrush, and wedge trackers. Export camera and backplate to the 3D package.
- Tracking: Use the 3D camera tracker in After Effects to track the scene.
- Setting up the scene in Cinema 4D: Set up the scene with appropriate lighting, camera settings, and a backplate to show what’s happening in the frame. Use Mixamo’s motion clips and control rig to animate the character.
- Set up the render with Octane or Redshift.
- Composite: Combine the CG elements with the cleaned and prepared footage. Add effects using footage packs, Particular or Stardust, and Ae’s native effects. Finish off with color correction and final touches.
Lesson plan:
- Asset preparation
- Video preparation and cleanup
- Character asset preparation with Mixamo
- Motion clips and control rig
- Scene assembly, animation, and previs
- Lighting, HDRI, and rendering
- Compositing in Ae with additional effects Master Class on PBR and textures in Substance Painter
Chapter 3. Non Planar Trip
We will compare two widely used non-planar tracking tools in After Effects, namely Lockdown and Mocha Pro. Additionally, we will learn how to add creative effects and stylization to human and pet faces.
- Video preparation: stabilizing the camera and denoising the footage. We use Mocha Pro for mesh tracking and create a texture in Photoshop for stylizing our subject. We add a colorful 2D animation to perfectly project onto the moving object and give it a trippy look.
- Using Lockdown: we analyze the plugin settings and use a separate window for tracking points. We also explore the frequency separation mode for ideal tracking. We then add texture and 2D animation.
- Advancing the task: exporting the mesh to a 3D package. We export the mesh from Lockdown and Mocha Pro and proceed with the 3D process. We export a backplate and set up the scene in Cinema 4D, where we add animated plants and spores to the moving object. We render the scene and composite it in AE.
Lesson plan:
- Introduction to Materials
- Mesh Tracking with Mocha Pro
- Lockdown Tracking
- Adding Animation and Extra Effects
- Exporting Mesh Data to 3D software. Adding 3D objects and creating previs Master Class on Chroma Key techniques.
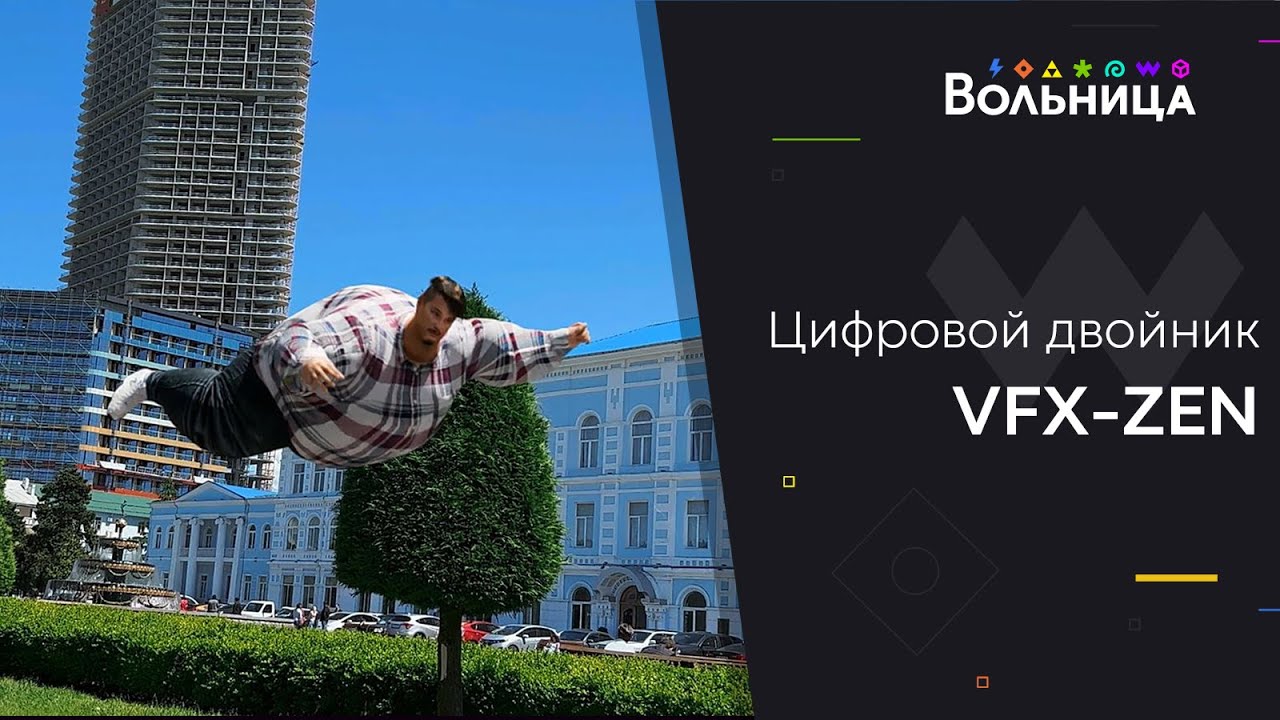
Chapter 4. Digital Twin
We will explore various techniques for creating a digital double. For instance, we can generate a 3D model of ourselves, simulate it in unique ways, and then blend it with footage of the actor seamlessly.
lesson plan:
- Materials
- Preparing the digital twin using Meshroom and rigging the model
- Video cleanup and tracking
- Character animation and previsualization
- Lighting, HDRI, and rendering
- Compositing in After Effects with additional effects
In addition to the lesson plan, we will also cover the following webinars:
- Levitating Monk
- Loop Through Computer
- Advertising with VFX and characters
Lesson plan – alternative pipeline with blender:
- Tracking footage in Blender to use as a reference for the 3D scene.
- Recreating lighting from the reference footage to make the 3D elements blend seamlessly with the live action.
- Creating the 3D scene in Blender and exporting the previs and camera data.
- Lighting, shading, and rendering the 3D elements using Cycles in Blender, and then compositing them into the footage in After Effects.
- Preparing the character asset using Meshroom and rigging it with Mixamo.
- Creating a control rig and using the Non-Linear Animation Editor (NLA) in Blender to animate the character.
- Assembling the scene and refining the animation with previs in Blender.
- Fine-tuning the lighting, adding HDRI lighting, and rendering the final output.
- Preparing the digital twin using Meshroom and rigging it for animation.
- Animating the character using a previs in Blender.
- Final lighting, adding HDRI, and rendering the digital twin output.
The course will cover more than four chapters, including more advanced topics such as color spaces, ACES, mixing CG colors with log-based materials, creating custom HDR maps on location, and tracking in PFTrack. However, the following topics will be covered first as a preview of what is to come.
01 Still Life – week 1
01 Урок Intro
02 Урок Color Spaces
03 Урок Denoise Footages
04 Урок Tracking_Cinema4D
05 Урок Tracking in Blender
06 Урок Light Setup
07 Урок Light Setup in Blender
08 Урок Scene Construction
09 Урок Scene Construction in Blender
10 Урок Home work
02 Still Life – week 2
01 Урок Redshift Shading
02 Урок Cycles_Shading
03 Урок Redshift Export
04 Урок Octane Shading
05 Урок Octane Export
06 Урок Cycles_Render_Export
07 Урок Compositing Tips & Tricks
08 Урок Home work
03 Use the Force – week 1
01 Урок Intro
02 Урок Tracking & Cleanup
03 Урок Character Lookdev
04 Урок Mixamo & Motion Clips
05 Урок Scene Assemble
06 Урок Blender_Character Asset
07 Урок Blender_Mixamo NLA
08 Урок Blender_Scene Assemble
10 Урок Home work
04 Use the Force – week 2
01 Урок Render with Redshift
02 Урок Render with Octane
03 Урок Cycles_Render
04 Урок Compose & Effects
05 Урок Home work
05 Non Planar Trip
01 Урок Intro
02 Урок Mocha Pro
03 Урок Lockdown
04 Урок 3D Mesh
06 Digital Double – week 1
01 Урок PHOTOGRAMMETRY_1
02 Урок PHOTOGRAMMETRY_2
03 Урок Home work
07 Digital Double – week 2
01 Урок Substance Painter Workflow
02 Урок Substance Painter Advanced
03 Урок Head & Details
08 Digital Double – week 3
01 Урок Create 360 HDRI
02 Урок Prepare footage & scene
03 Урок 3D Animation – 1
04 Урок 3D Animation – 2
05 Урок Final Compose
06 Урок Home work
[Вольница] VFX ZEN v.2 (Russian, Eng sub).7z
[Вольница] VFX ZEN v.2 (Russian, Eng sub)_Subtitles.7z


Let me know if the footage is required, it is 32Gb in size.
Hi, i need footages
That would be great!!!
Thank you!!! You guys are the best!
Please upload intro to rigging cource of CGMA👏
https://www.cgmasteracademy.com/courses/18-intro-to-rigging/
yes please admin !
Hi, can you please share the video footage file over mega or google drive
the footage please admin!!!
VFX ZEN v4 Please