Ad Clicks : Ad Views : Ad Clicks : Ad Views : Ad Clicks : Ad Views : Ad Clicks : Ad Views :
Oh Snap!

It looks like you're using an adblocker. Adblockers make us sad. We use ads to keep our content happy and free. If you like what we are doing please consider supporting us by whitelisting our website. You can report badly-behaved ads by clicking/tapping the nearby 'Advertisement' X text.

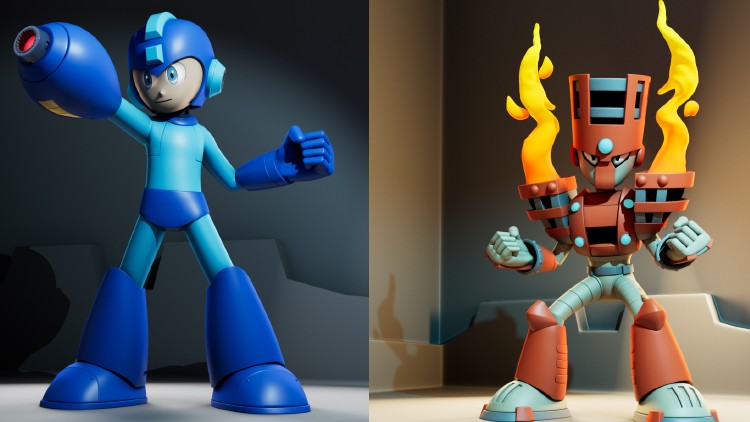
Creating Japanese Game Characters Megaman and Torch Man

/

Release date:2024, May

Author:Digital Saucer Studios

Skill level:Beginner

Language:English

Exercise files:Yes

This is the big one, folks! This incredible course spans almost thirty hours and covers everything you need to know to create two iconic Japanese game characters: Megaman and Torch Man.

Course Overview
Master 3D Modeling with Maya

In this comprehensive course, you will learn how to model two characters from scratch. Every step of the way, you’ll be guided through Maya’s powerful modeling tools to bring these characters to life. By the end of this section, you’ll have mastered the art and skill of modeling in Maya, enabling you to model any character you desire.

Color and Texture Your Models

Once the modeling is complete, we’ll move on to coloring and texturing the characters. You’ll learn how to use Maya’s Hypershade, which contains all the materials needed for shading and texturing effects. This includes:

  • Understanding the Arnold standard surface shader
  • Plugging in nodes to create effects like Ambient Occlusion and texture maps
Lighting and Rendering Techniques

Next, you’ll dive into lighting and rendering. You’ll explore:

  • Different types of lights used in the course, such as SkyDome Light and area lights
  • The difference between direct and indirect illumination
  • Applying light effects to create dramatic lighting for your scenes

Finally, you’ll learn to create high-quality renders using the Arnold render engine in Maya. This includes understanding settings like aspect ratio and sampling rates to achieve stunning results.

Why Take This Course?

This course is epic, with a primary focus on modeling in Maya. By the end of this journey, you’ll be confident in your ability to model at a professional level. Whether you’re an aspiring game artist or looking to enhance your 3D modeling skills, this course will equip you with the tools and knowledge to succeed.

Watch online or Download for Free
[Udemy] Creating Japanese Game Characters Megaman and Torch Man
01. Introduction

01. 001- Meet Megaman and Torch Man
02. 002- Some Basics

02. Modelling Megaman

01. 003- Creating a New Project
02. 004- Setting up the Image Planes
03. 005- Creating the Legs
04. 006- Starting on the Boot
05. 007- Continuing the Boot Part 1
06. 008- Continuing the Boot Part 2
07. 009- Finishing the Bottom Part of the Boot
08. 010- Finishing the Leg
09. 011- Creating the Head
10. 012- Starting on the Helmet
11. 013- Creating the Notches at the Back of the Helmet
12. 014- Creating Thickness for the Helmet
13. 015- Creating the Ear Parts of the Helmet Part 1
14. 016- Creating the Ear Parts of the Helmet Part 2
15. 017- Finishing the Helmet
16. 018- Creating the Neck
17. 019- Creating the Body
18. 020- Starting on the Waist
19. 021- Finishing the Waist
20. 022- Adding the Seams and Bolts to the Shoe
21. 023- Creating the Holes in the Body for the Arms
22. 024- Starting the Weapon Arm
23. 025- Continuing the Weapon Arm Part 1
24. 026- Continuing the Weapon Arm Part 2
25. 027- Continuing the Weapon Arm Part 3
26. 028- Continuing the Weapon Arm Part 4
27. 029- Finishing the Weapon Arm
28. 030- Attaching the Weapon Arm
29. 031- Starting the Left Arm
30. 032- Finishing the Left Arm
31. 033- Starting the Hand
32. 034- Continuing the Hand Part 1
33. 035- Continuing the Hand Part 2
34. 036- Continuing the Hand Part 3
35. 037- Continuing the Hand Part 4
36. 038- Continuing the Hand Part 5
37. 039- Continuing the Hand Part 6
38. 040- Continuing the Hand Part 7
39. 041- Finishing the Hand
40. 042- Posing the Arm
41. 043- Connecting the Arm to the Body Part 1
42. 044- Connecting the Arm to the Body Part 2
43. 045- Creating the Collar
44. 046- Starting on the Seams on the Body
45. 047- Finishing the Seams on the Body
46. 048- Posing the Character
47. 049- Cleaning up the Scene

03. Texturing Megaman

01. 050- Coloring the Character
02. 051- Creating the UVmap for the Head
03. 052- Texturing the Head in Photoshop
04. 053- Creating the Head Texture Shader

04. Modelling Torch Man

01. 054- Copying Megaman Model to use as Torch Man
02. 055- Starting on Torch Mans Boot
03. 056- Continuing Torch Mans Boot Part 1
04. 057- Continuing Torch Mans Boot Part 2
05. 058- Finishing the Boot
06. 059- Starting on the Shin
07. 060- Continuing the Shin
08. 061- Finishing the Shin
09. 062- Starting the Knee Cap
10. 063- Continuing the Knee Cap
11. 064- Finishing the Knee Cap
12. 065- Starting on the Leg
13. 066- Continuing the Leg
14. 067- Continuing the Leg and the Waist
15. 068- Finishing the Leg
16. 069- Continuing the Waist Part 1
17. 070- Continuing the Waist Part 2
18. 071- Finishing the Waist
19. 072- Starting the Belt
20. 073- Finishing the Belt
21. 074- Starting the Chest
22. 075- Continuing the Chest Part 1
23. 076- Continuing the Chest Part 2
24. 077- Continuing the Chest Part 3
25. 078- Continuing the Chest Part 4
26. 079- Continuing the Chest Part 5
27. 080- Finishing the Chest
28. 081- Creating the Back
29. 082- Starting the Shoulder
30. 083- Continuing the Shoulder Part 1
31. 084- Continuing the Shoulder Part 2
32. 085- Continuing the Shoulder Part 3
33. 086- Finishing the Shoulder
34. 087- Repositioning the Shoulder and Chest
35. 088- Starting the Arm
36. 089- Continuing the Arm
37. 090- Finishing the Arm
38. 091- Starting the Hand
39. 092- Continuing the Hand Part 1
40. 093- Continuing the Hand Part 2
41. 094- Continuing the Hand Part 3
42. 095- Continuing the Hand Part 4
43. 096- Continuing the Hand Part 5
44. 097- Finishing the Hand
45. 098- Starting the Head and Helmet
46. 099- Continuing the Head and Helmet Part 1
47. 100- Continuing the Head and Helmet Part 2
48. 101- Continuing the Head and Helmet Part 3
49. 102- Continuing the Head and Helmet Part 4
50. 103- Continuing the Head and Helmet Part 5
51. 104- Continuing the Head and Helmet Part 6
52. 105- Continuing the Head and Helmet Part 7
53. 106- Continuing the Head and Helmet Part 8
54. 107- Continuing the Head and Helmet Part 9
55. 108- Continuing the Head and Helmet Part 10
56. 109- Continuing the Head and Helmet Part 11
57. 110- Continuing the Head and Helmet Part 12
58. 111- Continuing the Head and Helmet Part 13
59. 112- Continuing the Head and Helmet Part 14
60. 113- Continuing the Head and Helmet Part 15
61. 114- Finishing the Head and Helmet
62. 115- Starting the Fire
63. 116- Finishing the Fire
64. 117- Cleaning up the Layers
65. 118- Cleaning up the Outliner
66. 119- Posing the Character

05. Texturing Torch Man

01. 120- Starting the Coloring Process
02. 121- Coloring the Eyes
03. 122- UVmapping the Fire
04. 123- Texturing the Fire

06. Lighting and Rendering

01. 124- Creating the Camera Angle for Megaman
02. 125- Creating the Set
03. 126- Creating the Key Light
04. 127- Creating the SkyDome Light
05. 128- Creating the Ambient Occlusion for Megaman
06. 129- Adding Rim Lights
07. 130- Adding Specialised Lights
08. 131- Setting up the Final Render
09. 132- Creating the Key Light for Torch Man
10. 133- Creating Ambient Occlusion for Torch Man
11. 134- Setting up the Rest of the Lights and Final Render

[Udemy] Creating Japanese Game Characters Megaman and Torch Man.7z

[Udemy] Creating Japanese Game Characters Megaman and Torch Man_Subtitles.7z


Join us on
  Channel    and      Group

  • Facebook
  • Twitter
  • Google+
  • Linkedin
  • Pinterest

Leave a Comment

Your email address will not be published. Required fields are marked *