Ad Clicks : Ad Views : Ad Clicks : Ad Views : Ad Clicks : Ad Views : Ad Clicks : Ad Views :
Oh Snap!

It looks like you're using an adblocker. Adblockers make us sad. We use ads to keep our content happy and free. If you like what we are doing please consider supporting us by whitelisting our website. You can report badly-behaved ads by clicking/tapping the nearby 'Advertisement' X text.

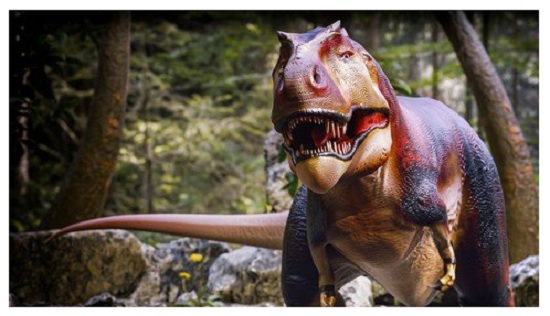
Create a Tyrannosaurus Rex in Blender 3.0+

/

Release date:2022, September

Author:Rachele Projects

Skill level:Beginner

Language:English

Exercise files:Yes

What Will I Learn?

  • Create a dinosaur from start to finish
  • Understand the importance of good typology
  • Working with a low to high poly model set-up
  • Utilize and properly set-up blueprints for modeling reference guides
  • Sculpt muscles and scales onto dinosaur using both manual brush work and alpha brushes
  • Baking texture maps using a multi-resolution and cage
  • Managing a shader node set-up
  • Render out a finalized image for your portfolio

Requirements
Understand how to navigate within Blender and its UI
Previous experience in modeling will aid in completion of this course
Mac or PC capable of Running Blender Version 3.0+

Description
In this course, you will be able to create a dinosaur from scratch to finish. You will learn the in’s and out’s when it comes to creating a finalized portfolio piece. What’s even better is this course is geared and created with an open-sourced program called Blender!

Inside this course, I do my absolute best to explain every process using real-time footage and explanations. You can see every click and change that I do within the video.

The Workflow:

  • Create a low to high poly T-Rex
  • Sculpt using a multiresolution modifier
  • UV unwrap
  • Bake information onto texture maps
  • Pose
  • Create a scene
  • Post-editing

What you can expect inside:
This course is designed with the intention of creating a finalized render for your portfolio.
Throughout the modeling stages of the T-Rex, we will start with designing a low poly T-Rex.

The process will entail using a multi-resolution modifier that we will enable once we get into the sculpting stages of the course. From that point, we will be baking our high poly information onto our low poly dinosaur via texture maps.

We will use several different techniques to bake our texture maps; one technique that is extremely useful is called a cage.

The next stages will include creating an armature, dealing with bones, and inverse kinematics so that we can pose our dinosaur.

We then create our scene with much more environmental detail.
Lastly, we render and finish up with some compositing!

Learn how to:

  • Insert blueprint references
  • Create a model from blueprint references
  • Join several pieces of geometry into one object
  • Utilize different tools and add-ons featured within Blender
  • Use alpha brushes to create scales on your T-Rex
  • Create your own alpha textures
  • UV unwrap your model
  • Create two different base colors for your Rex.
  • Create several different texture maps that will bring your T-Rex to life!
  • Finalize the scene with plants, trees, and lights for a final render.
  • Lastly, composite your T-Rex to apply final effects!
  • There is so much more inside the course!

This course was designed and created using Blender 3.0 +

Who is the target audience?
Blender users interested in the workflow creation of a prehistoric dinosaur.
Blender users looking to learn new methods when approaching their models
Students looking for an in-depth and extensive training course
Artists looking to challenge themselves

Watch online or Download for Free
01. Preparation and Working with References

01. Insert References
02. Testing References

03. Enabling Add-ons

01. Enabling Add-ons

04. MODELING Modeling the Body & Tail

01. Model the Body
02. Model the Tail

05. MODELING Begin Modeling the Back Feet

01. The UV Editor for Referencing
02. Modeling a Toe
03. Modeling the Middle Toe
04. Modeling the Larger Toe
05. Joining the Toes

06. MODELING Begin Modeling the Back Leg

01. Extruding the Foot and Creating the Leg
02. Creating the Last Inner Toe
03. Joining the Leg to the Body
04. Mirroring and Checking the Silhouette
05. Adjusting the Mesh with Sculpt Mode
06. Adding and Adjusting the Knee Cap

07. MODELING Begin Modeling the Fingers and Arm

01. Begin Modeling the Fingers
02. Joining the Arm to the Body
03. Making Arm Adjustments

08. MODELING Begin Modeling the Face

01. Creating the Skull
02. Adjusting the Shape of the Arm & Leg
03. Extruding the Mouth
04. Finishing the Mouth
05. Defining the Gumline
06. Creating the Nostril
07. Creating the Eye Socket
08. Adjusting the Shape of the Skull
09. Continuing Skull Adjustments
10. Creating a Neckline
11. Finalizing the Eye and Nose
12. Creating the Ear

09. MODELING Making Adjustments

01. Arm Refinements
02. Leg Refinements
03. Full Body Refinements
04. Final Adjustment Checks

10. MODELING Modeling the Teeth

01. Creating the Teeth
02. Placing Teeth Inside Upper Jaw
03. Placing Teeth Inside Bottom Jaw
04. Joining the Teeth
05. Checking UVs

11. MODELING Modeling the Eye

01. Creating the Eyeball

12. MODELING Modeling Final Checks

01. Modeling Final Checks

13. SCULPTING Early Sculpting Stages (Level 1)

01. Preparation Before Sculpting
02. Face Sets
03. Shoulder & Arm
04. Feet
05. Leg
06. Ribs
07. Chest & Neck
08. Skull
09. Tail & Modifications

14. SCULPTING Sculpting Further Details (Level 2)

01. Installing Files & Add-on
02. Drawing Distress Marks
03. Detailing the Mouth

15. SCULPTING Sculpting the Wrinkles and Scales

01. Wrinkle Detailing Part 1
02. Wrinkle Detailing Part 2
03. Scales Detailing Upper Body (Part 1)
04. Scales Detailing Part 2
05. Scales Tail (Part 3)
06. Scales Spine and Head (Part 4)
07. Scales Head and Miscellaneous (Part 5)
08. (72) Scales Gum (Part 6)
09. (73) Scales Veins and Final Touches (Part 7)

16. UV UNWRAPPING

01. Improving Memory Usage
02. Unwrapping the Eye
03. Unwrapping the Legs
04. Unwrapping the Arms
05. Unwrapping the Head (Part 1)
06. Unwrapping the Head (Part 2)
07. Managing the UV Grid
08. Finishing the UV Grid Layout

17. TEXTURING Baking Map Information

01. Baking the Normal Map
02. Baking the AO Map (Part 1)
03. Baking the AO Map and Cage Creation (Part 2)
04. Baking the Curvature Map
05. Creating the Subsurface Scattering (SSS) Map (Part 1)
06. Creating the Subsurface Scattering (SSS) Map (Part 2)
07. Creating a Roughness Map
08. Baking the Displacement Map

18. TEXTURE PAINTING [BASE COLOR 1] Painting the T-Rex

01. Preparation to Texture Paint
02. Painting the Base Color (Part 1)
03. Painting the Base Color (Part 2)
04. Painting the Nails and Teeth
05. Painting the Mouth and Horns
06. Painting the Eyeballs and Tear ducts
07. Finishing the Base Color

19. (Optional) EXOTIC TEXTURE PAINTING [BASE COLOR 2] Painting the T-Rex

01. Painting the Base Color and Using the Extract Palette (Part 1)
02. Painting the Base Color (Part 2)
03. Painting the Base Color & Stripes (Part 3)
04. Painting the Eyes & Nails (Part 4)

20. SHADING ARRANGING THE NODE EDITOR

01. Node Arrangement (Part 1)
02. Node Arrangement (Part 2)

21. ARMATURE CREATION CREATING BONES & WEIGHT PAINT

01. Creating the Bones & Intro to Weight Paint
02. Testing Bone Deformation & Adjusting Weight Influence

22. ARMATURE INVERSE KINEMATICS AND CONTROLLERS

01. LEG Setting Up IK and Controllers
02. ARM IK & Controller
03. PELVIS CREATION Creating a Manual Vertex Weight Group
04. SPINE Creating Rotations and Controllers
05. FEET & HANDS Parenting
06. HEAD IK, Rotation and Controller
07. (Optional) Addressing Weight Paint Issues

23. RENDERING Creating a Scene for Rendering

01. Creating a Backup File
02. Adding in a Ground Plane
03. Adding an HDRI
04. Adding a Camera
05. Creating a Pose
06. Manipulating the Ground
07. Adding in Large Rocks
08. Scattering Small Rocks
09. Camera DOF and Adding Ferns
10. Adding Bermuda Grass
11. Adding in Trees
12. Placing Dandelions
13. Adding a Branch Lighting Effect
14. Adding the Sun
15. Adding a Puddle

24. (Optional) Addressing Base Color Issues

01. Addressing Base Color 01 Issues
02. Addressing Base Color 02 Issues

25. RENDERING The Image

01. Render Settings & First Render (Base Color 1)
02. (Optional) Rendering Base Color 2

26. COMPOSITING Color Corrections and Vignette

01. Compositing the Renders

27. BONUS!

01. Bonus Pose!

[Udemy] Create a Tyrannosaurus Rex in Blender 3.0+.7z.001
[Udemy] Create a Tyrannosaurus Rex in Blender 3.0+.7z.002
[Udemy] Create a Tyrannosaurus Rex in Blender 3.0+.7z.003
[Udemy] Create a Tyrannosaurus Rex in Blender 3.0+_Subtitles.7z


Join us on
  Channel    and      Group

  • Facebook
  • Twitter
  • Google+
  • Linkedin
  • Pinterest

Leave a Comment

Your email address will not be published. Required fields are marked *