Resolve Color Management & Raw Footage
Release date:2015, September 11
Duration:00 h 14 m
Author:Robbie Carman
Skill level:Intermediate
Language:English
Exercise files:Yes
A Potentially Confusing Twist To The RCM Workflow
In my overview Insight On Resolve Color Management several members commented that when working with Raw footage things weren’t working as they expected – namely that the Input Color Space control didn’t do anything to transform footage.
In my previous Insight, I showed the RCM workflow with a ProRes clip where Input Color Space did indeed transform or assign a color space of a clip(s) in the media pool.
Since I was just getting acquainted with RCM, I didn’t dive into other managed workflows including working with Raw footage.
When I read the comments in the previous post about Raw & RCM I was intrigued.
While I had a pretty good idea of what was going on, I needed to do some testing and some more research.
This Insight is to explain those findings in a bit more detail.
Once again a big thanks to my good pal & friend of MixingLight Juan Salvo for listening to my seemingly non-stop ramblings about RCM and Raw workflows & providing some clarity on some of the finer details of what’s going on behind the scenes in the image processing pipeline.
If you missed Juan’s thoughts on RCM check out that First Look Insight.
It’s Raw Not Video!
As the comments detailed in my previous Insight and my own quick test confirmed, assigning an Input Color Space to a Raw file (.r3d, .ari, .dng) doesn’t do a thing.
But to understand why that it is we need to address a couple things:
First, as you probably know Raw is just data/information – it’s not video per se. But the thing is, the colorimetry of a Raw file is a well-known quantity. Software developers and apps like Resolve know exactly the colorimetry of an Arri Raw, Red or Sony Raw shot.
Because of this, the input color space assignment is simply not needed and redundant.
On the other hand, with a video file, the colorimetry could be anything.
For example, a ProRes file could be in Rec 709, Rec 2020, Log C, or any other color space. Just because its ProRes doesn’t mean color space and gamma information is explicit.
Resolve does a very good job most of the time of guessing the colorimetry details of video file in a non-managed workflow, but with RCM you have the ability to be explicit about how that file should be handled on input by changing the Input Color Space for any clip(s).
The Input Color space allows you to assign or reassign a color space to a clip based on what’s ‘right’ for a particular clip(s).
Again, with Raw footage because of the availability of SDKs by each camera manufacturer, Resolve knows exactly how to handle that data on input.
So, what happens with RAW in an RCM workflow is that Resolve processes the Raw data automatically for you into your timeline/output color space, and it does this with very high precision preserving all of the Raw image data via a computational transform.
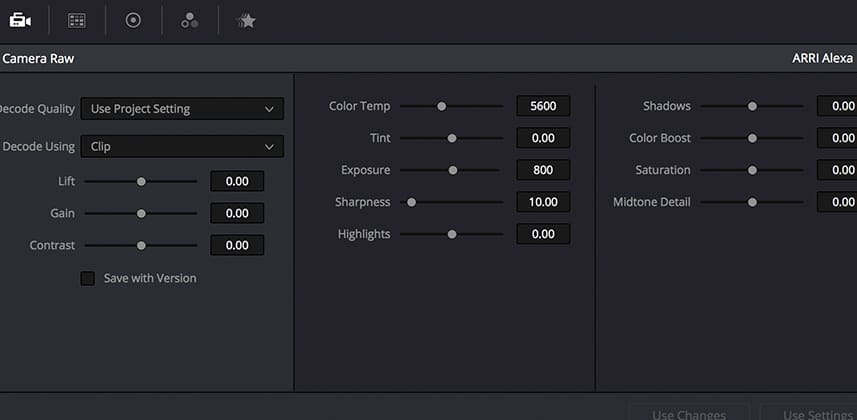
Next, in both managed and non-managed workflows you have a lot of control over the quality of Raw processing (debayering) and of course, you have access to Raw controls to massage a shot to your liking.
But with some Raw Formats like RED or Cinema DNG where you can assign color space and gamma settings for the Raw footage in the Raw panel, you don’t have those controls (grayed out, or not functional) in an RCM workflow because Resolve is automatically handling that processing for you.
RCM still works with Raw footage and as I’ll show you in the video, it’s just a different approach to how you’ve probably worked before in a non-managed workflow – and just like I mentioned in my previous Insight, you’re under no requirement to work with RCM!
Getting To A Starting Point (RED Is Just A Bit Different)
When it comes to Raw, many colorists just want to get to a good starting point for the rest of their grade.
We’ve talked in other Insights about Raw parameters as being ‘development’ tools.
So maybe you like Red Color 4 and Red Log Film for .r3ds or with BMD DNG files you like working with BMD film or you like starting with a LOG C file for Alexa.
With RCM and Raw, you can get to these starting points quite easily by using the Output Color Space control and by using the timeline color space to adjust how controls feel and how your grades are processed.
For example, if you have an Arri Raw file and you like as a starting point LogC, but you like ‘normal’ REC 709 interaction with the grading controls, simply set up your Timeline Space to Rec 709 Gamma 2.4, and your Output Color Space to Log C and it’s just like working with a ProRes LogC shot.
Furthermore, LUTs can work in an RCM workflow but because a LUT processes the image in the working (Timeline Color Space) you have to exercise a little care (and make decisions ahead of time) about your Timeline Color Space setup – I’ll show you what I mean in the video below.
Finally, RED has always been a bit different – the .r3d controls in Resolve have a lot of power, but RED does a lot of unique things in their SDK that developers – including the Resolve team – don’t have access to.
Remember how I mentioned Red Log Film?
You’ll notice that it’s missing from any of the color space pull downs (Cineon Film Log is a close match). This is because Red Log Film is unique processing from RED. There are workarounds, but yes, right now specifically with Red and RCM, there aren’t 1 to 1 equivalents with how you may have processed .r3ds in the past.


 Channel


