Ad Clicks : Ad Views : Ad Clicks : Ad Views : Ad Clicks : Ad Views : Ad Clicks : Ad Views :
Oh Snap!

It looks like you're using an adblocker. Adblockers make us sad. We use ads to keep our content happy and free. If you like what we are doing please consider supporting us by whitelisting our website. You can report badly-behaved ads by clicking/tapping the nearby 'Advertisement' X text.

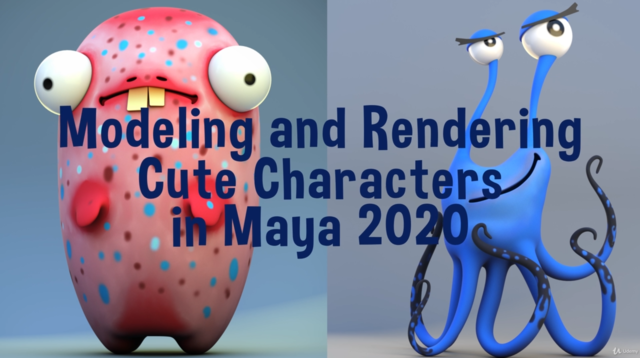
Modeling and Rendering Cute Characters in Maya 2020

/

Release date:2021, February 8

Author:Digital Saucer Studios

Skill level:Beginner

Language:English

Exercise files:Yes

In this tutorial, I will show you how to create TWO FUN, CUTE, CARTOON CHARACTERS in Maya 2020.

But first I begin by showing you some of the basic tools in Maya, like how to navigate the camera, how to set up your viewport in preparation to do some modeling, and how to use some of Maya’s most common modelling tools, like the:

EXTRUDE TOOL

MULTI-CUT TOOL

MIRROR TOOL

BEVEL TOOL

Then we move on to do some modeling.

Firstly, we block out the character shapes, then complete the process by adding details and learning how to use correct geometry so your models look clean and professional.

The next step is to use the UV Editor to create nice, clean UV maps for the characters. Having great UVs are important for when it comes to texturing.

I will show you how to texture in Maya using a variety of ways, mainly using various nodes inside the HYPERSHADE, and using the 3D Paint Tool.

Finally, I will show you how to set up the lighting, and how to create nice, clean, gorgeous renders of your models.

You will find this tutorial very informative, and packed with professional tips and tricks that will allow you to create your own characters in Maya.

Watch online or Download for Free

1. Introduction
01. Introduction
02. 002. Navigating the Camera
03. 003. Selection Tools
04. 004. Heads Up Display
05. 005. Custom Shelf
06. 006. Extrude Tool
07. 007. Multi-Cut Tool
08. 008. Bevel Tool and Mirror Tool

2. CHARACTER 1
01. 01. Blocking Out the Body
02. 02. Creating the Eyeballs
03. 03. Projecting Curves for Nostril and Mouth
04. 04. Creating the Hand
05. 05. Creating the Leg and Halfing the Model
06. 06. Quad Draw Tool to Create Topology
07. 07. Relaxing Topology with Quad Draw
08. 08. Finishing the Nostril
09. 09. Finishing the Mouth
10. 10. Finishing the Eye
11. 11. Attaching the Hand
12. 12. Creating the Feet
13. 13. Finishing the Feet and Mirroring the Body
14. 14. Creating the Teeth and Fixing the Nostrils
15. 15. Fixing the Geometry
16. 16. Fixing the Geometry and Finishing the Mouth
17. 17. Setting Up the Camera and Background
18. 18. UV Mapping the Left Eye
19. 19. UV Mapping the Right Eye
20. 20. UV Mapping the Teeth
21. 21. UV Mapping the Hands, Mouth and Nostrils
22. 22. UV Mapping the Body
23. 23. Creating the Skydome Light
24. 24. Creating the Arnold Materials
25. 25. Adding Ambient Occlusion
26. 26. Texturing the Eyes
27. 27. Texturing the Teeth
28. 28. Texturing the Body
29. 29. Applying the Body Texture to Arnold Material
30. 30. Creating Area Lights
31. 31. Creating the Final Render

3. CHARACTER 2
01. 001. Setting Up the Image Plane
02. 002. Creating the Eyes
03. 003. Blocking Out the Eyelids
04. 004. Finishing the Eyelids
05. 005. Blocking Out the Stalks
06. 006. Finishing the Stalks
07. 007. Blocking Out the Body
08. 008. Projecting Mouth Curve onto Geometry
09. 009. Creating the Curves for the Tentacles
10. 010. Creating Tentacle 1
11. 011. Creating Tentacle 2
12. 012. Creating Tentacle 3
13. 013. Creating Tentacle 4
14. 014. Creating Tentacle 5
15. 015. Posing the Tentacles
16. 016. Using Quad Draw Part 1
17. 017. Using Quad Draw Part 2
18. 018. Attaching the Stalks
19. 019. Attaching the Tentacles Part 1
20. 020. Attaching the Tentacles Part 2
21. 021. Attaching the Tentacles Part 3
22. 022. Finishing the Mouth and the Body
23. 023. Creating the Eyelashes
24. 024. UV Maaping Part 1
25. 025. UV Mapping Part 2
26. 026. UV Mapping Part 2
27. 027. Setting Up the Camera
28. 028. Creating the Skydome Light
29. 029. Texturing the Background and Eyelashes
30. 030. Texturing the Eyeballs
31. 031. Using 3D Paint Tool to Texture the Character
32. 032. Finishing the Texturing Process
33. 033. Creating Area Lights and Final Render

[Udemy] Modeling and Rendering Cute Characters in Maya 2020.7z


Join us on
  Channel    and      Group

  • Facebook
  • Twitter
  • Google+
  • Linkedin
  • Pinterest

1 Comments

  1. Hello, thx for website
    Pls upload this course Complete Drawing Course: Create Video Game Concept Art by GameDev.tv Team and Grant Abbitt

Leave a Comment

Your email address will not be published. Required fields are marked *