Ad Clicks : Ad Views : Ad Clicks : Ad Views : Ad Clicks : Ad Views : Ad Clicks : Ad Views :
Oh Snap!

It looks like you're using an adblocker. Adblockers make us sad. We use ads to keep our content happy and free. If you like what we are doing please consider supporting us by whitelisting our website. You can report badly-behaved ads by clicking/tapping the nearby 'Advertisement' X text.

Create an Animated Character in Blender 2.9

Release date:2021

Author:Darrin Lile

Skill level:Beginner

Language:English

Exercise files:Not Provided

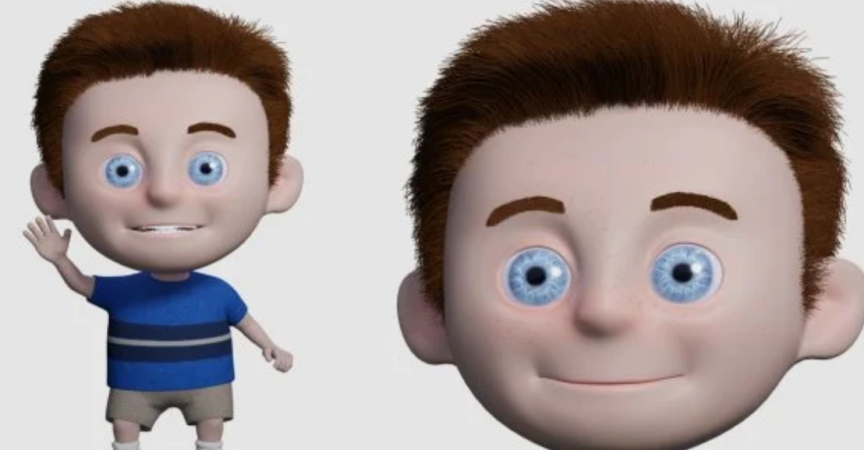
Welcome to “Create an Animated Character in Blender 2.9.” This course uses only open-source software, Blender and the paint program Krita, to create an animated character from the first polygon to the final rendered animation.

We will begin by first bringing in the reference images of the character. And use Blender’s modeling tools to create the face with proper edge-flow for animation. We’ll create the hands, the feet, and the clothes. And when the modeling is done, we will UV map all the parts of the character, and we will use that UV map for our texturing.

In the texturing phase, we will use Krita to create the textures for the clothes, and Blender’s own Texture Paint tools to paint the details of the skin. You’ll learn how to use Blender’s Particle System to create, cut, and comb the character’s hair.

And then we will use Blender’s Rigify rigging system to set-up the bones of the character. We will bind the character mesh to the rig, and adjust the weights to improve the deformations.

And when all of that is done, we will begin animating the character. You’ll learn how to set-up a reference video in Blender’s interface, how to animate character movements, and how to create lip sync animation for a dialogue track.

Watch online or Download for Free

01 – course-promo-video
02 – introduction
03 – importing-reference-images
04 – beginning-the-loop-mask
05 – completing-the-loop-mask
06 – pulling-the-face-into-3d
07 – adjusting-the-face-and-adding-the-eyes
08 – extruding-the-forehead-and-top-of-head
09 – creating-the-back-and-side-of-the-head
10 – extruding-the-neck
11 – creating-the-ears
12 – creating-the-inner-mouth
13 – adjusting-the-lips-and-extruding-the-tongue
14 – beginning-the-gums
15 – modeling-the-top-teeth
16 – finishing-the-teeth
17 – extruding-the-torso
18 – modeling-the-legs
19 – creating-the-arms
20 – creating-a-finger
21 – extruding-the-hand
22 – connecting-the-thumb
23 – extruding-the-foot
24 – finishing-the-feet
25 – creating-the-shirt
26 – modeling-the-shorts
27 – beginning-the-shoes
28 – continuing-the-shoes
29 – finishing-the-shoe
30 – creating-the-shoelaces
31 – sculpting-the-socks
32 – preparing-the-model-for-uv-mapping
33 – uv-mapping-the-shirt
34 – uv-mapping-the-clothes
35 – uv-mapping-the-legs-and-arms
36 – uv-mapping-the-head
37 – organizing-the-uv-map
38 – uv-mapping-the-eyes-and-teeth
39 – establishing-the-materials
40 – beginning-the-color-map
41 – working-on-the-color-map
42 – generating-a-normal-map-in-krita
43 – texturing-the-eyes
44 – beginning-to-texture-paint
45 – texture-painting-the-skin-details
46 – painting-the-freckles
47 – painting-the-shirts-stripes
48 – beginning-the-character-s-hair
49 – texturing-the-hair
50 – cutting-and-combing-the-hair
51 – creating-the-eyebrows
52 – placing-the-joints-of-the-rig
53 – adjusting-the-finger-joints
54 – placing-the-joints-of-the-face
55 – continuing-the-face-joints
56 – modeling-the-eyelids
57 – arranging-the-joints-of-the-eyelids
58 – completing-the-metarig
59 – adjusting-alignment-of-the-rig
60 – rig-layers-and-control-objects
61 – modifying-the-control-objects
62 – binding-the-character-to-the-rig
63 – parenting-the-eyes-hair-and-teeth
64 – adjusting-the-character-weights
65 – assigning-weights-to-the-leg
66 – finishing-the-leg-weights
67 – adjusting-the-torso-weights
68 – assigning-weights-for-the-fingers
69 – assigning-weights-for-the-arm
70 – adjusting-the-weights-of-the-face
71 – creating-a-shape-key-for-the-eye-blink
72 – testing-the-rig-and-adjusting-weights
73 – setting-up-the-interface-for-animation
74 – beginning-the-contact-poses
75 – continuing-the-contact-positions
76 – more-contact-positions
77 – ups-and-downs-and-planting-the-feet
78 – working-on-the-feet
79 – arms-fingers-shoulders-and-head
80 – animating-the-wave
81 – creating-a-facecam-and-eye-blinks
82 – beginning-the-lip-sync-animation
83 – continuing-with-the-lip-sync-animation
84 – creating-a-test-render
85 – making-final-adjustments
86 – using-the-graph-editor
87 – fixing-the-weights-of-the-shorts
88 – adding-music-and-sound-fx
89 – rendering-the-final-animation
90 – conclusion

Create an Animated Character in Blender 2.9 – Reference image.7z
(Thanks to JamesBulger for the reference images)


Join us on
  Channel    and      Group

  • Facebook
  • Twitter
  • Google+
  • Linkedin
  • Pinterest

12 Comments

  1. Thank you guys so so much
    Can you please upload the following
    Architecture academy by blender guru
    Nature academy by blender guru
    Character animation in blender by danan thilakanathan
    3d character development in blender for beginners by danan thilakanathan

  2. Where the user got the image references for the “Create an Animated Character in Blender 2.9” Series?

Leave a Comment

Your email address will not be published. Required fields are marked *