Ad Clicks : Ad Views : Ad Clicks : Ad Views : Ad Clicks : Ad Views : Ad Clicks : Ad Views :
Oh Snap!

It looks like you're using an adblocker. Adblockers make us sad. We use ads to keep our content happy and free. If you like what we are doing please consider supporting us by whitelisting our website. You can report badly-behaved ads by clicking/tapping the nearby 'Advertisement' X text.

Concepting Futuristic Cityscapes in Photoshop

/

Release date:2018

Author:Francesco Lorenzetti

Skill level:Beginner

Language:English

Exercise files:Yes

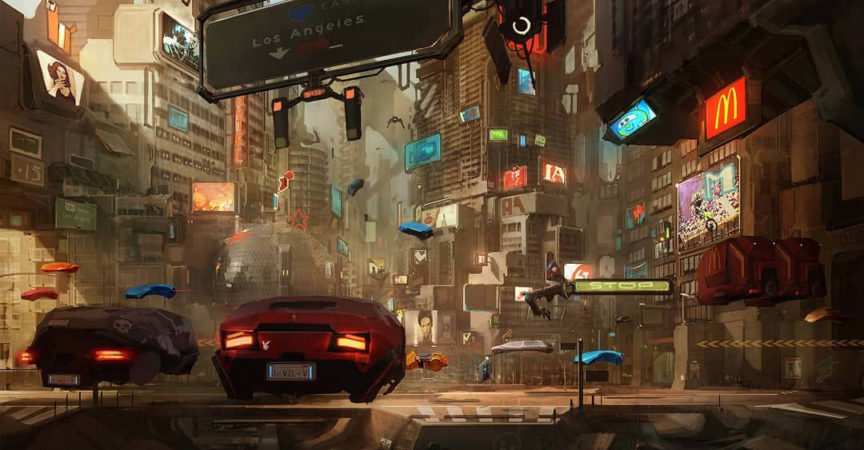
In this on-demand course, Francesco Lorenzetti will guide you through the development of a futuristic cityscape using industry standard techniques for creating visually stunning concepts, including how to implement the most important photo texturing and painting techniques used in film and game environment concept art today.

The 5 most important lessons:
Using the process of thumbnailing to find direction in design
Important factors to take into consideration in order to create a well balanced concept
Photo-texturing and detailing techniques for enhanced realism
How to quickly but effectively refine the shapes and silhouettes of your artwork
Texturing methods and lighting techniques to produce realistic shadows and overall value

Course Outline

Project 1 : Introduction To Thumbnailing
Francesco covers the basic principles of thumbnailing and establishing quick concepts to start his landscape.
23 Lectures

Project 2 : Adding Contrast To The Scene
Francesco adds basic contrast and shadows to his piece, in order to get a general understanding of what direction he wants to take it.
13 Lectures

Project 3 : Balancing Your Artwork
Francesco covers important factors you need to take into consideration to create a well balanced art piece.
17 Lectures

Project 4 : Phototexturing And Detailing Techniques
Francesco demonstrates more of this texturing and detailing techniques by gathering high resolution photos and implementing them in his scene for realistic results.
14 Lectures

Project 5 : Refining Shapes And Silhouettes
Francesco goes over how to quickly but effectively block in shapes and silhouettes for your artwork.
18 Lectures

Project 6 : Texturing And Lighting The Landscape
Francesco covers addition texturing methods and lighting techniques to produce realistic shadows and overall value.
19 Lectures

Project 7 : Adding More Detail To The Landscape
Francesco goes over populating the scene with objects and adding subtle details to bring more character to the scene.
18 Lectures

Project 8 : Finishing the Painting
Making final adjustments for the painting and adding any last corrections.
22 Lectures

Watch online or Download for Free

Project 1 Introduction To Thumbnailing
01 Introduction to Thumbnailing
02 Compiling Reference
03 Thumbnailing with Photography
04 Refining the Base Image
05 Understanding the Rule of Thirds
06 Following the Rules of Perspective
07 Being Flexible to the Project Needs
08 Changing Views and Experimenting
09 Adding Values
10 Giving Shape to the Line Drawing
11 Finishing Touches
12 Evaluating the Thumbnails
13 Setting Up the Canvas
14 Adjusting Value and Adding Height
15 Adding Texture to the Background
16 Adding Midground Detail
17 Further Refining the Middleground
18 Expanding the Canvas
19 Photo Texturing the Background
20 Using Existing Layers to Refine the Scene
21 Defining Shapes in the Midground Part 1
22 Defining Shapes in the Midground Part 2
23 Adding a Bridge in the Background

Project 2 Adding Contrast To The Scene
01 Adding Contrast to the Scene
02 Using Duplicated Elements of the Painting
03 Mixing Color Values in the City
04 Refining Middle Ranged Buildings with Image
05 Shaping the Background Buildings
06 Adding Shadows and Scene Shape
07 Overhanging Bridge
08 Flipping the Image and Adding Detail to Lower Building
09 Phototexturing Lower Building
10 Texturing the Highrise
11 Placing Additional Opposing Features
12 Tangent Spacing Between Buildings
13 Breaking Building Tangents and Adding Detail to Ground Scene

Project 3 Balancing Your Artwork
01 Phototexturing
02 Reinforcing Shadows
03 Controlling Emotion and Imagination Part 1
04 Controlling Emotion and Imagination Part 2
05 Painting Midground and Foreground
06 Refining and Outlining Midground
07 Filling The Image Part 1
08 Filling The Image Part 2
09 Softening Shadows and Designing The Midground
10 Blocking Out Props and Vehicles
11 Balancing Your Artwork
12 Occupying Space With Props, Vehicles and Volumes
13 Designing Midground With Line Drawing
14 Design, Inspiration and Backstory for Your Artwork Part 1
15 Design, Inspiration and Backstory for Your Artwork Part 2
16 Refining Structures
17 Thinking About Our Environment

Project 4 Phototexturing And Detailing Techniques
01 Detailing Midground Part 1
02 Detailing Midground Part 2
03 Using Selection Tool For Sharp Detail
04 Creating a Streetlight
05 Phototexturing and Detailing Part 1
06 Phototexturing and Detailing Part 2
07 Phototexturing and Detailing Part 3
08 Working On The Second Structure
09 Breaking Up The Second Structure
10 Phototexturing and Detailing Second Structure Part 1
11 Phototexturing and Detailing Second Structure Part 2
12 Creating A Streetlamp Brush
13 Phototexturing and Detailing Middle Platform Part 1
14 Phototexturing and Detailing Middle Platform Part 2

Project 5 Refining Shapes And Silhouettes
01 Adding Texture to Left Overhanging Bridge
02 Fine Tuning Overhanging Bridge
03 Finishing out the Bridge
04 Blocking in New Buildings
05 Detailing Neighboring Building Part 1
06 Detailing Neighboring Building Part 2
07 Blocking in Alley Buildings
08 Filling in Smaller Buildings Near Alley
09 Texture Alley Buildings
10 Finish Texturing of Middleground Buildings
11 Layers for Background Spaceships
12 Adding Ship Silhouettes to Scene Part 1
12a Placing Spaceships Silhouettes
13 Adding Ship Silhouettes to Scene Part 2
14 Establishing Ship Traffic Lanes
15 Increasing Traffic by Duplicating Layers
16 Blocking in the Building Dome
17 Finish Sphere and Recognizing Major Scene Shapes

Project 6 Texturing And Lighting The Landscape
01 Starting Work on Foreground
02 Using Local Colors to Block In Shapes
03 Marking Middleground Areas to be Detailed
04 Features Within the Middleground
05 Middle Ground Phototexturing Part 1
06 Middle Ground Phototexturing Part 2
07 Painting and Blending Phototextures
08 Refining lower Middleground Building
09 Adding Values to Middlegroud Buildings
10 Additional Phototexturing to Smaller Buildings
11 Texturing Apartment Building
12 Lighting and Details
13 Marking Part of Image for Next Render
14 Phototexturing Large Structure Part 1
15 Phototexturing Large Structure Part 2
16 Blocking in Large Building with Textures
17 Adding Values to Large Building
18 Flipping the Image and Layer Management
19 Phototextureing for Subtle Details

Project 7 Adding More Detail To The Landscape
01 Working On Forground Structure Part 1
02 Working On Forground Structure Part 2
03 Bringing The Structure Together
04 Removing And Adding To The Forground
05 Adding Detail To The Building
06 Creating A Sign For The Building
07 File Organization and Notes
08 Looking at Color and Reference for The Sign
09 Populating The Environment With Signs
10 Detailing and Placing Signs
11 Adding Color and Detail To The Signs Part 1
12 Adding Color and Detail To The Signs Part 2
13 Adding an Neon Feel To The Signs
14 Detailing Round Ship
15 Blocking Out The Silhouette Of Ships
16 Adding More Signs
17 Adjusting The Values Of The Environment Part 1
18 Adjusting The Values Of The Environment Part 2

Project 8 Finishing the Painting
01 Adjusting The Shadows of Forgoround Structure
02 Adding Graffiti and Signs To The Environment Part 1
03 Adding Graffiti and Signs To The Environment Part 2
04 Adding Foliage To The Environment
05 Using Shadowing
06 Controlling Atmosphere
07 Adding Color To Our Atmosphere
08 Adding and Detailing Cars Part 1
09 Adding and Detailing Cars Part 2
10 Adding and Detailing Cars Part 3
11 Adding and Detailing Cars Part 4
12 Adding Blur and Highlights To The Cars
13 Adding Highlights To The Signs
14 Tweaking The Environment
15 Adjusting The Value of Our Image
16 Creating a Futuristic Structure Part 1
17 Creating a Futuristic Structure Part 2
18 Refining The Environment Part 1
19 Refining The Environment Part 2
20 Artist Tips and Class Overview Part 1
21 Artist Tips and Class Overview Part 2
22 Finals Adjustments


Join us on
  Channel    and      Group

  • Facebook
  • Twitter
  • Google+
  • Linkedin
  • Pinterest

Leave a Comment

Your email address will not be published. Required fields are marked *