Ad Clicks : Ad Views : Ad Clicks : Ad Views : Ad Clicks : Ad Views : Ad Clicks : Ad Views :
Oh Snap!

It looks like you're using an adblocker. Adblockers make us sad. We use ads to keep our content happy and free. If you like what we are doing please consider supporting us by whitelisting our website. You can report badly-behaved ads by clicking/tapping the nearby 'Advertisement' X text.

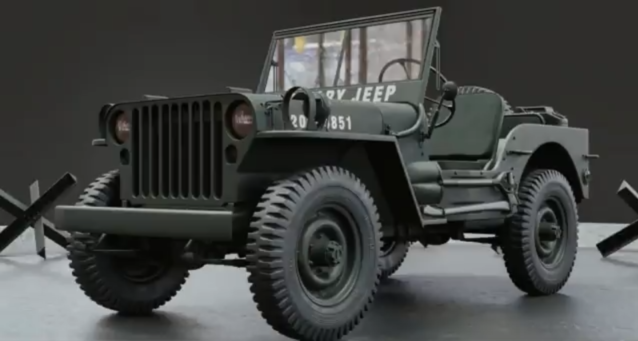
Blender – Create Jeep Willys MP 1942 From Start To Finish

/

Release date:2021, March 8

Author:Mrawan Hussain

Skill level:Beginner

Language:English

Exercise files:Yes

Welcome to my new course on how to create Jeep Willys MP 1942 from start to finish with Blender 2.91, I’m not going to use any other software, the only software that you need to accomplish this project is Blender.

Before you read the description I advise you to see the intro video and switch the video resolution to HD to see the details better.

These kinds of projects like creating Jeep Willys 1942 needs time and decent knowledge in modeling in general, where to start how to create complex shapes from primitives shapes, and we will go through all of that step by step.

We will start by adding the reference images and align them correctly to start the journey of the modeling.

Modeling will take the most of the course time because there are tons of objects we need to cover in this section, and it will be fun to go through because I explained all the steps that I made, that’s mean it will be easier to you to follow along with me.

When the modeling section is finished we will go to the Unwrapping section, in this section, we will unwrap most of the necessary details of the vehicle to make these objects receive the texture correctly without any problem, and at the end of the day to get realistic results.

After that we will go to the materials section, in this section we will create the materials one by one and add them correctly to the vehicle and make it a bit old and rusty with some imperfections to boost the realism to the maximum.

After that we will ad the camera and make the scene ready to make the final render, we will use HDRI images to illuminate the scene with natural lighting, and that’s will help to have a realistic render.

This description is just a short overview of the course, too many details and nice stuff you can see inside I don’t like to mention them here because I want to make the description short and straight.

Watch online or Download for Free

01. Introduction
01. Introduction
02. Before you starting
03. Adding the reference Images
04. 04_Modeling_starting with the grilles
05. 05_Modeling_starting with the grilles-2
06. 06_Modeling_ creating the hood
07. 07_Modeling_Creating the fenders
08. 08_Modeling_Creating the fenders-2
09. 09_Modeling_Creating the Body
10. 10_Modeling_Creating the Body-2
11. 11_Modeling_Creating the Body-3
12. 12_Modeling_Starting with the tire
13. 13_Modeling_Starting with the tire-2
14. 14_Modeling_creating the wheel
15. 15_Modeling_Creating the wheel-2
16. 16_Modeling_Create the front and back bumper
17. 17_Modeling_creating the chassi
18. 18_Modeling_creating the chassi_2
19. 19_Modeling_creating the back hook
20. 20_Modeling_creating the back hook_2
21. 21_Modeling_creating the back hook_3
22. 22_Modeling_adding details to the back side of the vehicle
23. 23_Modeling_adding details to the back side of the vehicle_2
24. 24_Modeling_creating the water can handle
25. 25_Modeling_Creating the bak light
26. 26_Modeling_Creating the Back light and the back handle
27. 27_Modeling_Creating the lights on the sides
28. 28_Modeling_Creating the side handle
29. 29_Modeling_Creating the shovel
30. 30_Modeling_Creating the shovel-2
31. 31_Modeling_Creating the ax
32. 32_Modeling_Creating the Ax holders
33. 33_Modeling_Creating the Ax holders_2
34. 34_Modeling_putting the shovel and the Ax in the right position
35. 35_Modeling_Creating the shovel holder
36. 36_Modeling_Creating the shovel belt
37. 37_Modeling_Creating the axe belt
38. 38_Modeling_Creating the windsheld
39. 39_Modeling_Creating the windsheld_2
40. 40_Modeling_Creating the windsheld_3
41. 41_Modeling_Creating the windshield side joins
42. 42_Modeling_Creating the Blackout Drive light base
43. 43_Modeling_Creating the Blockout drive light
44. 44_Modeling_Creating the Blockout Light wire and make some tweaking
45. 45_Modeling_Creating the hood lock
46. 46_Modeling_Creating the hood lock_2
47. 47_Modeling_Creating the head light and mirror the fender on the other side
48. 48_Modeling_Creating the mirror base
49. 49_Modeling_Creating the Mirror_2
50. 50_Modeling_Creating the spare carrier
51. 51_Modeling_Creating the Axle
52. 52_Modeling_Creating the Axle_2
53. 53_Modeling_Creating the Axle_3
54. 54_Modeling_Creating the Axle_4
55. 55_Modeling_Creating the Axle_5
56. 56_Modeling_Creating the Axle_6
57. 57_Modeling_Creating the Axle_7
58. 58_Modeling_ adding details to the Axle
59. 59_Modeling_adding details to the Axle_2
60. 60_Modeling_Creating the leaf spring
61. 61_Modeling_edit the Leaf spring
62. 62_Modeling_Creating the leaf joins
63. 63_Modeling_creating the brake drum
64. 64_Modeling_Creating the axle before the drum
65. 65_Modeling_Creating the arm of the front tire axes rotation
66. 66_Modeling_Creating the leaf holders
67. 67_Modeling_Creating right Rod for the steering system
68. 68_Modeling_Creating the Left Rod
69. 69_Modeling_Creating the tire stem
70. 70_Modeling_Create the Shock Absorber
71. 71_Modeling_copy the front Axle to the back side of the vehicle
72. 72_Modeling_creating the radiator
73. 73_Modeling_Creating the drive shaft
74. 74_Modeling_Creating the drive shaft_2
75. 75_Modeling_Creating the gear holder
76. 76_Modeling_Create the bottom part of the engine
77. 77_Modeling_ starting with the interior
78. 78_Modeling_Interior_creating the floor and sides
79. 79_Modeling_Interior_Creating the back interior side
80. 80_Modeling_Creating the cushions
81. 81_Modeling_creating the cushions_2
82. 82_Modeling_Creating the cushions_3
83. 83_Modeling_Creating the back cushions
84. 84_Modeling_Adding some details to the back side
85. 85_Modeling_Creating the fuel tank
86. 86_Modeling_ creating the gear sticks
87. 87_Modeling_Creating the Gas pedal
88. 88_Modeling_Creating the steering
89. 89_Modeling_Creating the dashboard
90. 90_Modeling_Dashboard details
91. 91_Modeling_Dashboard details_2
92. 92_Modeling_Dashboard details_3
93. 93_Modeling_Tweaking part 1
94. 94_Modeling_Tweaking part 2
95. 95_Modeling_Tweaking part 3

02. Unwrapping
01. 96_Unwrapping_part_1
02. 97_Unwrapping_part_2
03. 98_Unwrapping_part_3
04. 99_Unwrapping_part_4
05. 100_Unwrapping_part_5
06. 101_Unwrapping_Part_6
07. 102_Unwrapping_part_7

03. Materials
01. 103_setup the Environment
02. 104_Material_part_1
03. 105_Material_part_2
04. 106_Material_part_3
05. 107_Material_part_4
06. 108_Material_part_5
07. 109_Material_part_6
08. 110_Material_part_7
09. 111_Material_part_8
10. 112_Material_part_9
11. 113_Creating the exhaust
12. 114_Final Render

Blender – Create Jeep Willys MP 1942 From Start To Finish_Subtitles.7z
Blender – Create Jeep Willys MP 1942 From Start To Finish.7z


Join us on
  Channel    and      Group

  • Facebook
  • Twitter
  • Google+
  • Linkedin
  • Pinterest

1 Comments

  1. hi can you get this cource please ?
    Rigging and Animating Low Poly FPS Arms in Blender
    Learn how to rig and animate low poly style FPS arms from scratch using Blender 2.9.
    on udemy

Leave a Comment

Your email address will not be published. Required fields are marked *