Stylized Plaster Wall Tutorial – VOL 04 by Milad Kambari

Release date:2023
Skill level:Beginner
Language:English
Exercise files:Yes
Course URL:https://www.artstation.com/marketplace/p/lbK0v/stylized-plaster-wall-tutorial-vol-04
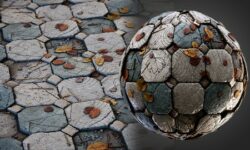
How to make a Stylized wall in Substance Designer
In the continuation of the designer training series, we will take a new style in this series and learn how to make a stylized wall with two different wooden structures in the designer. In these process videos, you see all the steps in the designer that we take to reach the result.
Contents:
100 minutes of unnarrated videos
1080 Resolution
Chapters:
Chapter 01– First Step: In this chapter, we will create a different surface for blending. First, we are going to make bricks and modify them to reach what we want, and after that, we will create a plaster cover for the wall; after blending these two, we will make and add a wooden structure to the wall.
Chapter 02– Second Step: The next step is creating this material’s color data and roughness. For this tutorial, we use the gradient map, sampling colors from different images and blending them to get what we want. And for roughness data, we are using a simple and effective way.