


Creating a Medieval Town Environment – Using UE5 & Blender by FastTrack Tutorials

Duration:23:59:00
Actual Duration:23h 59m
Release date:2024, April
Skill level:Beginner
Language:English
Exercise files:Yes
Course URL:https://www.udemy.com/course/creating-a-medieval-town-environment-using-ue5-blender/?couponCode=LETSLEARNNOW
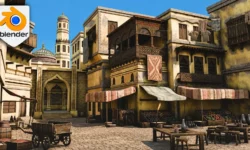
Learn how to create a medieval-style town environment using Blender and Unreal Engine 5, guided by the techniques of a professional environment artist. This course, inspired by the stunning concept art of Vincent Lau, explores the use of tools like Blender, Substance Designer & Painter, ZBrush, and Unreal Engine 5 features such as Nanite and Lumen to bring the environment to life.
Key topics covered in this comprehensive course include:
- Project planning and scene blockout techniques.
- Building modular structures for high reusability.
- Sculpting wood and concrete assets using ZBrush.
- Utilizing Nanite in Unreal Engine 5 to create high-quality models with compatibility for other 3D software.
- Creating tileable materials with Substance 3D Designer.
- Developing unique textures using Substance Painter.
- Implementing lighting and post-effects within Unreal Engine 5.
- Applying geometry displacement on modular assets using Unreal’s modeling tools.
- General level art and environment design principles in Unreal Engine.
By the end of this course, you’ll have the skills and knowledge to recreate the medieval town environment depicted in the concept art and apply these techniques to create diverse environments for various types of games and projects.
[Udemy] Creating a Medieval Town Environment – Using UE5 & Blender by FastTrack Tutorials
1 – Main Course
01 – Going Over Our Reference And Planning
02 – Setting Up Our Scenes And Start Creating Our Blockout Pieces
03 – Creating Our Blockout Part2
04 – Creating Our Blockout Part3
05 – Creating Our Blockout Part4
06 – Creating Our Blockout Part5
07 – Creating Our Blockout Part6
08 – Creating Our Blockout Part7
09 – Creating Our Blockout Part8
10 – Designing Our Buildings Part1
11 – Designing Our Buildings Part2 Timelapse
12 – Designing Our Buildings Part3 Timelapse
13 – Designing Our Buildings Part4 Timelapse
14 – Discussing Our Progress So Far
15 – Designing Our Buildings Part5 Timelapse
16 – Creating Our Round Roof
17 – Designing Our Buildings Part6 Timelapse
18 – Creating And Placing Our Prop Blockouts Timelapse
19 – Creating Our Wood Material Part1
20 – Creating Our Wood Material Part2
21 – Creating Our Pavement Material Part1
22 – Creating Our Pavement Material Part2
23 – Creating Our Pavement Material Part3
24 – Creating Our Pavement Material Part4
25 – Creating Our Pavement Material Part5
26 – Creating Our Pavement Material Part6
27 – Creating Our Pavement Material Part7
28 – Creating Our Brick Wall Material Part1
29 – Creating Our Brick Wall Material Part2
30 – Creating Our Brick Wall Material Part3
31 – Creating Our Slate Roof Texture Part1
32 – Creating Our Slate Roof Texture Part2
33 – Creating Our Plaster Material Part1
34 – Creating Our Plaster Material Part2
35 – Selecting Our Wood Pieces And Preparing Them For Sculpting
36 – Sculpting Our Wood Pieces Part1
37 – Sculpting Our Wood Pieces Part2
38 – Sculpting Our Wood Pieces Part3 Timelapse
39 – Sculpting Our Wood Pieces Part4 Timelapse
40 – Sculpting Our Wood Pieces Part5
41 – Optimizing Our High Poly And Exporting It
42 – Creating Our Lowpoly Wood Pieces
43 – Preparing Our Lowpoly Wood Pieces For Uv Unwrap
44 – Uv Unwrapping Our Wood Pieces Part1
45 – Uv Unwrapping Our Wood Pieces Part2 Timelapse
46 – Uv Unwrapping Our Wood Pieces Part3
47 – Baking Our Wood Pieces
48 – Texturing Our Wood Pieces
49 – Setting Up Our Final Modular Assets Part1
50 – Setting Up Our Final Modular Assets Part2
51 – Setting Up Our Final Modular Assets Part3 Timelapse
52 – Setting Up Our Final Modular Assets Part4 Timelapse
53 – Creating Our Street Light Part1
54 – Creating Our Street Light Part2
55 – Creating Our Street Light Part3
56 – Creating Our Street Light Part4
57 – Creating Our Doors And Windows Part1 Timelapse
58 – Creating Our Doors And Windows Part2 Timelapse
59 – Creating Our Curb Part1
60 – Creating Our Curb Part2
61 – Finishing Our Roof Assets
62 – Placing Our Small Assets Timelapse
63 – Doing Our First Lighting Pass And Adding Variation
64 – Adding More Variation To Our Environment
65 – Creating And Placing Our Foliage Part1
66 – Creating And Placing Our Foliage Part2
67 – Creating And Placing Our Foliage Part3
68 – Doing Our Second Lighting Pass And Planning The Polishing Phase
69 – Polishing Our Scene Part1 Timelapse
70 – Polishing Our Scene Part2 Timelapse
71 – Outro
2 – Creating Additional Assets
72 – BarrelCreation
73 – CrateCreation
74 – FlowerPotCreation
75 – FountainCreation
76 – SeatingCreation


Exercise files?
Unreal Engine 5 C++ Multiplayer Shooter by Stephen Ulibarri
Please add it
I encounter an issue when playing a video in the media file cloud and attempting to skip through it on the timeline, as it restarts from the beginning. Any solution for this? :/
please use firefox browser
part 54 – Creating Our Street Light Part2 is not working please update
Episode 26 not working? =x
Thank you for ur content!
Hey can you post the resource files.
Also thank you for posting this tutorial.
Thank you for course!!! Please add Create a Gothic Hallway in the Style of Dark Souls in UE5….