Ad Clicks : Ad Views : Ad Clicks : Ad Views : Ad Clicks : Ad Views : Ad Clicks : Ad Views :
Oh Snap!

It looks like you're using an adblocker. Adblockers make us sad. We use ads to keep our content happy and free. If you like what we are doing please consider supporting us by whitelisting our website. You can report badly-behaved ads by clicking/tapping the nearby 'Advertisement' X text.

Create a Classic Speedster with Blender by Darren Lile

/

Release date:2023, August

Duration:13 h 35 m

Author:Darren Lile

Skill level:Beginner

Language:English

Exercise files:Yes

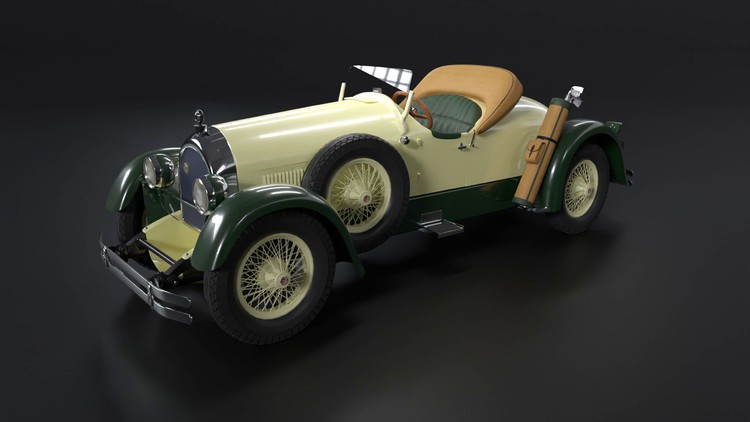
This course will use only free, open-source software to create a 1925 Kissel “Gold Bug” Speedster. It was the luxury car of the stars in its day, owned by Amelia Earhart, Greta Garbo, and Al Jolson. Of the 35,000 vehicles that were produced, only 150 of them are still around. But we are going to make one more using Blender and Krita.

We will begin with the fundamental modeling tools of Blender, building up the basic shapes of the car. You’ll be introduced to more advanced tools and hard surface modeling techniques as we progress. Once the modeling is complete, we will begin assigning materials and adding textures to the leather seats and the woodgrain steering wheel. You’ll learn to use Krita to add text to an object and even try out Blender’s 3D Text tool. Finally, we will set up the lights for our scene and render our final images.

If you’re interested in creating vehicles and would like a comprehensive project through which to learn Blender, then this course is for you. This scene is excellent for building your skills and gaining valuable insights into organizing and managing a complex project.

So let’s get started! Join me as we “Create a Classic Speedster with Blender.”

Watch online or Download for Free
1. Introduction

01. Overview of Course
02. Creating Background Images in Krita
03. Setting Up Background Images in Blender

2. Modeling the Exterior

01. Beginning to Block in Shapes
02. Two Ways to Mirror Objects
03. Beginning the Front Grill
04. Finishing the Grill
05. Blocking in the Shapes of the Hood
06. Continuing the Line of the Body
07. Modeling the Trunk Area
08. Closing Off the Trunk Shape
09. Beginning the Bumpers
10. Adding Pieces to the Back of the Car
11. Organizing the Scene
12. Connection Pieces for the Bumpers
13. Continuing the Back of the Car
14. GlobalLocal and ObjectEdit Modes
15. Face Orientation and the Path Tool
16. Creating the Rear Fenders
17. Modeling the Headlights
18. Working on the Front Details
19. Modeling More Front Details
20. Connecting the Fender to the Chassis
21. Creating the Connecting Pieces for the Lights
22. Finishing the Headlight Hardware
23. Connecting the Front Bumper to the Chassis
24. Adding Detail to the Front Bumper
25. Modeling the Turn Signals and Vent
26. Modeling the Engine Vents
27. Connecting the Body Panels
28. Beginning the Windshield Frame
29. Finishing the Windshield

3. Modeling the Interior

01. Organizing the Scene and Beginning the Interior
02. Blocking in the Seats
03. Beginning the Dashboard
04. Beginning the Steering Wheel
05. Finishing the Steering Wheel
06. Modeling the Steering Column Brace
07. Modeling the Interior Door Panels
08. Creating the Interior Door Pockets and Handles
09. Continuing the Interior Panels
10. Creating Trim with the Curve Tool
11. Modeling the Gear Shift
12. Adding Details to the Dashboard
13. Modeling the Rearview Mirror
14. Creating the Interior Door Straps
15. Modeling the Interior Panel of the Rear Seat

4. Creating the Convertible Top and Trunk

01. Beginning the Convertible Top
02. Continuing the Convertible Top
03. Creating the Exterior Door Handle
04. Using Booleans to Create the Trunk

5. Creating the Wheels, Spokes, and Tire Treads

01. Beginning a Tire and Rim
02. Beginning the Wheels
03. Creating the First Row of Spokes
04. Continuing with the Spokes
05. Finishing the Spokes
06. Cleaning up the Body Panels
07. Beginning the Tire Treads
08. Finishing the Tire Treads

6. Adding More Details

01. Adding Detail to the Seats
02. Adjusting the Seats and Creating the Door Hinges
03. Modeling the Hood Ornament
04. Finishing the Hood Ornament and Hood Area
05. Creating a Side Step
06. Finishing the Side Steps
07. Tweaking the Steps and Closing the Rear Fender
08. Filling in Behind the Wheels
09. Placing the Objects Behind the Wheels
10. Modeling the Rear Light
11. Using Blenders Text Tool
12. Connecting the Rear Light to the Car
13. Finishing the Rear Light
14. Redoing the Trunk with a Smoothing Mesh
15. Finishing the Trunk and Rear of Car

7. Creating Materials and Textures

01. Beginning to Assign Materials
02. Adding Multiple Materials to an Object
03. Continuing the Materials for the Exterior
04. Finishing the Exterior and Beginning the Interior
05. Assigning Textures with the Node Wrangler
06. Adding Wood Texture to the Steering Wheel
07. Texturing the Headlights
08. Creating the Wheel Logo Plate
09. Texturing the Grill and Front Logo
10. Texturing the Interior Carpet
11. Adding Text to the Dash (process 1)
12. Adding Text to the Light Switch (process 2)
13. Modeling the Gauges Panel
14. Adding Textures to the Gauges Panel
15. Applying Textures to the Turn Signals
16. Appending and Setting Up the Golf Bag

8. Rendering the Scene

01. Creating a Test Render
02. Depth of Field and Final Render
03. Conclusion

[Udemy] Create a Classic Speedster with Blender by Darren Lile.7z.rar

[Udemy] Create a Classic Speedster with Blender by Darren Lile_Subtitles.7z


Join us on
  Channel    and      Group

  • Facebook
  • Twitter
  • Google+
  • Linkedin
  • Pinterest

Leave a Comment

Your email address will not be published. Required fields are marked *