Ad Clicks : Ad Views : Ad Clicks : Ad Views : Ad Clicks : Ad Views : Ad Clicks : Ad Views :
Oh Snap!

It looks like you're using an adblocker. Adblockers make us sad. We use ads to keep our content happy and free. If you like what we are doing please consider supporting us by whitelisting our website. You can report badly-behaved ads by clicking/tapping the nearby 'Advertisement' X text.

Katon Callaway – Videogame Character Creation

/

Release date:2019

Author: Katon Callaway

Skill level:Beginner

Language:English

Exercise files:Yes

MonsterMentor.com Presents VideoGame Character Creation with Katon.

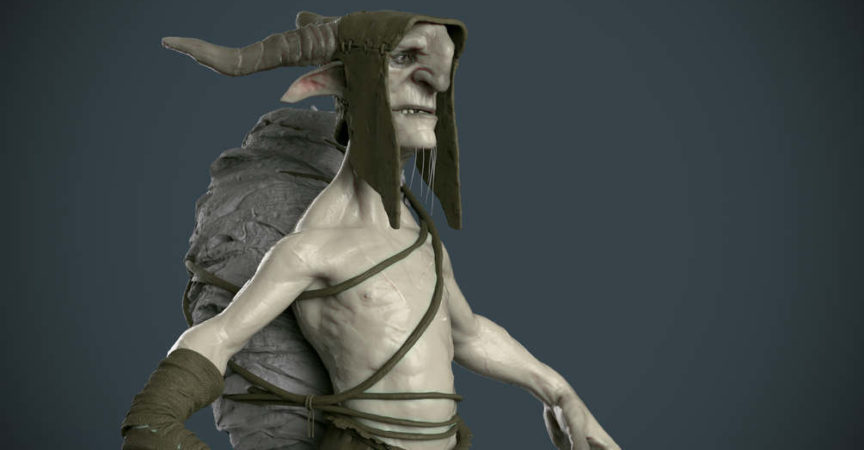
This is the most indepth class that I offer, and sold out for years when I taught it before. I take you from beginning to end in the character creation process. I provide a concept you can follow if you like, and take you from making a low poly mesh, to high poly sculpt, polypaint, uvs, baking, texturing and presentation. A step by step guide is below.

For those wanting to understand the game pipeline, this is for you.

Week 1- Create base mesh and begin initial sculpt.
• In week one, we break down our design and make our base mesh for the body and start to block in the forms in Zbrush.

Week 2- blocking in the rest of the character-
• In our second week, we will work on blocking in the rest of the characters clothes. The first week is the setup for this week, a solid base sculpt is our foundation for the rest of the character.

Week 3- Catch up Week
• I like to use the third week to take a breather and catch up on anything that we might need some extra time on. Also it is nice to go back and tweak anything before getting into details.

Week 4- Finishing the sculpt
• Now we should have all the base assets in place and need to finish our character sculpt. This can be a tough thing to do, but I will take you through my process on how I go about closing the sculpt out.

Week 5- Creating our low poly mesh
• There are many tools that have greatly sped up our low poly creation process, but it is crucial to understand why we have the edge loops that we do, and also you have to know where they are needed. In this week, we go over topology and creating it for our character.

Week 6- Creating UVs and also our normal and AO maps.
• In week 6, we talk about solid uv layout, and I then show you my workflow using xnormal on how I go about creating my normal and ao maps.

Week 7 – Texturing and Marmoset
•I show my texturing workflows, generally from polypaint to Photoshop, then finally into marmoset with everything together!

Week 8 – Presentation

Watch online or Download for Free

Week 01
01. reference Sheet
01a. basemesh Intro
01b. head Topo TimeLapse
01c. topo Finish
01d. topo Time Lapse
02. Body Start
02a. materials And Basics
02b. mesh Prep Polygroups
02c. planarity Basics
03. Leg Sculpting Time Lapse
04. start Head
05. Hand Part1
05a. Hand Part2
05b. Hand Time Lapse VO
06. Feet
07. Finished Sculpt Time Lapse and Vo
07a. Finishing The Sculpt

week 02
02. Planning
02a. waste Cloth Block in
02b. Arm Cloth Intro
02c. Arm Straps Modeling Time Lapse VO
02d. Arm Strap Modeling Explanation
03. Cloth Uvs Part1
03a. Cloth Uvs Part2
04. How To Make Rope
05. hat Intro
05a. hat Time Lapse
06. teethPLacement
07. BeeHiveBlockin
08. ropeBlockin
Extras – 01. Hard Surface Basics Part1
Extras – 02. Hard Surface Basics Part2
Extras – 03. Hard Surface Basics Part3
Extras – 04. Hard Surfac eBasics Part4
Extras – 05. Hard Surface Basics Part5
Extras – 06. HornDemo
Extras – 07. trim

week 03
01. Horns 2
02. appending Subtools
03. Staff Part1
04. Staff Part2
05. Head Retopo Part 1
06. Head Retopo Part 2
07. Head Retopo Part 3

week 04
01. Cloth Details
01a. Cloth Details
02. Body Polish
02a. Torso Polish
03. Legs Polish
04. Arms Polish
05. Feet Polish
06. Hands Polish
07. Hat Time Lapse
08. Wrist Straps
09. Horns Sculpting
10. BeeHive Part1
10a. Bee Hive Part2
10b. Bee Hive Part 3
11. Scars
12. teeth And Tongue
13. Head Detailing
14. Final Sculpt
15. staff
16. Armor detailing

week 05
01. topology Basics
02. Tris vs. Quads
03. Mesh Prep
04. Head Intro
04a. Head Topo
04b. Head Topo
05. torso Topo
06. leg Topo
07. Mesh Clean Up
08. Horn Decimation
09. Hat Topo
10. Teeth
11. Teeth Time Lapse
12. Arm Cloth
13. Staff Topo
14. Armor Topo
15. Finished
Extras – Basic Skinnnig
Extras – Topology Joints

week 06
01. Rendering Basics
02. Vertex Color And More
03. Combining Maps
04. Alpha Map
05. finished
06. DX11 Setup
07. marmoset
08. Torso Uv
09. arms Legs Feet
10. HANDS
11. Head
12. Teeth Tongue
13. Beehive
14. Hat and Waste Cloth
15. Wrist Straps
16. Rope
17. Staff Uvs
18. Uv Layout Head
19. Uv Layout Textile
20. Rendering Prep
21. Exporting

week 07
01. Skin Intro
02. Skin Paint Time Lapse
03. Skin Finish Zbrush
04. Leather Diffuse
05. Leather Normal Gloss
06. Cloth Time Lapse
07. Cloth
08. Armor
09. Metal
10. Beehive And Extras

week 07 Part 2
01. Alpha
02. Diffuse Update
03. Skin Gloss
04. Horns
05. Teeth
06. Eye
07. Eye Shader
08. Skin Shader
09. Staff Setup
10. Complete

week 08
01. presentation
02. website

Videogame Character Creation Files.7z


Join us on
  Channel    and      Group

  • Facebook
  • Twitter
  • Google+
  • Linkedin
  • Pinterest

Leave a Comment

Your email address will not be published. Required fields are marked *