Ad Clicks : Ad Views : Ad Clicks : Ad Views : Ad Clicks : Ad Views : Ad Clicks : Ad Views :
Oh Snap!

It looks like you're using an adblocker. Adblockers make us sad. We use ads to keep our content happy and free. If you like what we are doing please consider supporting us by whitelisting our website. You can report badly-behaved ads by clicking/tapping the nearby 'Advertisement' X text.

AutoCAD Advanced 3D Modeling

/

Release date:2018, November 26

Duration:05 h 23 m

Author:Scott Onstott

Skill level:Advanced

Language:English

Exercise files:Yes

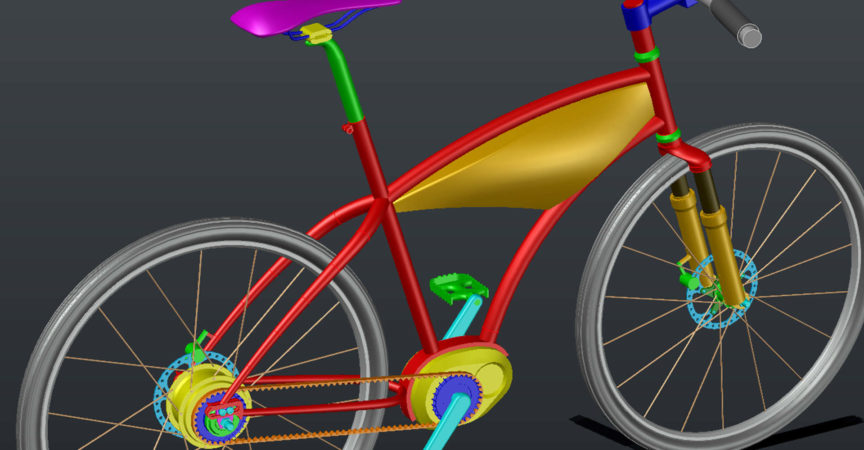
You can model almost any form imaginable with the AutoCAD 3D toolsets. In this project-based course, Scott Onstott teaches you the techniques required to solve complex modeling challenges in AutoCAD, while focusing on an innovative ebike design. Learn how to create each 3D component of the bicycle model, including its frame, belt-tensioner mechanism, drivetrain, power components, brakes, wheels, axels, hubs, spokes, handlebars, and even the bicycle seat. The techniques (which can be applied to other mechanical models) cover extruding profiles, lofting 2D cross sections, revolving profiles around an axis, filleting edges, smoothing mesh objects, sculpting complex NURBS surfaces, and much more.

Topics include:
Establishing a layer convention and property filters
Extracting isolines
Trimming and extruding surfaces
Lofting cross sections
Sculpting watertight surfaces into solids
Sweeping and sculpting
Revolving boundaries to create surfaces
Welding objects together with Fillet Edge
Rebuilding NURBS surfaces
Offsetting a surface

Watch online or Download for Free

001 Design surface model with AutoCAD
002 What you should know
003 Navigate in 3D space
004 Configure 3D workspaces
005 Configure options
006 Create layer and property filters for 3D modeling
007 Extrude and patch a surface
008 Manipulate the user coordinate system
009 Use Offset and regions to generate surfaces
010 Sweep a profile along a curved path
011 Extrude and trim surfaces
012 Revolve profiles
013 Extrude a profile along a curved path
014 Draft multiple cross sections
015 Loft surfaces from cross sections
016 Draw cross sections along a spline
017 Loft with the Path option
018 Adjust a lofted objects 3D form
019 Sculpt a solid out of watertight surfaces
020 Use Boolean operations on solid objects
021 Model a dropout to be sandwiched between plates
022 Model fasteners
023 Adjust and trim the bottom triangle
024 Mirror the frame and belt-tensioning components
025 Position cross-sectional drawings relative to a model
026 Remove unwanted volume with Subtract
027 Combine surface and solid modeling
028 Configure sketches of sprockets
029 Fillet edges and array sprocket components
030 Create the drive belt as a solid object
031 Duplicate and 3D rotate the sprocket
032 Revolve, extrude, and subtract objects
033 Subobject editing and filleting edges
034 Use region editing techniques
035 Model fasteners that hold the rotor on the hub
036 Use Boundary to generate a profile
037 Create disk brake calipers welded onto the frame
038 Revolve profiles and manipulate layers
039 Sweep a spoke along a 3D path
040 Use Array and Mirror to fill the rim with spokes
041 Build the drive unit using Extrude and Loft
042 Model the cranks using the solid tools and point filters
043 Smooth a mesh object
044 Tilt up and assemble extruded objects
045 Use 3D Align to align a pedal with crank
046 Loft cross sections to create a complex form
047 Clean up 2D entities in preparation for 3D modeling
048 Revolve boundaries to create surfaces
049 Copy components from the rear to front axle
050 Model the front hub
051 Sweep spokes along 3D paths
052 Adjust the front axle, acorn nuts, and spacer
053 Copy and reposition the front brake calipers
054 Copy the rim and tire to the front
055 Weld objects together with Fillet Edge
056 Extract isolines from surfaces to loft new surfaces
057 Sculpt a NURBS surface using its CVs
058 Loft between NURBS surfaces
059 Extrude and subtract regions
060 Loft and revolve profiles
061 Create a 3D path from the intersection of two extrusions
062 Rebuild NURBS surface to optimize its control vertices
063 Move CVs in multiple viewports
064 Offset a surface and round its hard edges
065 Clean up and visualize the entire bicycle
066 Next steps
Ex_Files_AutoCAD_3D_Surface_Model.7z


Join us on
  Channel    and      Group

  • Facebook
  • Twitter
  • Google+
  • Linkedin
  • Pinterest

Leave a Comment

Your email address will not be published. Required fields are marked *